Twisted Love Heart Cable Knit Hat Pattern

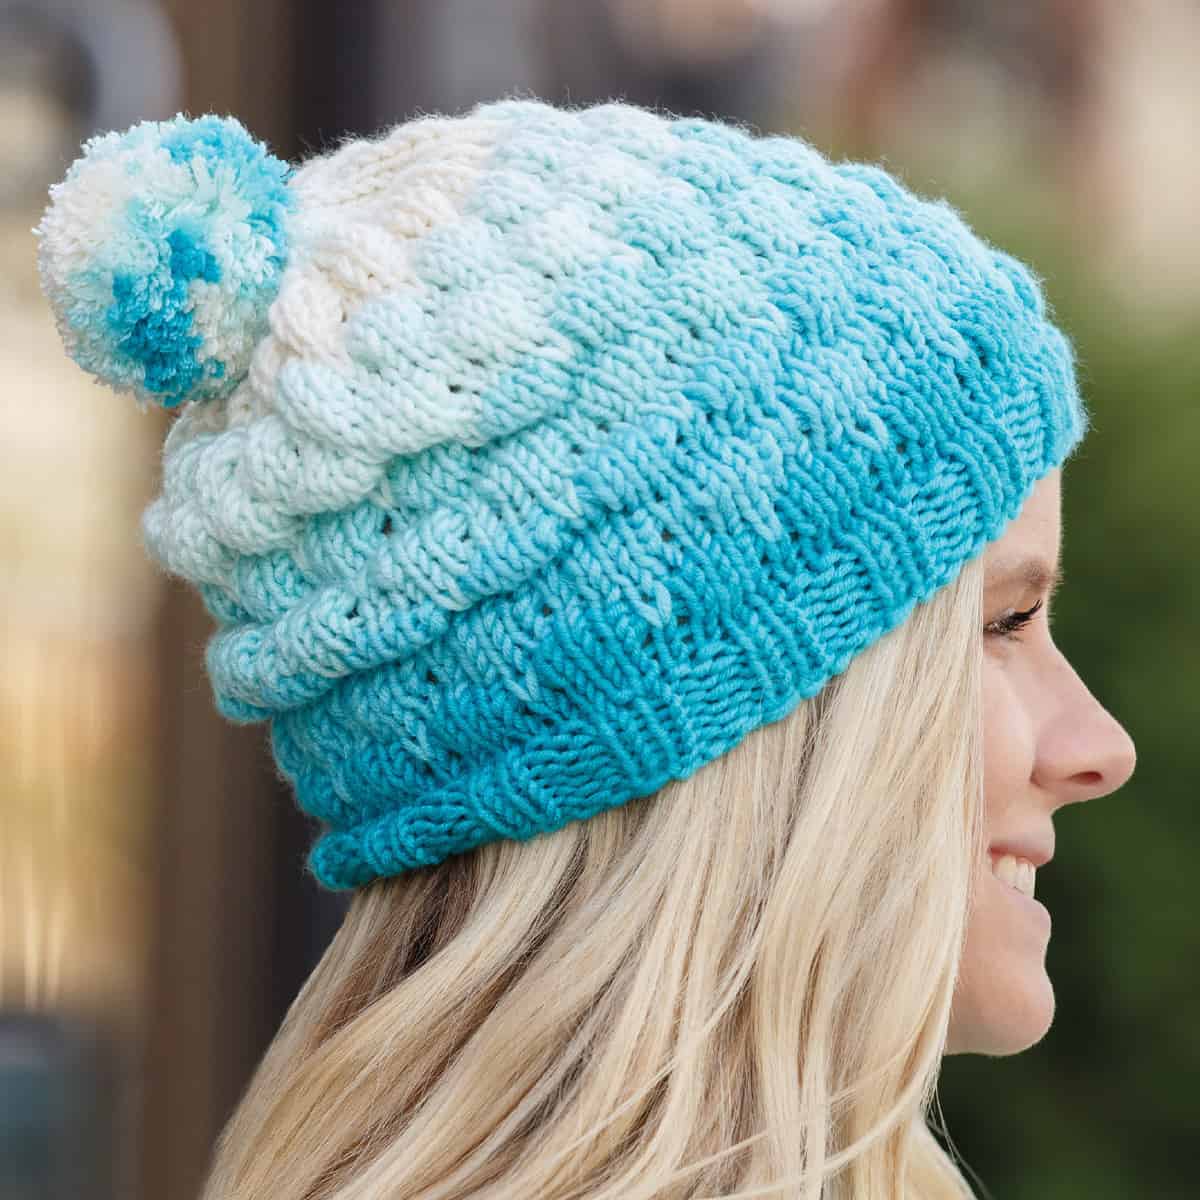
This Twisted Love Heart Cable Knit Hat Pattern is a special project filled with love. Enjoy knitting up this slouchy beanie created from my popular Celtic Cable Heart Stitch.
This knitted hat design begins with a brim in the twisted rib stitch, allowing the hat to snugly fit on your head. While knitting the hat’s body, it’s fun to see the cable heart design emerge. This hat includes alternating columns of ribbing with 2/2 cable cross stitches twisted to the left. Finishing up, the crown is beautifully finished in pattern and ready to wear immediately!
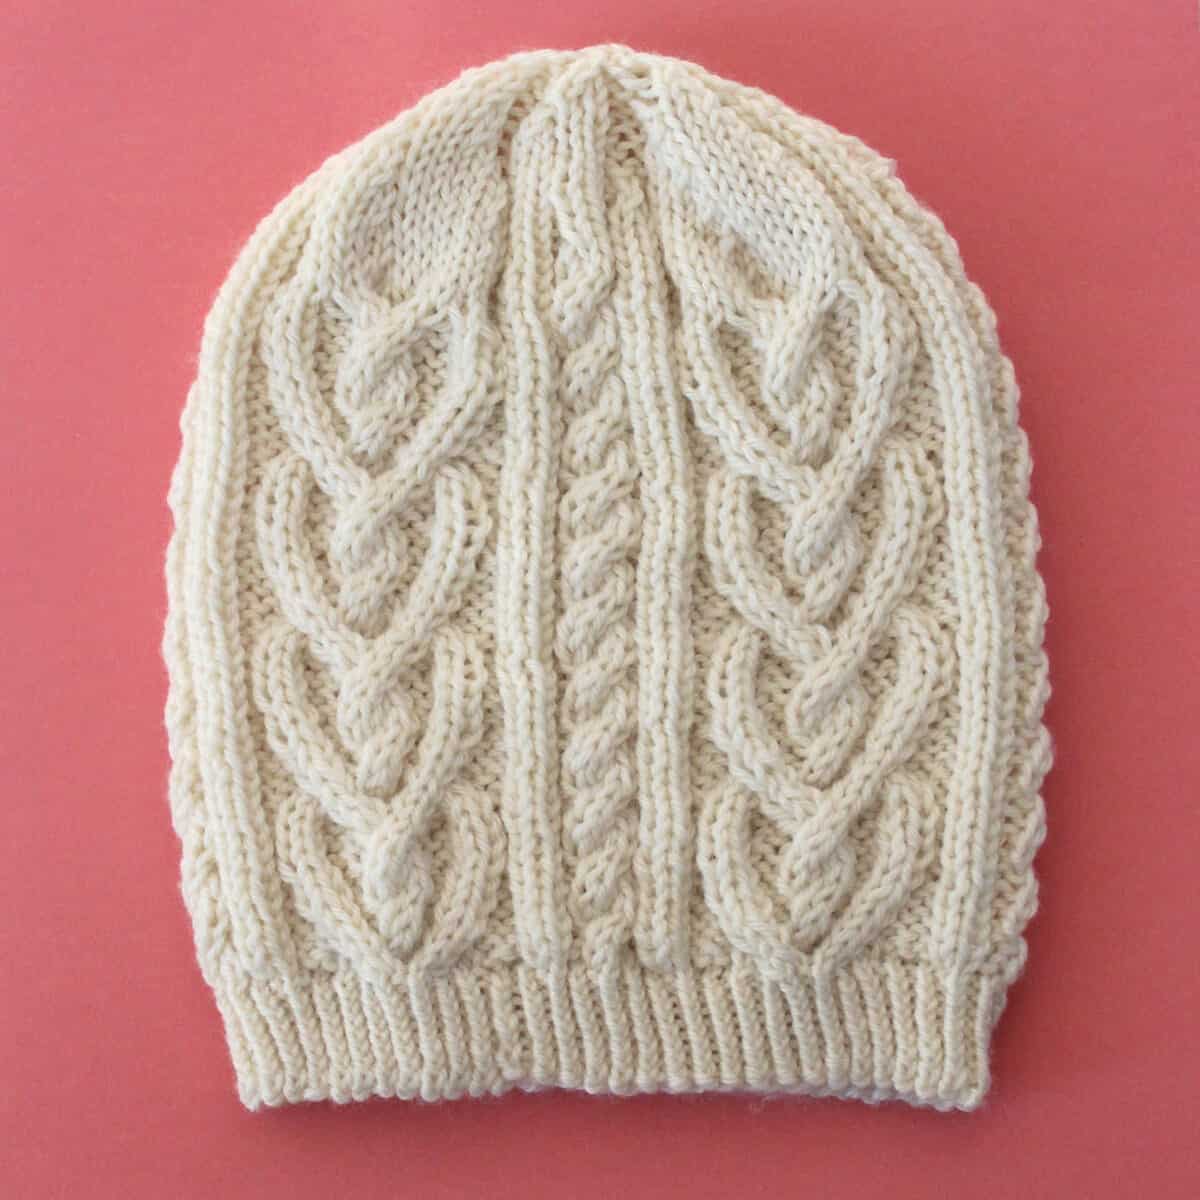
Table of Contents
Printable Knitting Pattern (ad-free)
I hope you enjoy my free pattern instructions below.
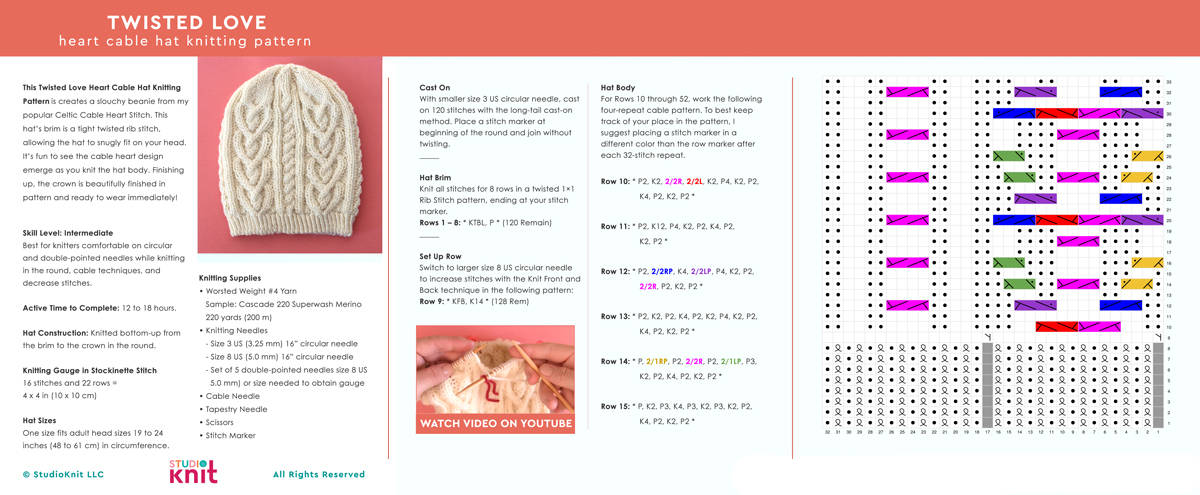
My 8-page ad-free printable pdf pattern, complete with a knitting chart, of my Twisted Love Heart Cable Hat design is available for purchase in my Studio Knit Pattern Shop.
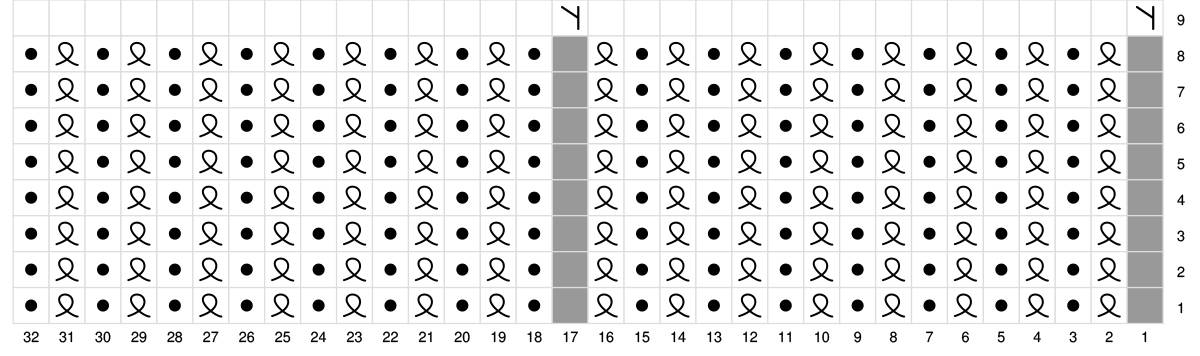
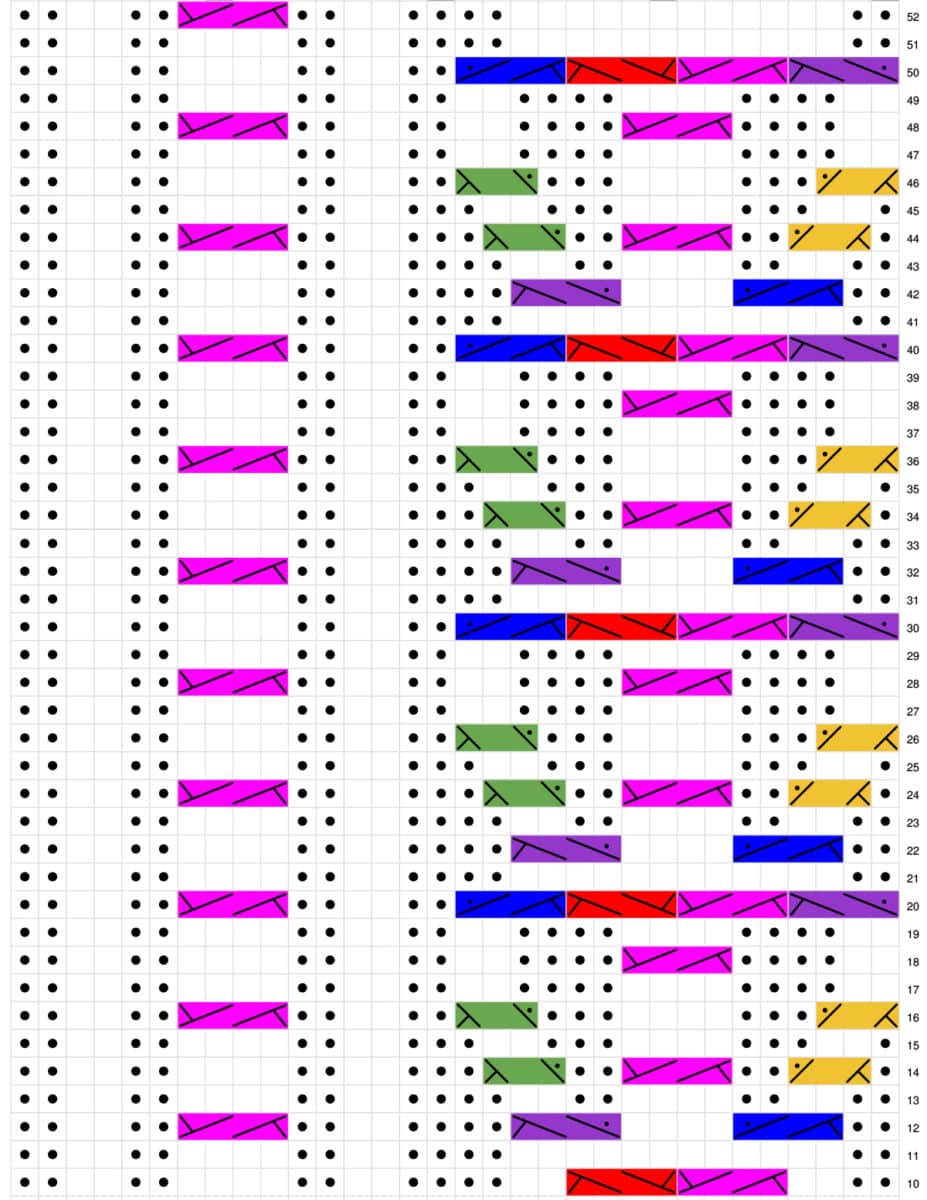
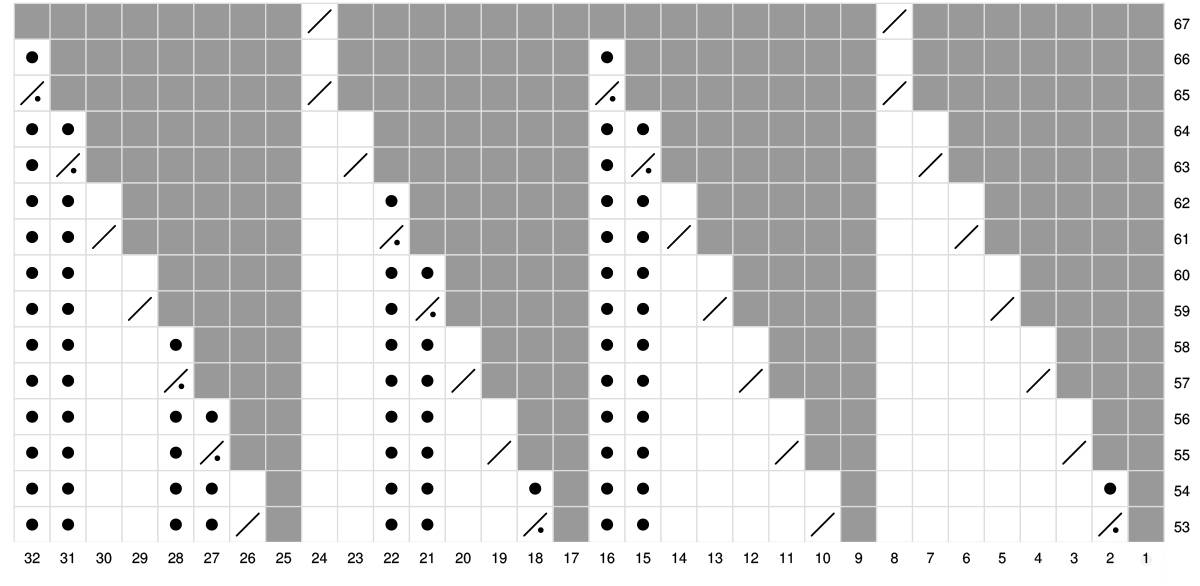
I have created a color-coded system in both the written and chart patterns to easily discern the 6 different cable stitches at a glance. Knitters have told me they love it and I hope it helps you, too! Purchasing this pattern at a low cost is a great way to support my knitting work.
Shop Pattern and Yarn Kit
I hope you enjoy my free pattern instructions below. You may also purchase the ad-free printable pdf or yarn kit from my Studio Knit Shop.
Knitted Hat Gauge, Sizes, and Characteristics
Knitted Bottom-Up
This hat pattern is knitted bottom-up from the brim to the crown.

Gauge Swatch
16 stitches and 22 rows = 4 x 4 in (10 x 10 cm) in Stockinette Stitch with worsted weight yarn knitting with size 8 US needles:
Row 1: Knit All
Row 2: Purl All
Repeat Rows 1 and 2
Hat Size: Adult
One size fits adult head sizes 19 inches (48 cm) to 24 inches (61 cm) in circumference.
Skill Level: Intermediate
Here’s an intermediate-level project for knitters comfortable on circular and double-pointed needles while knitting in the round, cable techniques, and decrease stitches.

Active Time to Complete: 12 to 16 hours
This hat takes a bit longer to finish than most, since you will be paying close attention to the pattern row-by-row while cable stitching throughout. I estimate it takes approximately 12 to 18 hours to complete, depending on your knitting speed.
Knitting Supplies
As an Amazon Associate, I earn from qualifying purchases.
Yarn: Worsted Weight #4, 220 yards (200 m)
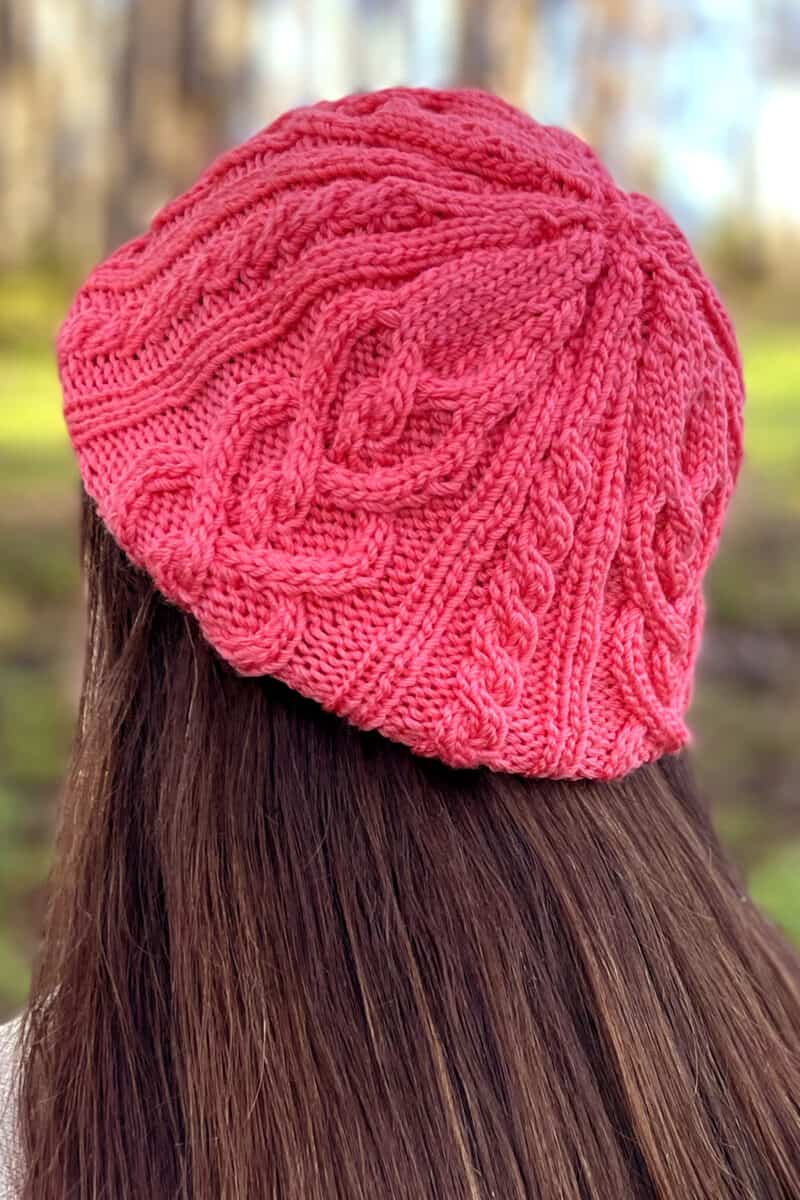
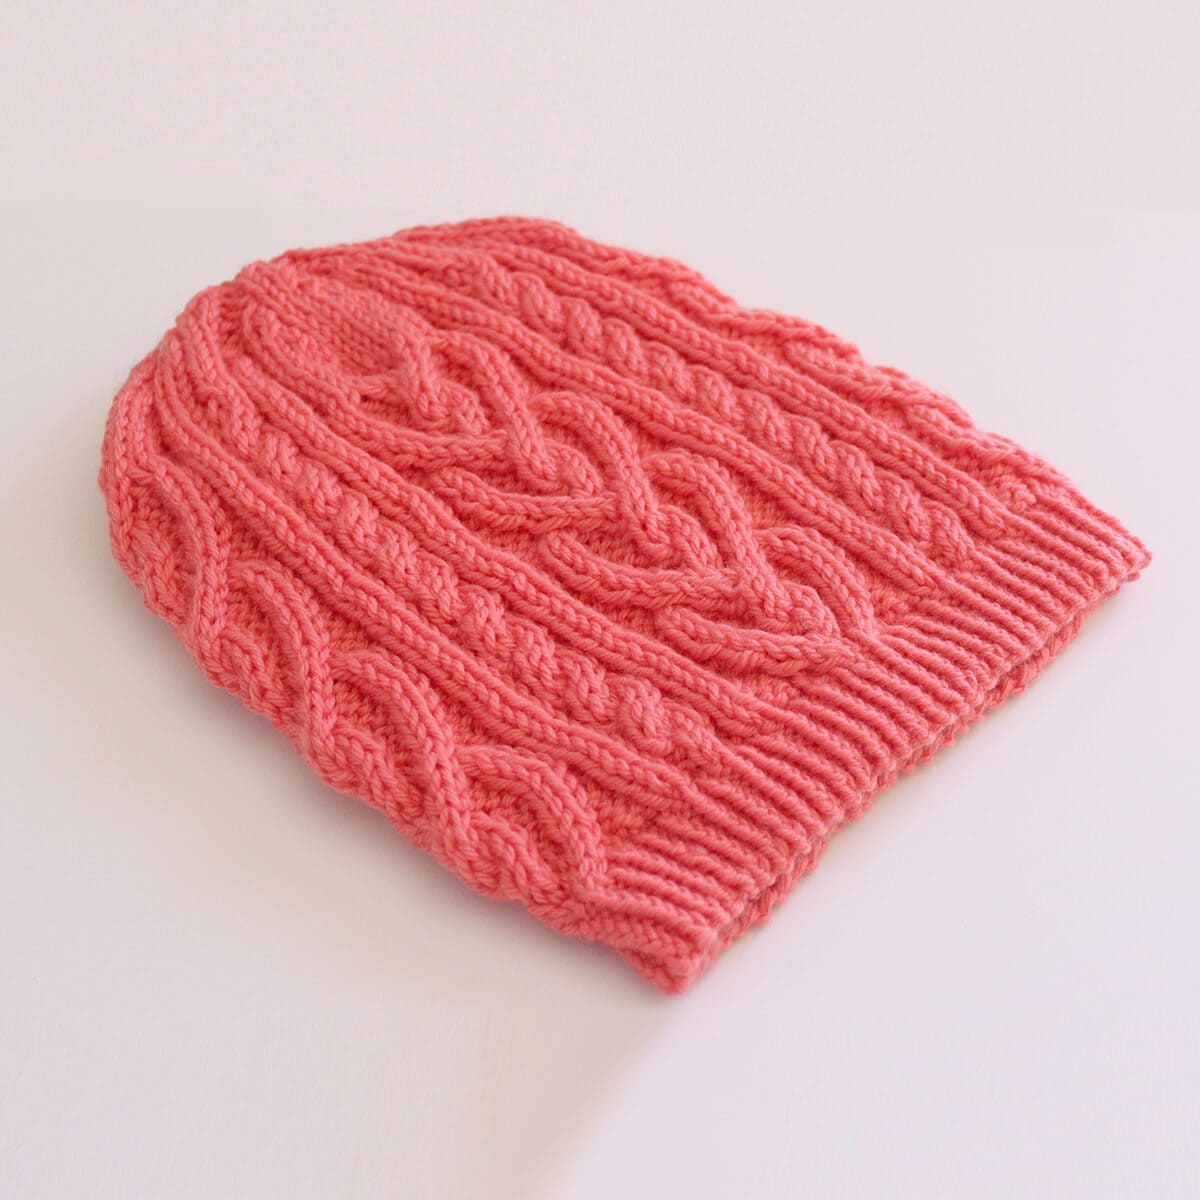
Samples knit in Cascade 220 Superwash Merino in colors Cream and Sugar Coral
Feel free to select any fiber and colors of your choice
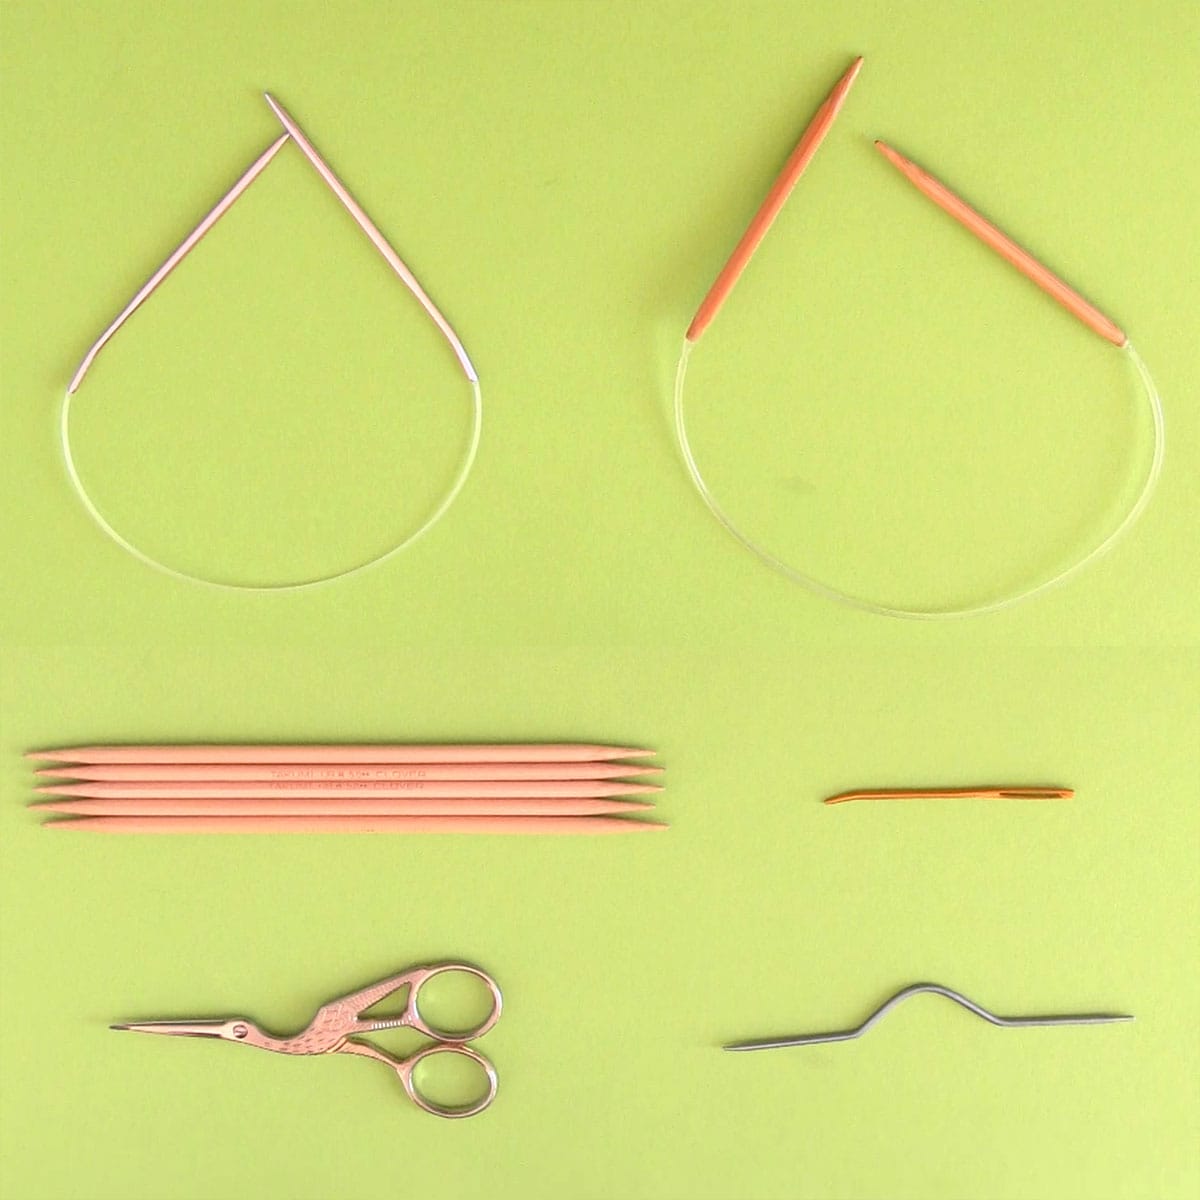
Knitting Needles
Size 3 US (3.25 mm) 16-inch circular needle
Size 8 US (5.0 mm) 16-inch circular needle
Set of 5 double-pointed needles size 8 US (5.0 mm) or size needed to obtain gauge
4 Stitch Markers – I simply use scraps of yarn with a slip knot.
Knitting Techniques
My full video tutorial demonstrates all knitting techniques.
- CO = Cast On Long Tail
- K = Knit Stitch
- P = Purl Stitch
- KTBL = Knit Through the Back Loop
- KFB = Knit Front and Back Increase
- K2Tog = Knit Two Together Decrease
- P2Tog = Purl Two Together Decrease
- Weave in Yarn Tails
- St Rem = Stitches Remain on the Needle
- * * = Repeat Pattern Between Asterisks
Cable Stitches
- 2/2R = Slip 2 Hold Back > Knit 2 + Knit 2 from Cable Needle
- 2/2L = Slip 2 Hold Front > Knit 2 + Knit 2 from Cable Needle
- 2/2RP = Slip 2 Hold Back > Knit 2 + Purl 2 from Cable Needle
- 2/2LP = Slip 2 Hold Front > Purl 2 + Knit 2 from Cable Needle
- 2/1RP = Slip 1 Hold Back > Knit 2 + Purl 1 from Cable Needle
- 2/1LP = Slip 2 Hold Front > Purl 1 + Knit 2 from Cable Needle
Watch Video Tutorial
Knitting Instructions
Step 1: Cast On
With your smaller size 3 US circular needle, cast on 120 stitches with the long-tail cast-on method. Place a stitch marker at the beginning of the round and join without twisting.
Step 2: Hat Brim
The KTBL Knit Through the Back Loop technique creates one twisted knit stitch by entering the needle into the stitch in the opposite direction. This technique tightens the rib stitches, allowing the hat to fit snugly around the circumference of your head.
Knit all stitches for 8 rows in a twisted 1×1 Rib Stitch pattern, ending at your stitch marker.
Rows 1 – 8: * KTBL, P * (120 St Rem)
Step 3: Set Up Row
Switch to larger size 8 US circular needle, then increase stitches with the Knit Front and Back technique in the following pattern:
Row 9: * KFB, K14 * (128 St Rem)
Step 4: Hat Body
For Rows 10 through 52, work the following four-repeat cable pattern. To best keep track of your place in the pattern, I suggest placing a stitch marker in a different color than the row marker after each 32-stitch repeat.
Row 10: * P2, K2, 2/2R, 2/2L, K2, P4, K2, P2, K4, P2, K2, P2 *
Row 11: * P2, K12, P4, K2, P2, K4, P2, K2, P2 *
Row 12: * P2, 2/2RP, K4, 2/2LP, P4, K2, P2, 2/2R, P2, K2, P2 *
Row 13: * P2, K2, P2, K4, P2, K2, P4, K2, P2, K4, P2, K2, P2 *
Row 14: * P, 2/1RP, P2, 2/2R, P2, 2/1LP, P3, K2, P2, K4, P2, K2, P2 *
Row 15: * P, K2, P3, K4, P3, K2, P3, K2, P2, K4, P2, K2, P2 *
Row 16: * 2/1RP, P3, K4, P3, 2/1LP, P2, K2, P2, 2/2R, P2, K2, P2 *
Row 17: * K2, P4, K4, P4, K2, P2, K2, P2, K4, P2, K2, P2 *
Row 18: * K2, P4, 2/2R, P4, K2, P2, K2, P2, K4, P2, K2, P2 *
Row 19: * K2, P4, K4, P4, K2, P2, K2, P2, K4, P2, K2, P2 *
Row 20: * 2/2LP, 2/2R, 2/2L, 2/2RP, P2, K2, P2, 2/2R, P2, K2, P2 *
Row 21: * P2, K12, P4, K2, P2, K4, P2, K2, P2 *
Row 22: * P2, 2/2RP, K4, 2/2LP, P4, K2, P2, K4, P2, K2, P2 *
Row 23: * P2, K2, P2, K4, P2, K2, P4, K2, P2, K4, P2, K2, P2 *
Row 24: * P, 2/1RP, P2, 2/2R, P2, 2/1LP, P3, K2, P2, 2/2R, P2, K2, P2 *
Row 25: * P, K2, P3, K4, P3, K2, P3, K2, P2, K4, P2, K2, P2 *
Row 26: * 2/1RP, P3, K4, P3, 2/1LP, P2, K2, P2, K4, P2, K2, P2 *
Row 27: * K2, P4, K4, P4, K2, P2, K2, P2, K4, P2, K2, P2 *
Row 28: * K2, P4, 2/2R, P4, K2, P2, K2, P2, 2/2R, P2, K2, P2 *
Row 29: * K2, P4, K4, P4, K2, P2, K2, P2, K4, P2, K2, P2 *
Row 30: * 2/2LP, 2/2R, 2/2L, 2/2RP, P2, K2, P2, K4, P2, K2, P2 *
Row 31: * P2, K12, P4, K2, P2, K4, P2, K2, P2 *
Row 32: * P2, 2/2RP, K4, 2/2LP, P4, K2, P2, 2/2R, P2, K2, P2 *
Row 33: * P2, K2, P2, K4, P2, K2, P4, K2, P2, K4, P2, K2, P2 *
Row 34: * P, 2/1RP, P2, 2/2R, P2, 2/1LP, P3, K2, P2, K4, P2, K2, P2 *
Row 35: * P, K2, P3, K4, P3, K2, P3, K2, P2, K4, P2, K2, P2 *
Row 36: * 2/1RP, P3, K4, P3, 2/1LP, P2, K2, P2, 2/2R, P2, K2, P2 *
Row 37: * K2, P4, K4, P4, K2, P2, K2, P2, K4, P2, K2, P2 *
Row 38: * K2, P4, 2/2R, P4, K2, P2, K2, P2, K4, P2, K2, P2 *
Row 39: * K2, P4, K4, P4, K2, P2, K2, P2, K4, P2, K2, P2 *
Row 40: * 2/2LP, 2/2R, 2/2L, 2/2RP, P2, K2, P2, 2/2R, P2, K2, P2 *
Row 41: * P2, K12, P4, K2, P2, K4, P2, K2, P2 *
Row 42: * P2, 2/2RP, K4, 2/2LP, P4, K2, P2, K4, P2, K2, P2 *
Row 43: * P2, K2, P2, K4, P2, K2, P4, K2, P2, K4, P2, K2, P2 *
Row 44: * P, 2/1RP, P2, 2/2R, P2, 2/1LP, P3, K2, P2, 2/2R, P2, K2, P2 *
Row 45: * P, K2, P3, K4, P3, K2, P3, K2, P2, K4, P2, K2, P2 *
Row 46: * 2/1RP, P3, K4, P3, 2/1LP, P2, K2, P2, K4, P2, K2, P2 *
Row 47: * K2, P4, K4, P4, K2, P2, K2, P2, K4, P2, K2, P2 *
Row 48: * K2, P4, 2/2R, P4, K2, P2, K2, P2, 2/2R, P2, K2, P2 *
Row 49: * K2, P4, K4, P4, K2, P2, K2, P2, K4, P2, K2, P2 *
Row 50: * 2/2LP, 2/2R, 2/2L, 2/2RP, P2, K2, P2, K4, P2, K2, P2 *
Row 51: * P2, K12, P4, K2, P2, K4, P2, K2, P2 *
Row 52: * P2, K12, P4, K2, P2, 2/2R, P2, K2, P2 *
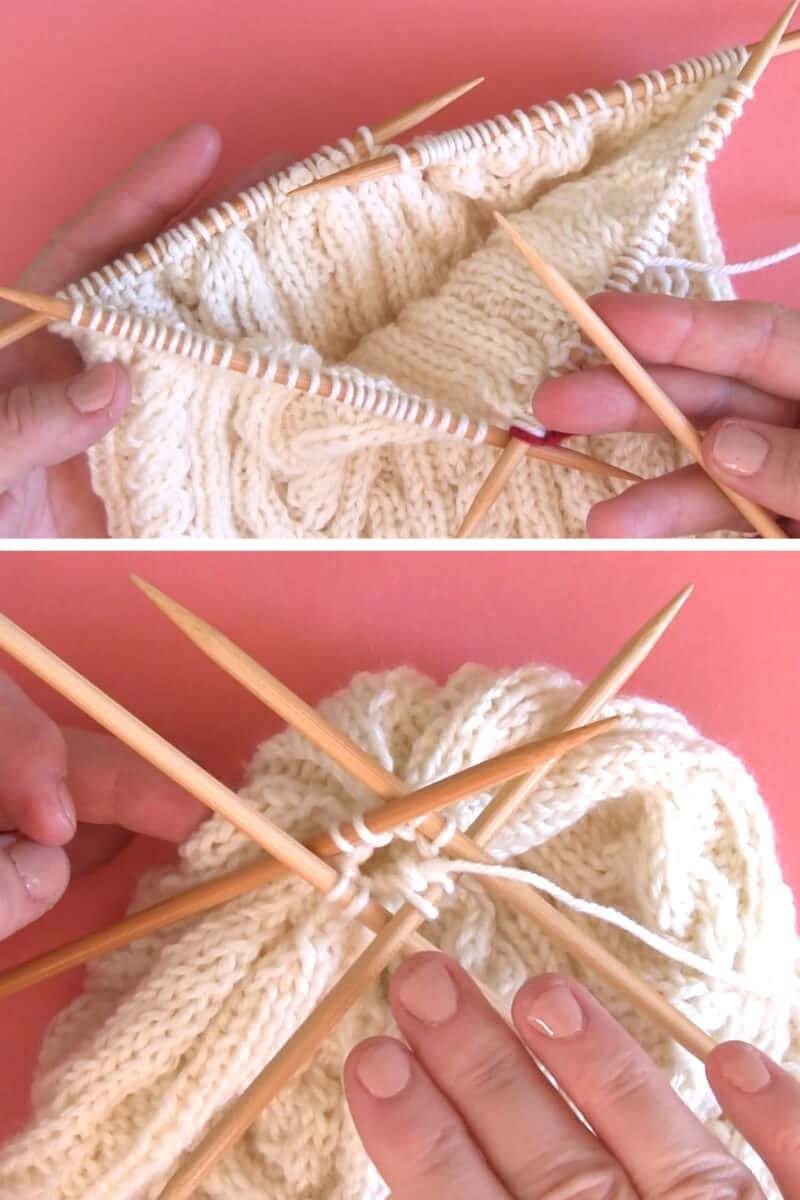
Step 5: Decrease Crown
The following decrease rows create your hat crown finished beautifully in pattern. Change to 4 Double-Pointed Needles by dividing stitches in multiples of 32 once your stitches get too tight on your circular needle.
Row 53: * P2Tog, K6, K2Tog, K4, P2, P2Tog, K2, P2, K2, K2Tog, P2, K2, P2 * (112 St Rem)
Row 54: * P, K11, P3, K2, P2, K3, P2, K2, P2 *
Row 55: * K2Tog, K5, K2Tog, K3, P2, K2Tog, K, P2, K2, P2Tog, P, K2, P2 * (96 St Rem)
Row 56: * K10, P2, K2, P2, K2, P2, K2, P2 *
Row 57: * K2Tog, K4, K2Tog, K2, P2, K2Tog, P2, K2, P2Tog, K2, P2 * (80 St Rem)
Row 58: * K8, P2, K, P2, K2, P, K2, P2 *
Row 59: * K2Tog, K3, K2Tog, K, P2, P2Tog, P, K2, K2Tog, K, P2 * (64 St Rem)
Row 60: * K6, P4, K4, P2 *
Row 61: * K2Tog, K2, K2Tog, P2, P2Tog, K2, K2Tog, P2 * (48 St Rem)
Row 62: * K4, P3, K3, P2 *
Row 63: * K2Tog, K, P2Tog, P * (32 St Rem)
Row 64: * K2, P2 *
Row 65: * K2Tog, P2Tog * (16 St Rem)
Row 66: * K, P *
Row 67: * K2Tog * (8 St Rem)
Step 6: Finishing
- Cut yarn, run tail through all remaining stitches
- Turn inside out to weave in ends
- Block to size, if desired.
Knit Hearts Pattern Book
Get 6 heart stitch patterns available in both print and digital formats from my
Studio Knit Shop.


Kristen McDonnell
Author • Designer • Teacher
Kristen from StudioKnit LLC produces knitting video lessons and pattern designs from her vibrant production studio on Half Moon Bay’s California coast.
Kristen McDonnell is the author of the highly acclaimed book Knit Stitch: 50 Knit + Purl Patterns featuring vintage and unique designs.