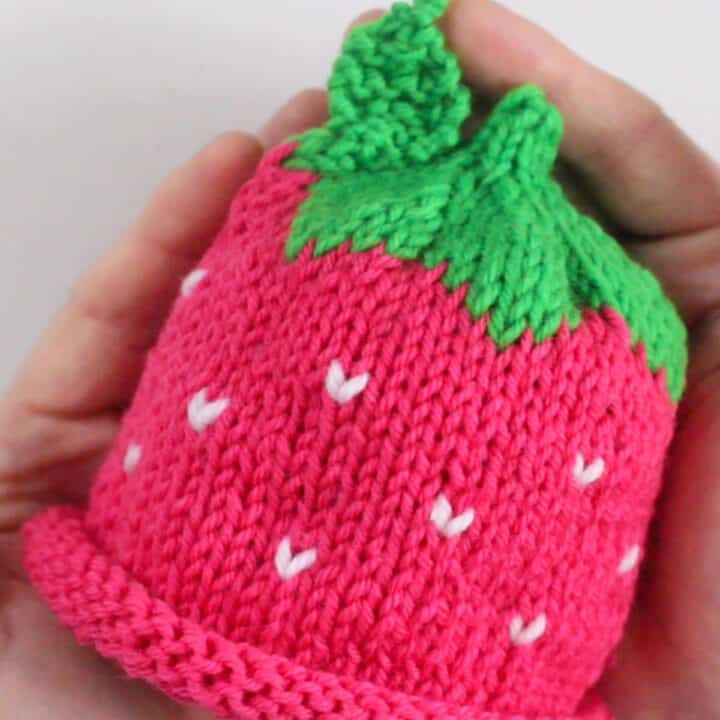
Strawberry Baby Hat Knitting Pattern

This Strawberry Baby Hat knitting pattern creates joy and warmth for the little ones in your life. As sweet as a ripe strawberry on a sunny day, your tiny, squishy bundle of joy will be giggling and cooing, wrapped in the cutest handmade hat.
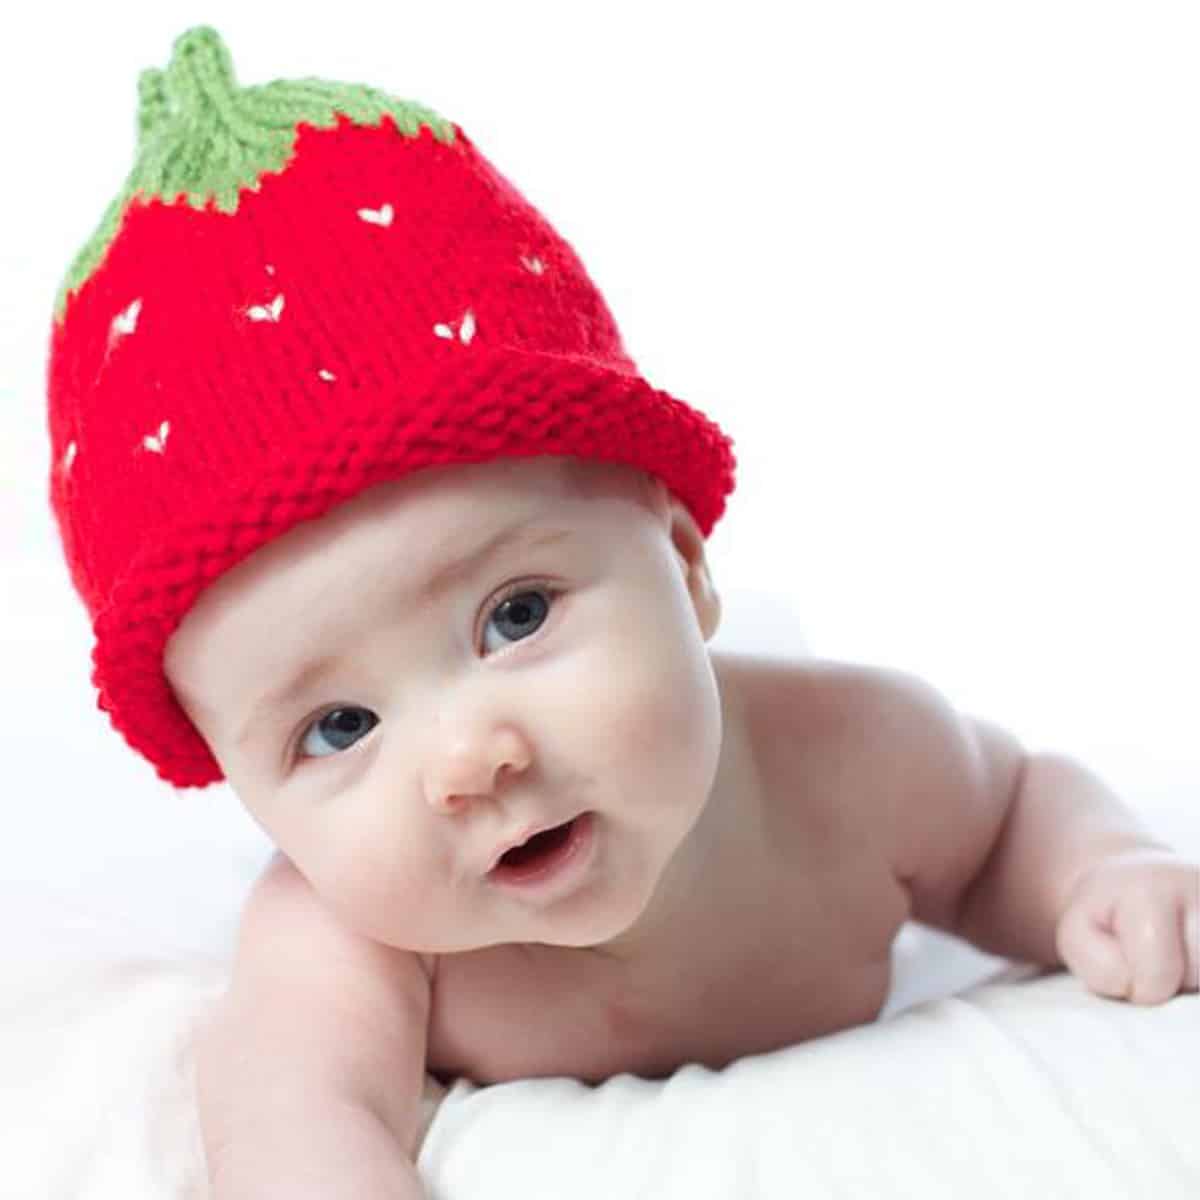
Table of Contents
Table of Contents
Knitted Hat Gauge, Sizes, and Characteristics
This strawberry baby hat is a symbol of love and care, knitted stitch by stitch, by none other than you. I hope you enjoy knitting up my favorite baby shower gift!
Knitted Bottom-Up
This hat pattern is knitted bottom-up from the brim to the crown.
Gauge Swatch
20 stitches and 28 rows = 4 x 4 in (10 x 10 cm) in Stockinette Stitch with worsted weight yarn knitting with size 7 US needles:
Row 1: Knit All
Row 2: Purl All
Repeat Rows 1 and 2
Hat Size: Baby
Three sizes fits babies ages. If in between ages, I suggest knitting the size up so your little one will grow into it.
- Age 6 months
- Age 1 year
- Age 2 year
Skill Level: Intermediate
This is an intermediate-level project for knitters comfortable on circular and double-pointed needles while knitting in the round, catching yarn floats, along with increasing and decreasing stitches.
Active Time to Complete: 6 to 12 hours
I estimate it takes approximately 6 to 12 hours to complete, depending on your personal knitting speed. As such, you can expect to complete it within 2 to 3 sittings, making it a fun quick-knit gift!
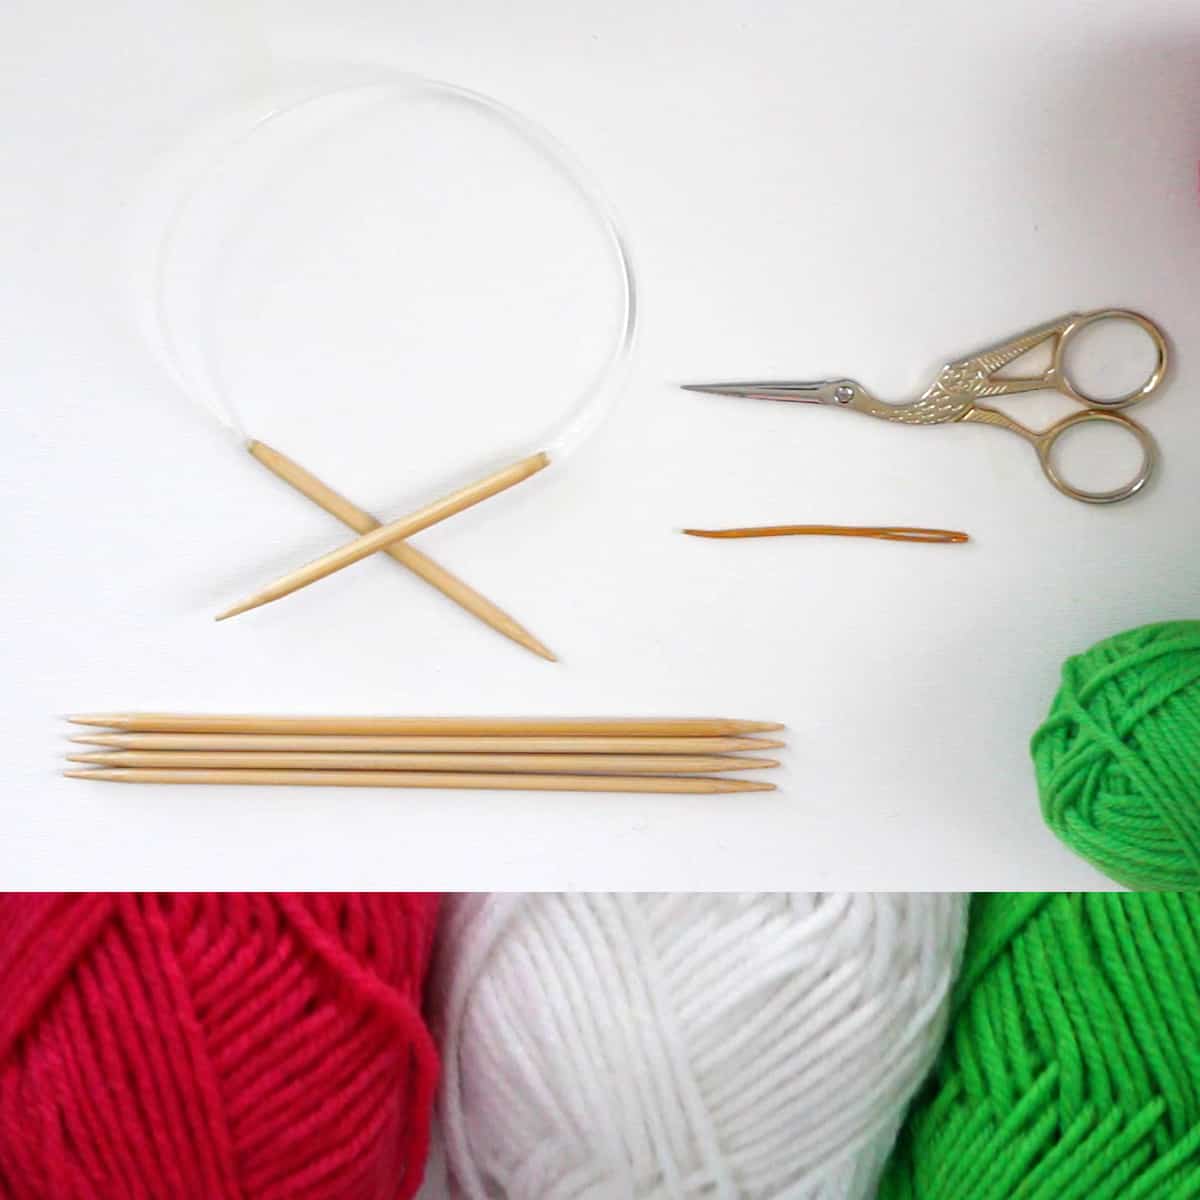
Knitting Supplies
Select your favorite yarn, circular needles, and get ready to knit some magic. Whether you’re knitting this strawberry baby hat for a loved one or to donate to a charity, remember that each stitch is made with love and joy. And when that sweet little head pops on this hat, the world will be a better place with every stitch and smile.
As an Amazon Associate, I earn from qualifying purchases.
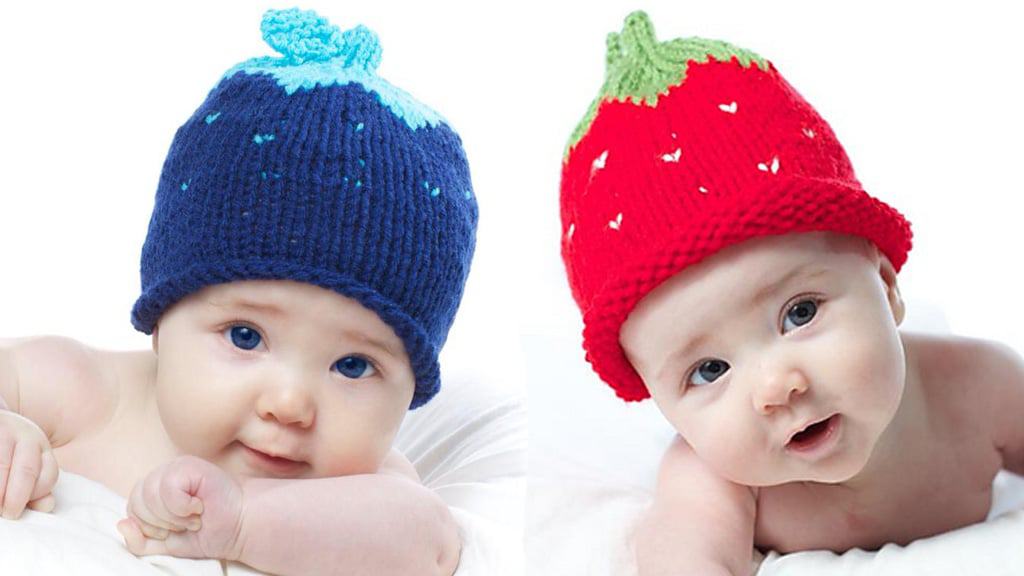
- Suggested Yarn: Red Heart Super Saver in colors Cherry Red, Paddy Green, and White
Worsted Weight #4
Main Color: 100 yards (92 meters).
2 Contrasting Colors: 75 yards each (69 meters each).
Feel free to select any fiber and colors of your choice.
- Circular Knitting Needle: Size 7 US (4.5 mm) 16-inch needle
- Set of 4 double-pointed needles size 7 US (4.5 mm)
- Tapestry Needle
Watch Video Tutorial
Knitting Techniques
With just a little patience and a whole lot of fun, you’ll soon be creating an heirloom-quality piece that’ll warm the hearts of parents and keep those little cherubs cozy and stylish.
- Cast On
- Knit Stitch
- Knit in the Round Circular Needles
- K2Tog = Knit Two Together Decrease
- KFB = Knit Front and Back Increase
- Switching to DPNs
- How to Catch Back Yarn in Two-Color Stranded Knitting
Are you ready to create something adorable? Let’s pick up those needles and knit our way to cuteness overload. So gather around, knitting enthusiasts, and let’s make some strawberry-infused magic.

Knitting Process
Brim & Base
The beginning base of your knitted hat will be knit in the round on circular needles in the Stockinette Stitch with easy knit stitches. The number of cast on stitches and rows depends on your hat size.
For specific knitting instructions, please visit the printable knitting pattern below.

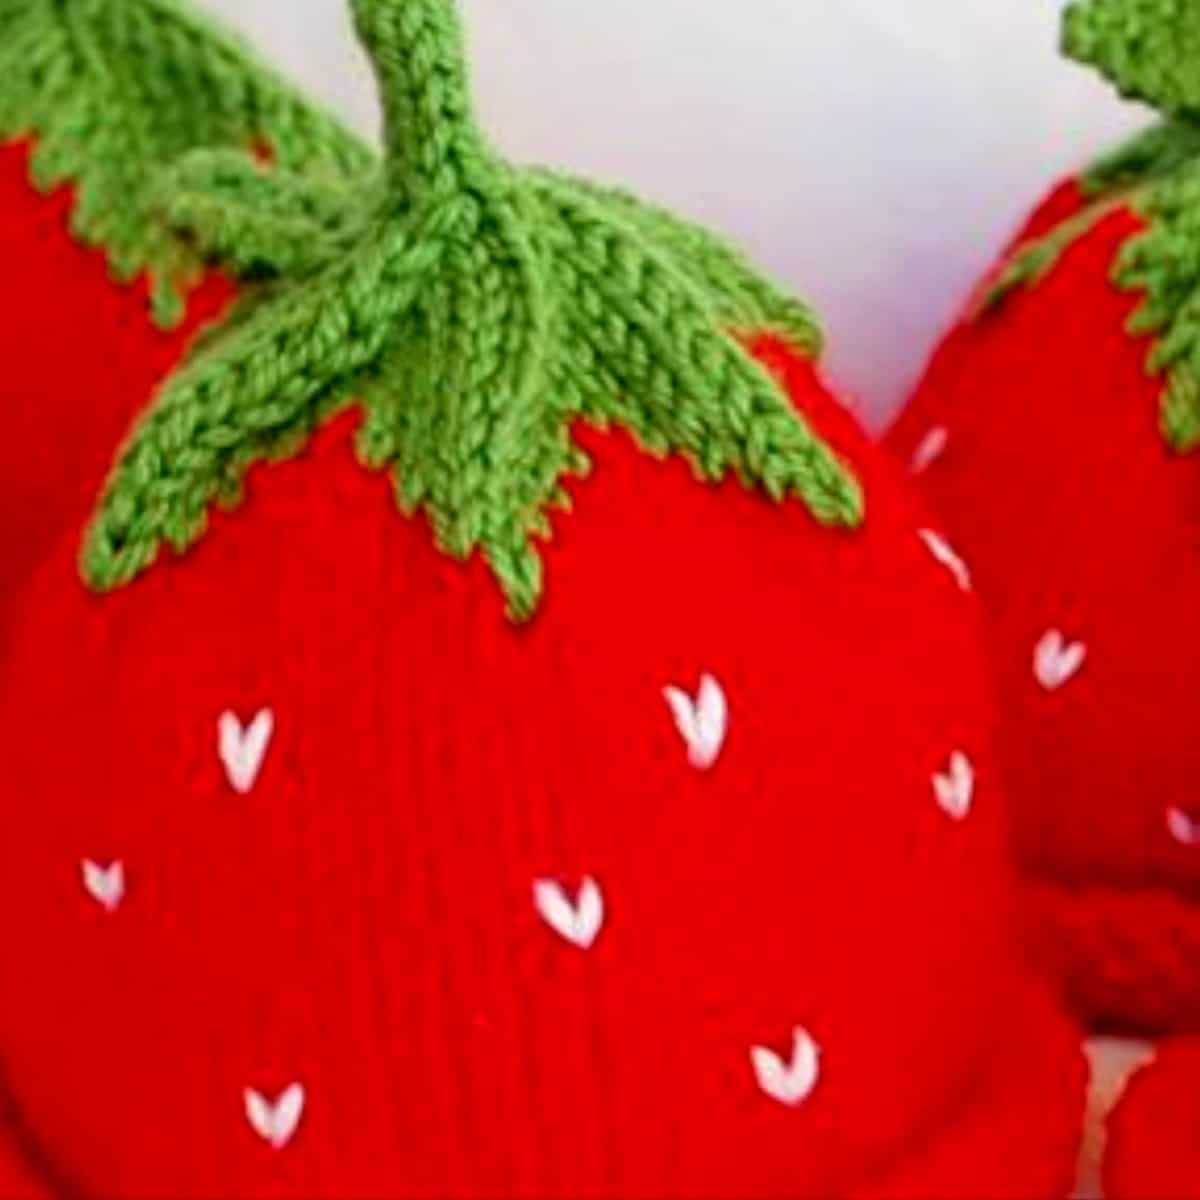
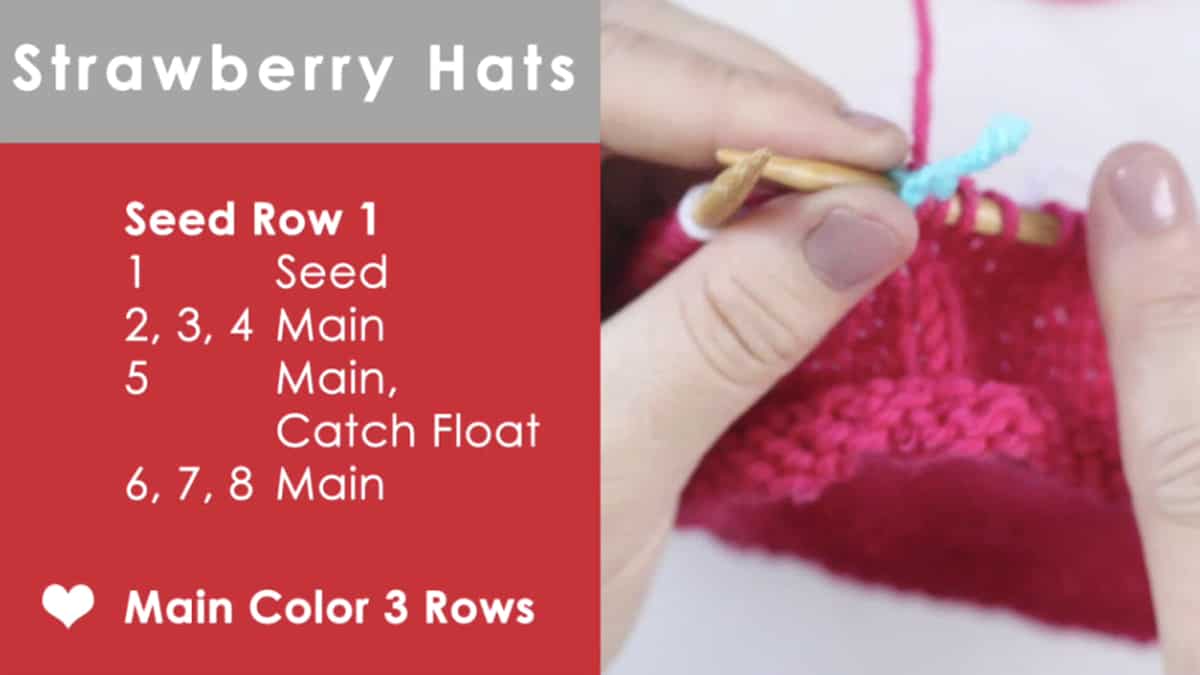
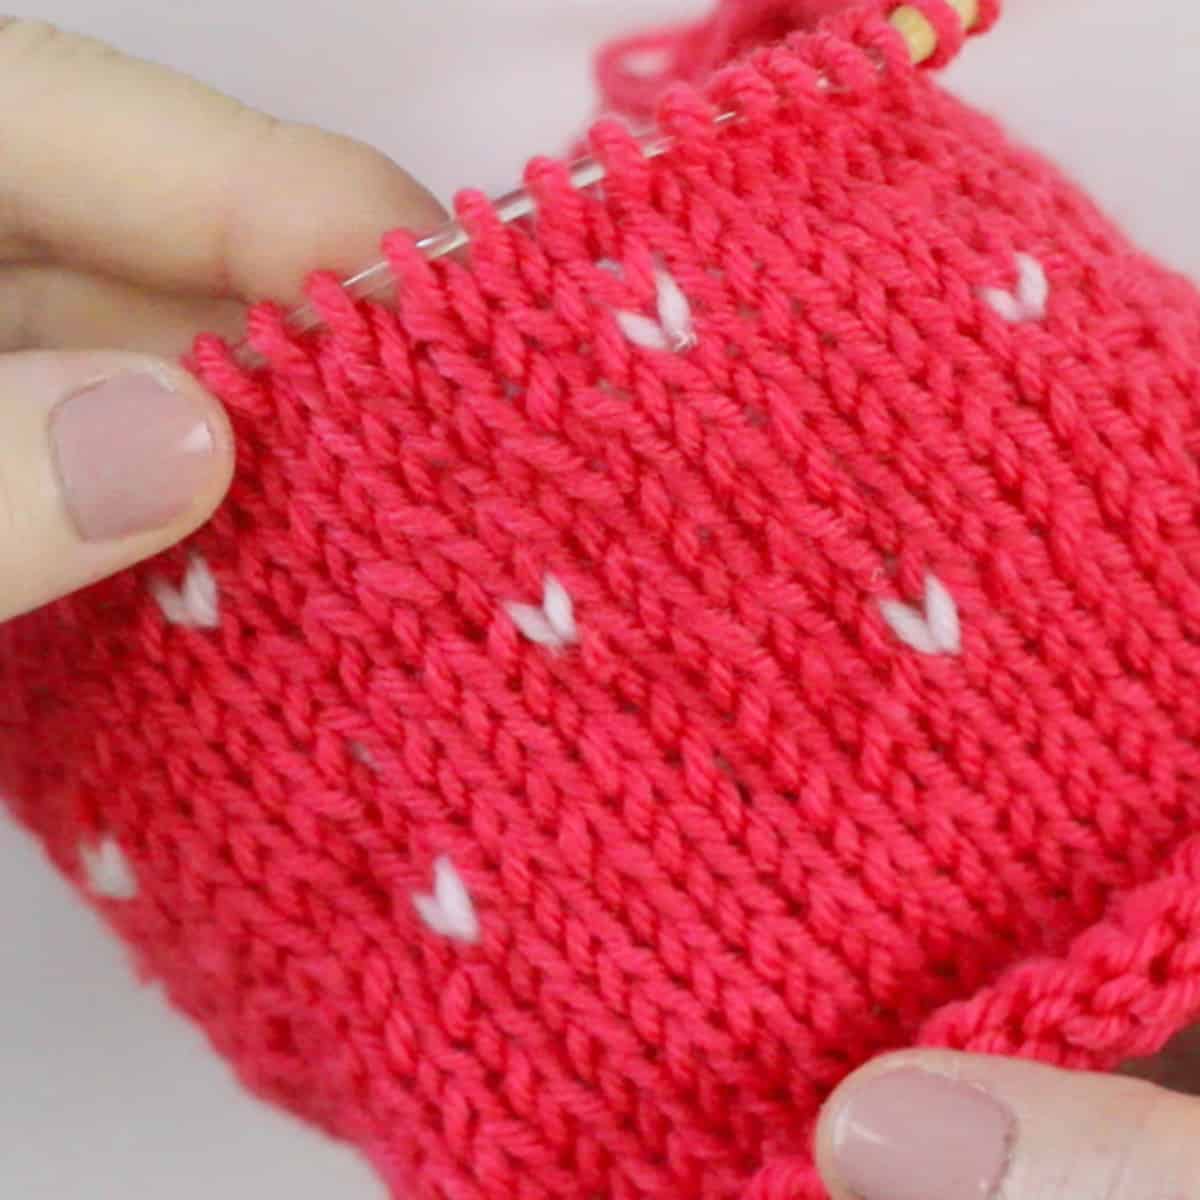
Strawberry Seed Rows
The hat body adds these cute little strawberry seeds in a new color of your choice. I think white looks adorable. The alternating seeds are created with just one knit stitch.
We will carry the yarn floats on the wrong side of our work. The video tutorial below helps you see exactly how to knit it up!
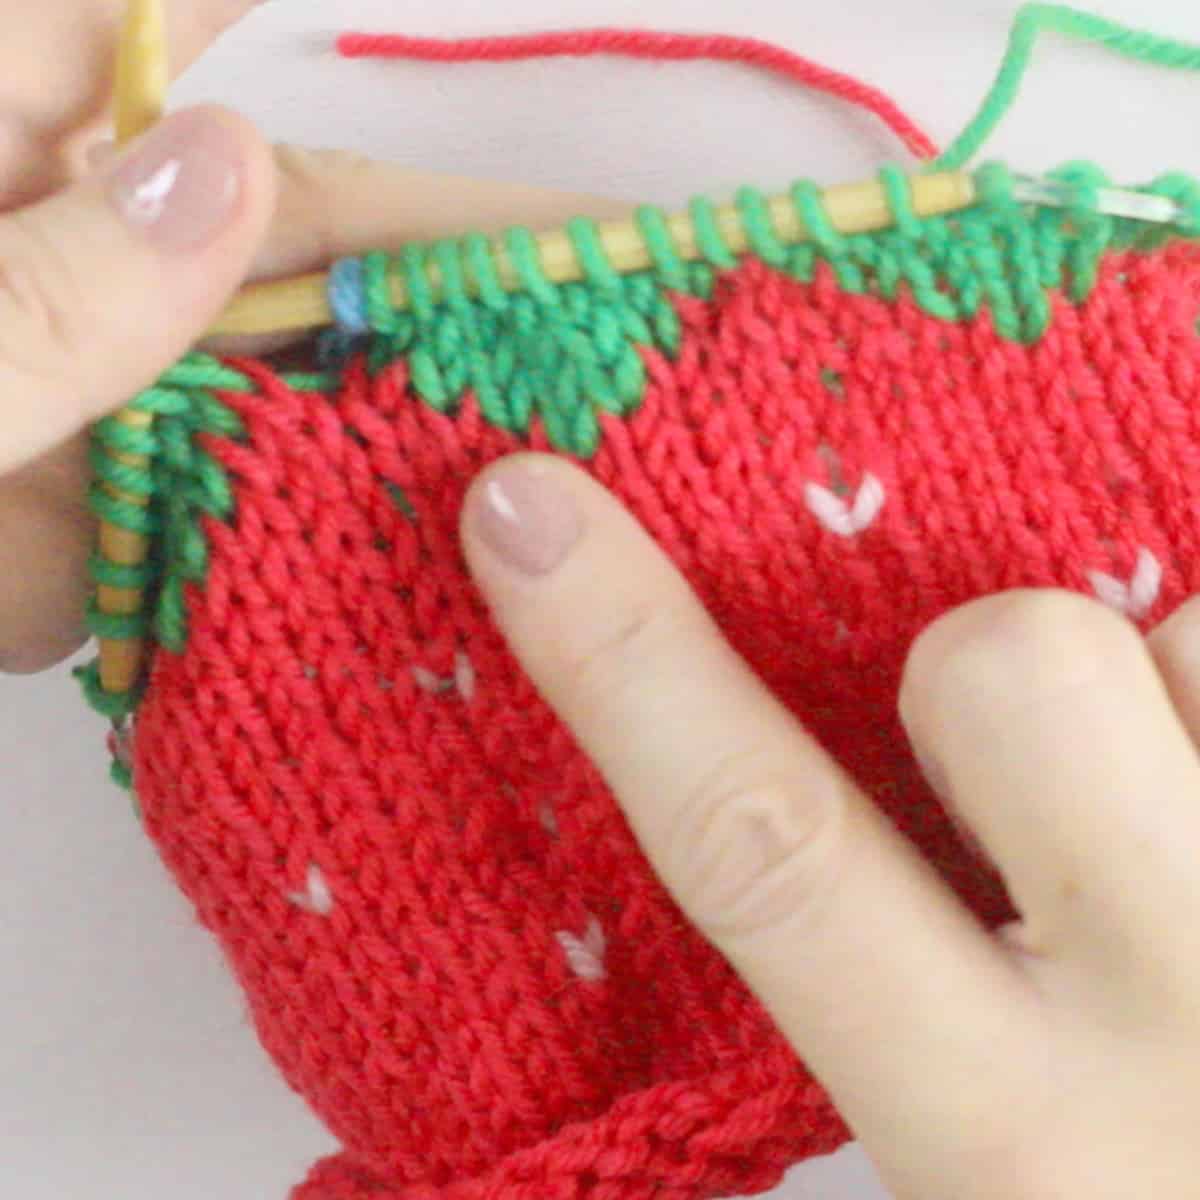
Topper Points and Cap
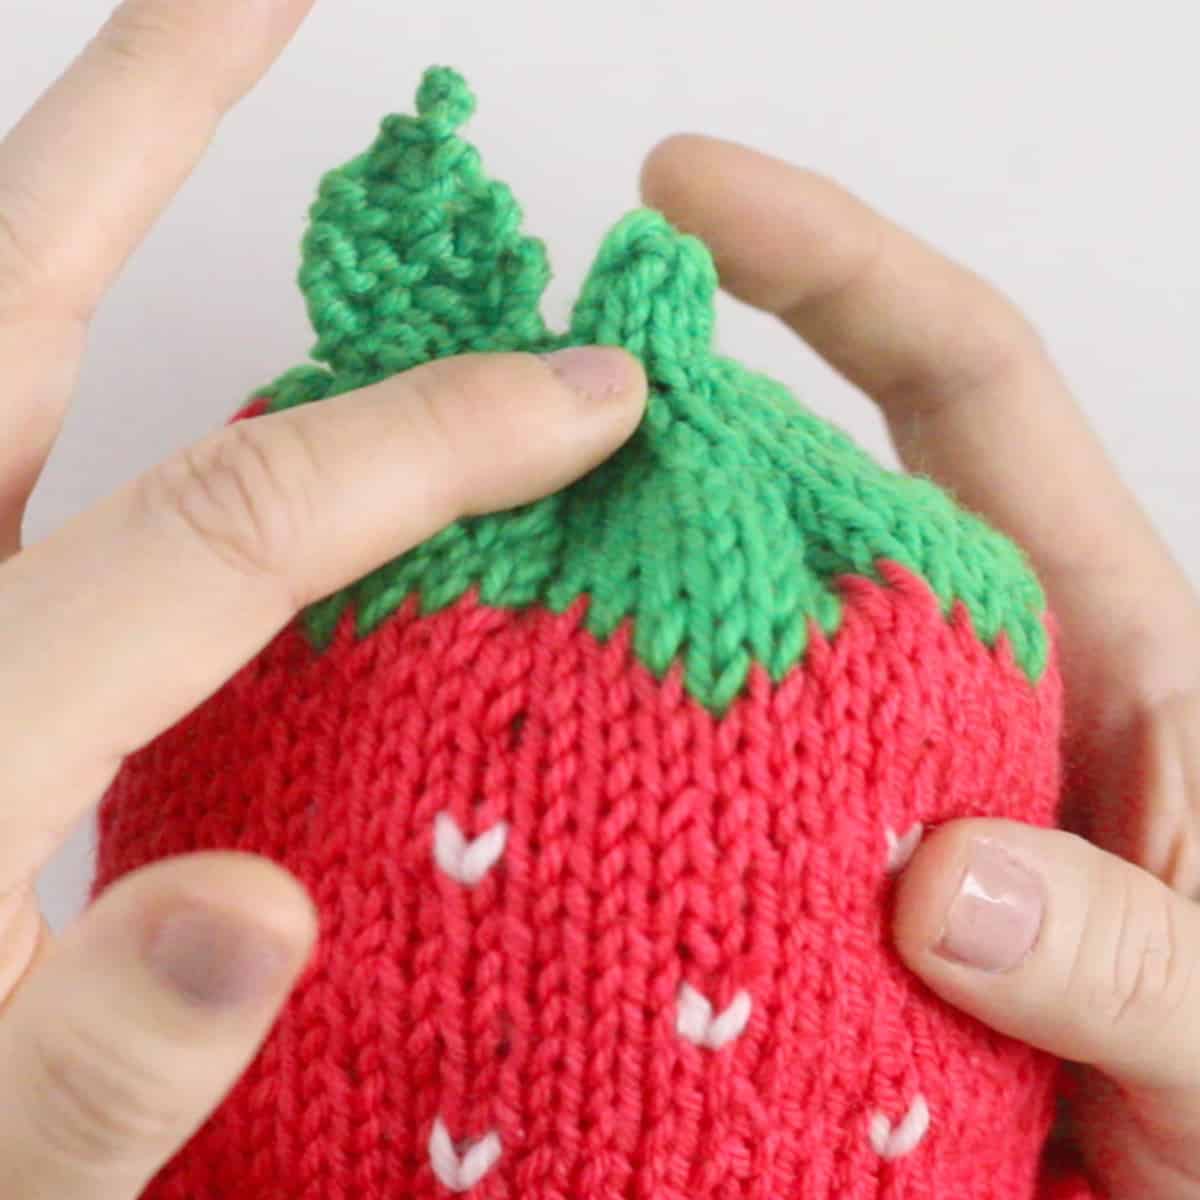
We then will knit up the strawberry topper in a third yarn color, which I’ve selected green.
You know that part at the top of a fruit where it looks like there are some green leaves? That’s called the calyx. When the fruit was a baby flower, these green leafy parts protected it. And even as the flower grows into a yummy fruit, those green leaves stay on top, making a kind of cap for the fruit. So, you can call them “caps” too!
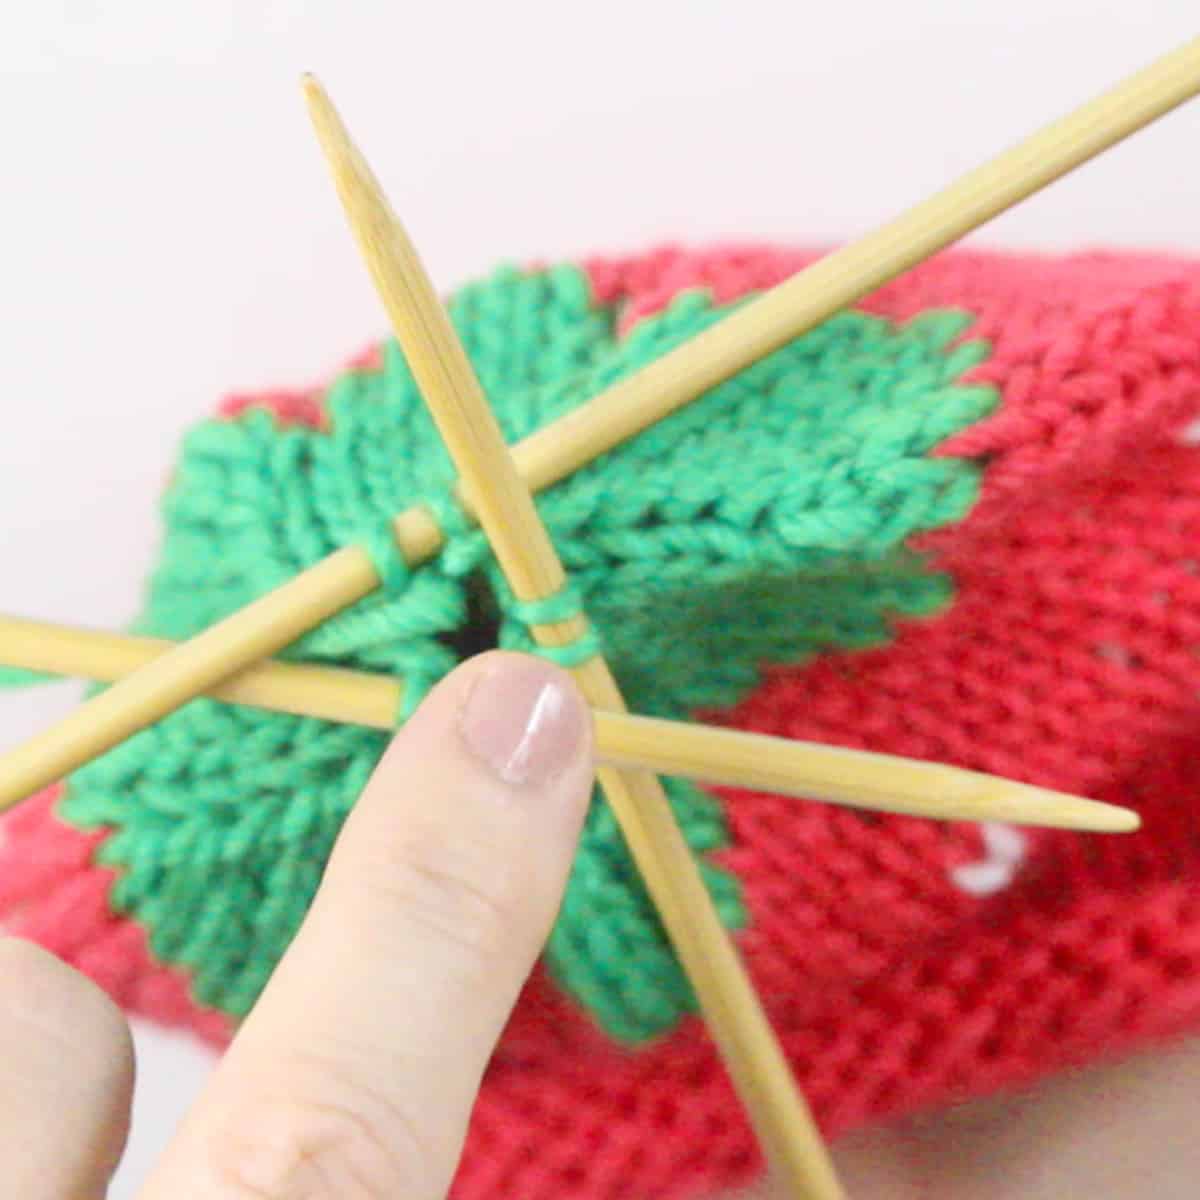
Crown Decreases
Nearing the top of the hat, we will switch to double-pointed needles. The decrease section not only begins to close up your hat but also gives an added texture to the strawberry’s calyx.
Stem, Leaf, and Finishing
Lastly, we will knit the adorable little stem. An optional touch is to create a little leaf. Too cute!
Printable Knitting Instructions
Printable Knitting Pattern
Learn How to Knit a Strawberry Baby Hat. Get Easy Step-by-Step Knitting Tutorials and written instructions.
Materials
- Worsted Weighted Yarn, in any fiber/colors of your choice.
- Main Color: 100 yards (92 meters).
- 2 Contrasting Colors: 75 yards each (69 meters each).
Tools
- 1 Circular Knitting Needle Size 7 US (4.5 mm), 16 inches long
- 4 Double Pointed Knitting Needles – Size 7 US
- Scissors
- Tapestry Needle
- Stitch Markers (scraps of yarn are fine)
Instructions
Sizes: 6 months (1 year, 2 years)
Gauge: 20 stitches and 28 rows = 4 x 4 in (10 x 10 cm) in Stockinette Stitch
_____
Step 1: Brim & Base
With Your Circular Knitting Needles, Cast On in Multiples of 8 in your main color.
- Age 6 months, Cast On 72 Stitches
- Age 1 year, Cast On 80 Stitches
- Age2 years, Cast On 88 Stitches
Place marker and join together by knitting first stitch being careful not to twist.
Knit in the round evenly for 18 (20, 22) rows.
_____
Step 2: Hat Body with Strawberry Seed Rows
Repeat the following Seed Rows until your hat measures 4.5" (4.75", 5") and there are three solid rows of knitting after the last seed round.

_____
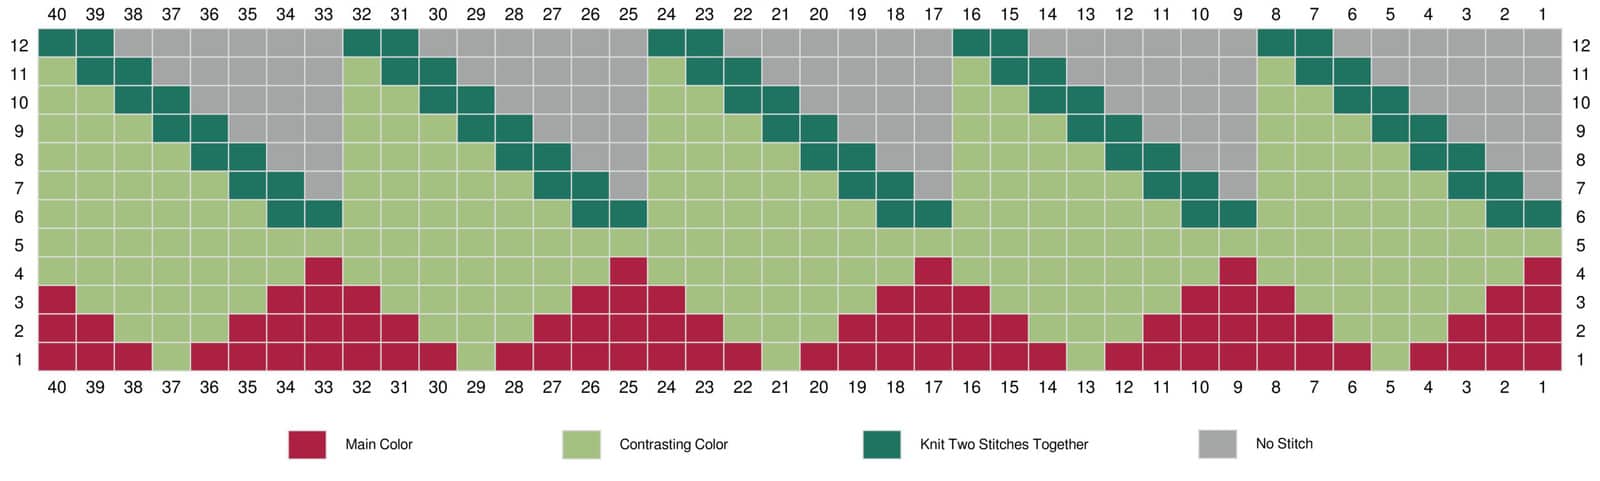
Step 3: Hat Top with Strawberry Calyx
We will begin our decreases, so it's time to change to double-pointed needles.
Row 1 - 5: Follow the chart for placement of Contrasting Color (green) added to your Main Color (red). Begin with the point of the leaves and increase the size of the leaves until they meet on the 5th row.
Row 6 is your first decrease round. Begin decreasing at the darkest squares of the chart and continue to follow the written instructions.
* * = Repeat the pattern between the asterisks
- Row 1: K4 MC, * K1 CC, K7 MC *, K1 CC, K3 MC
- Row 2: K3 MC, * K3 CC, K5 MC *, K3 CC, K2 MC
- Row 3: K2 MC, * K5 CC, K3 MC *, K5 CC, K1 MC
- Row 4: K1 MC, * K7 CC, K1 MC *, K1 CC, K3 MC
Rows 5 - 12 are all knit with your Contrasting Color - Row 5: Knit All CC
- Row 6: * K2Tog, K6 *
- Row 7: * K2Tog, K5 *
- Row 8: * K2Tog, K4 *
- Row 9: * K2Tog, K3 *
- Row 10: * K2Tog, K2 *
- Row 11: * K2Tog, K1 *
- Row 12: * K2Tog *
_____
Step 4: Stem, Leaf, and Finishing
STEM
Switch from 3 Double Pointed Needles Down to Just 2.
Knit in the round until your stem is the length you desire.
Cut Yarn, Draw Through and Weave in yarn ends.
If you wish to add a leaf, follow this easy pattern:
LEAF PATTERN (optional embellishment)
Cast On 5 Stitches
- Row 1: Knit 5
- Row 2: K1, Knit Front & Back Increase (KFB), K1, KFB, K1 (7 stitches)
- Row 3: Knit 7
- Row 4: K1, KFB, K3, KFB, K1 (9 Stitches)
- Row 5: Knit 9
- Row 6: K1, K2Tog, K3, K2Tog, K1 (7 Stitches)
- Row 7: K1, K2Tog, K1, K2Tog, K1 (5 Stitches)
- Row 8: K1, K2Tog, K2 (4 Stitches)
- Row 9: K2Tog, K2Tog (2 Stitches)
Bind Off
Tack your LEAF onto your hat, weave in the ends, and you are DONE!!!
Notes
Knitting Techniques
- Slip Knot
- Cast On
- Knit Stitch
- Knit in the Round Circular Needles
- Knit Two Together Decrease
- Knit Front and Back Increase
- Switching to DPNs
- How to Catch Back Yarn in Two-Color Stranded Knitting
_____
Glossary Abbreviations
- BEG = Begin
- CC = Contrasting Color
- CO = Cast On
- DEC = Decrease
- DP = Double point
- K = Knit
- K2Tog = Knit Two Stitches Together
- KFB = Knit Front and Back
- MC = Main Color
- REM = Remaining
- REP = Repeat
- TOG = Together
- * * = Repeat pattern between the asterisks

Kristen McDonnell
Author • Designer • Teacher
Kristen from StudioKnit LLC produces knitting video lessons and pattern designs from her vibrant production studio on Half Moon Bay’s California coast.
Kristen McDonnell is the author of the highly acclaimed book Knit Stitch: 50 Knit + Purl Patterns featuring vintage and unique designs.