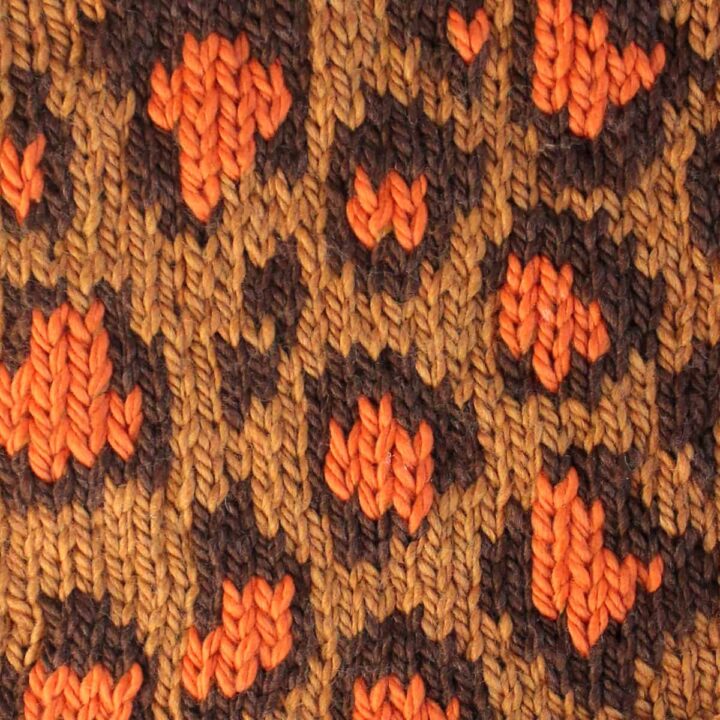
Leopard Print Knit Stitch Pattern
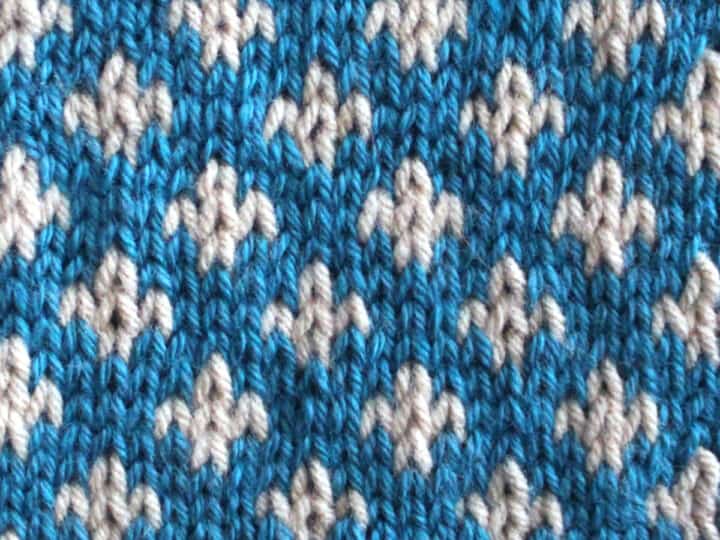
This Leopard Print Knit Stitch Pattern, inspired by the untamed beauty of the jungle, unleashes the wild side of your creativity. Using either two or more yarn colors, discover the endless possibilities for incorporating this colorwork design into your next knitting piece.
Incorporate this repeating design into cozy sweaters, stylish accessories, or even vibrant home decor accents. Get your written pattern instructions both flat and in the round, along with knitting chart and video tutorial.
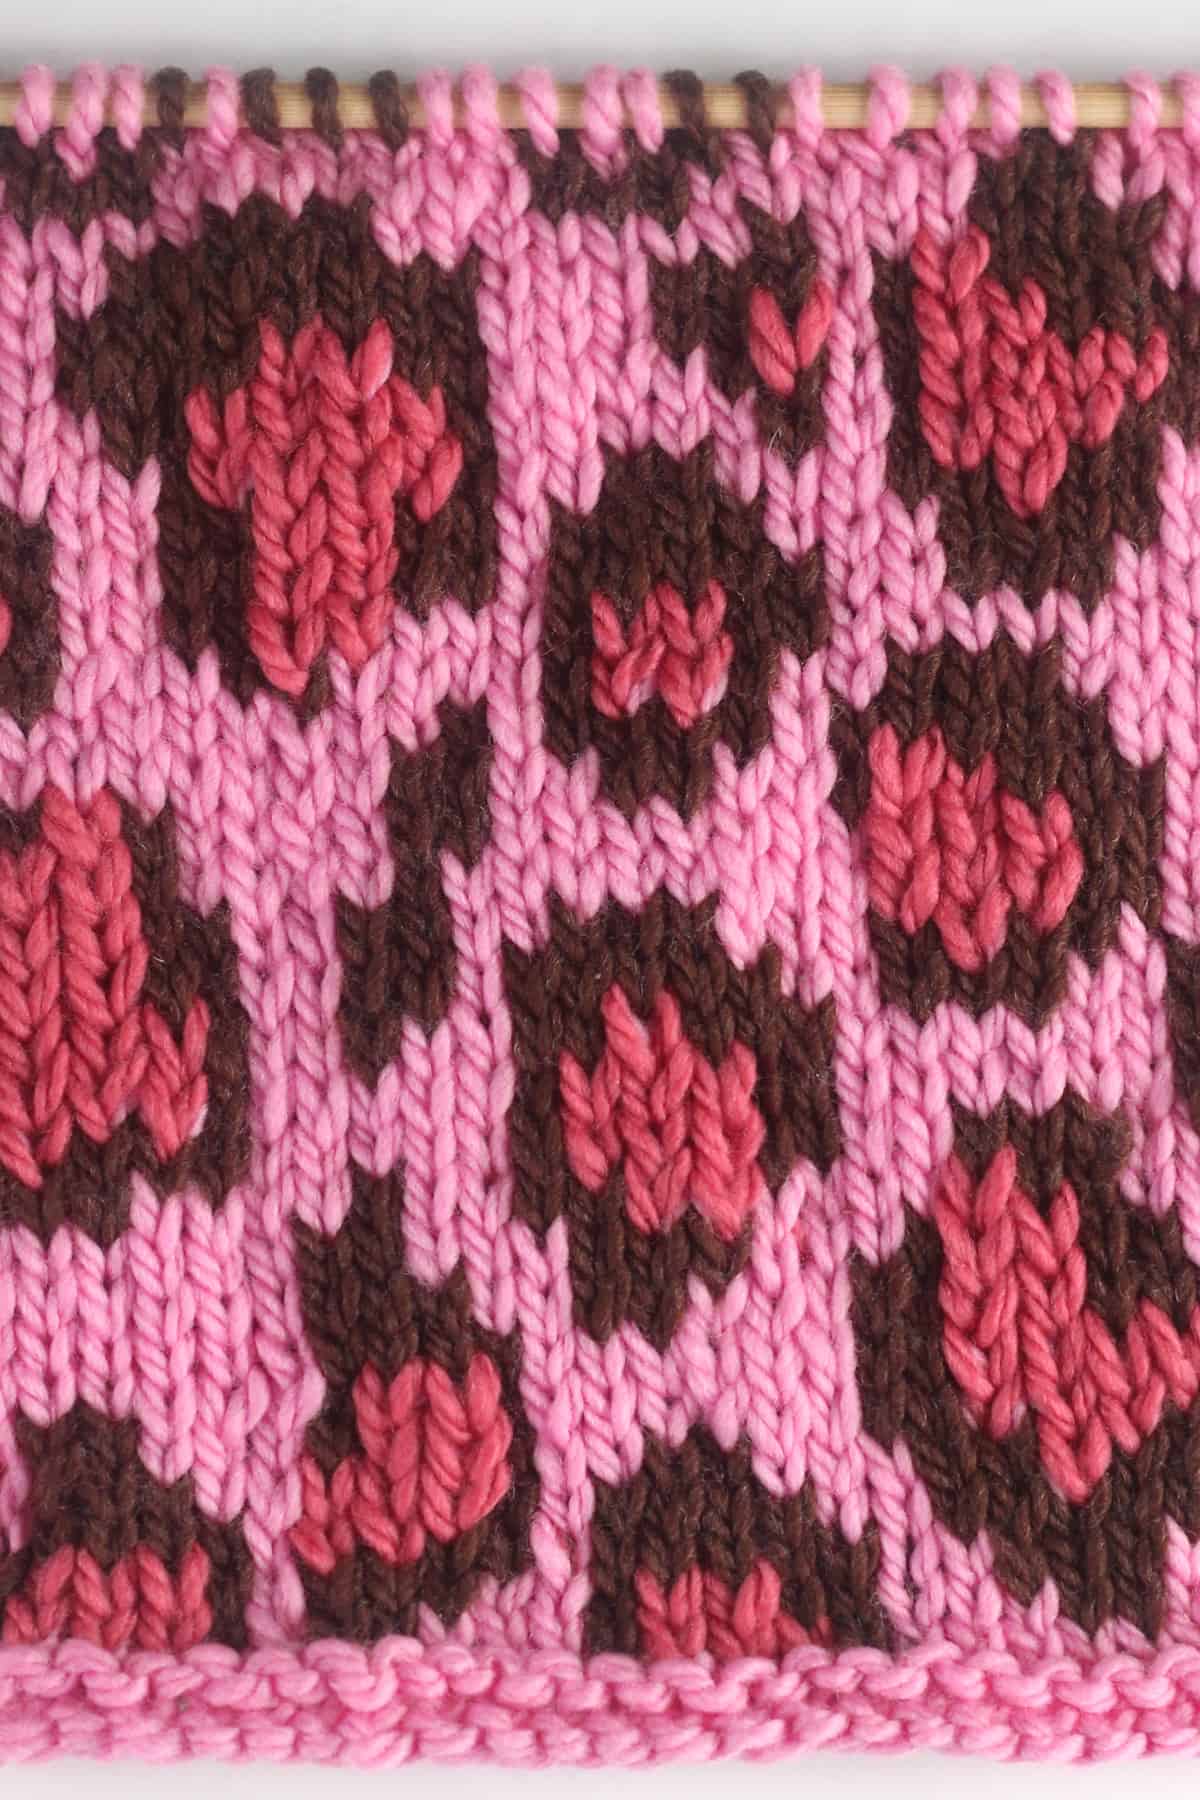
Table of Contents
Colorwork Knitting Design
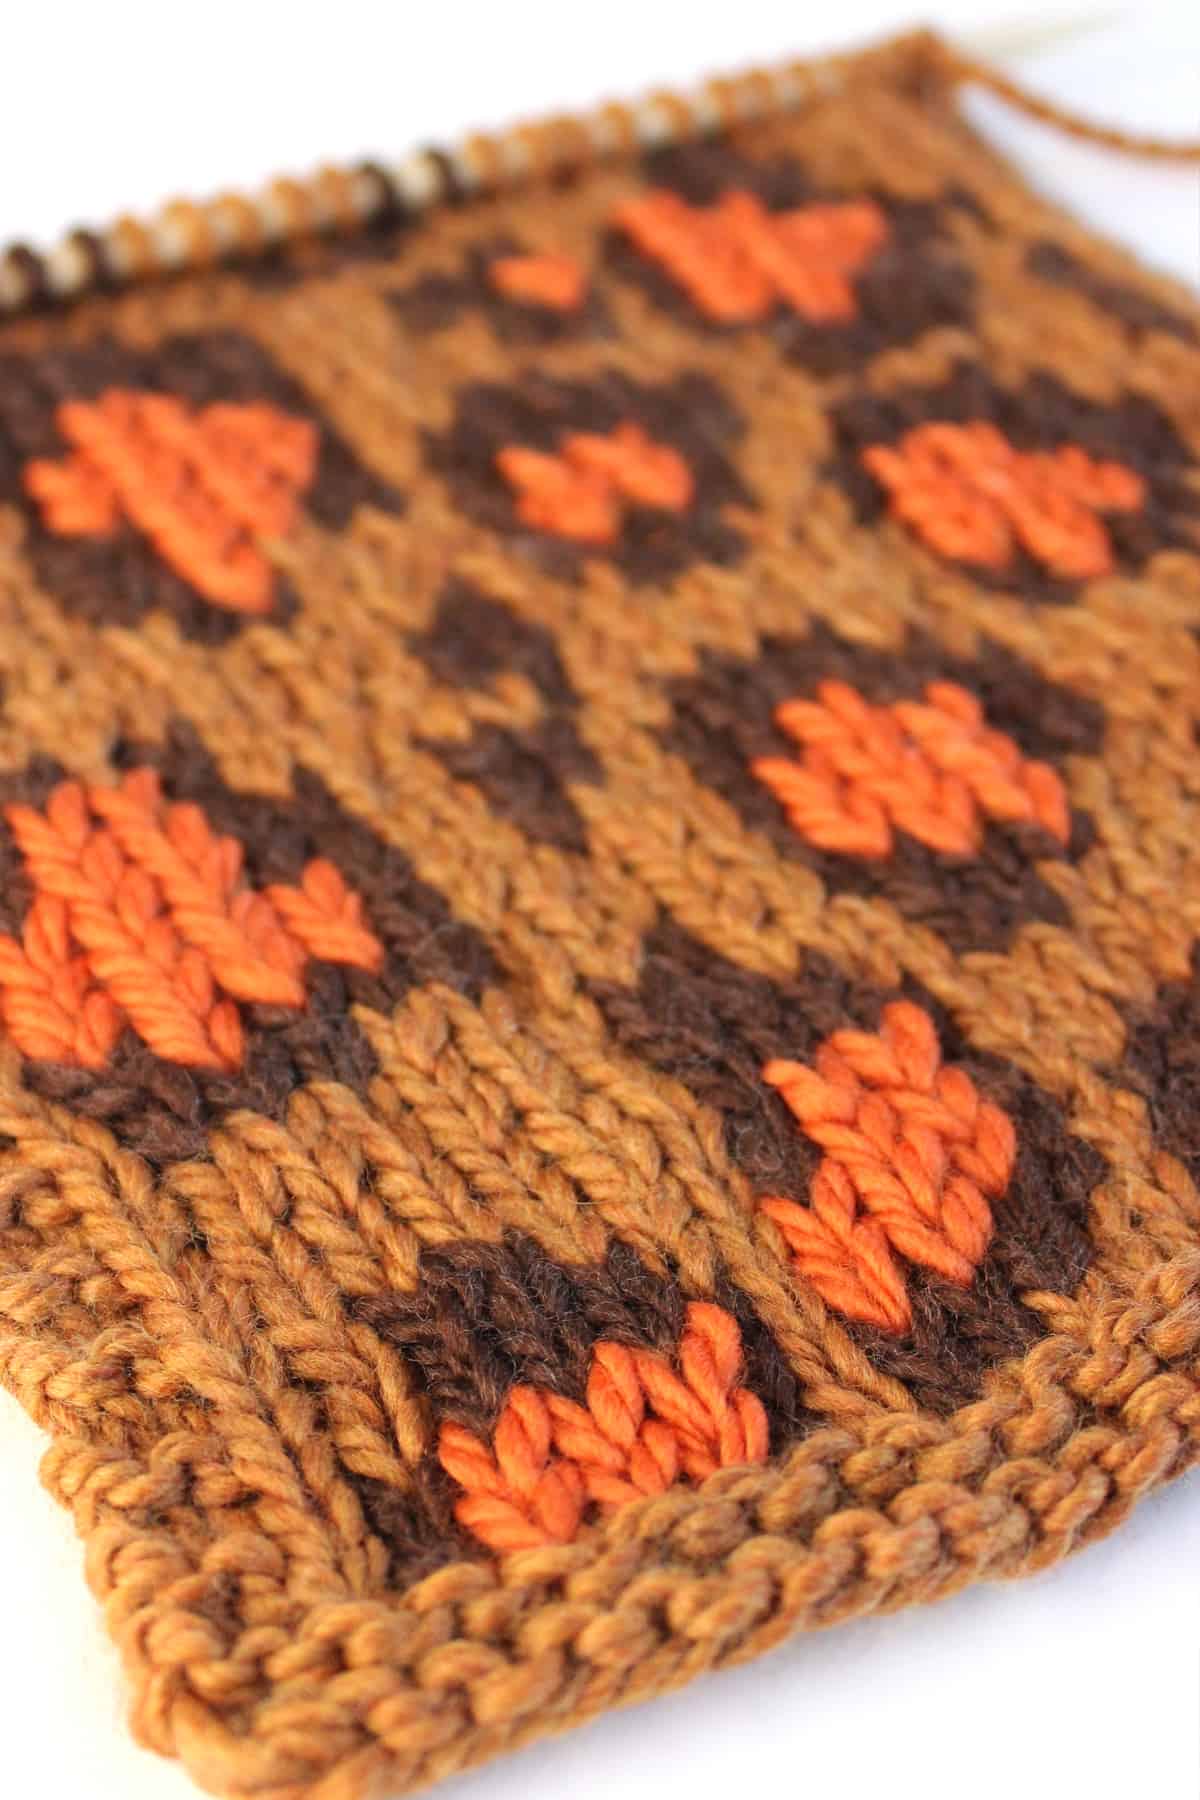
This squared stitch pattern is a 24-stitch 32-row repeat. You can give it a try as just one swatch or use it within your knitting designs. You will find the complete printable written pattern, along with knitting charts, below.
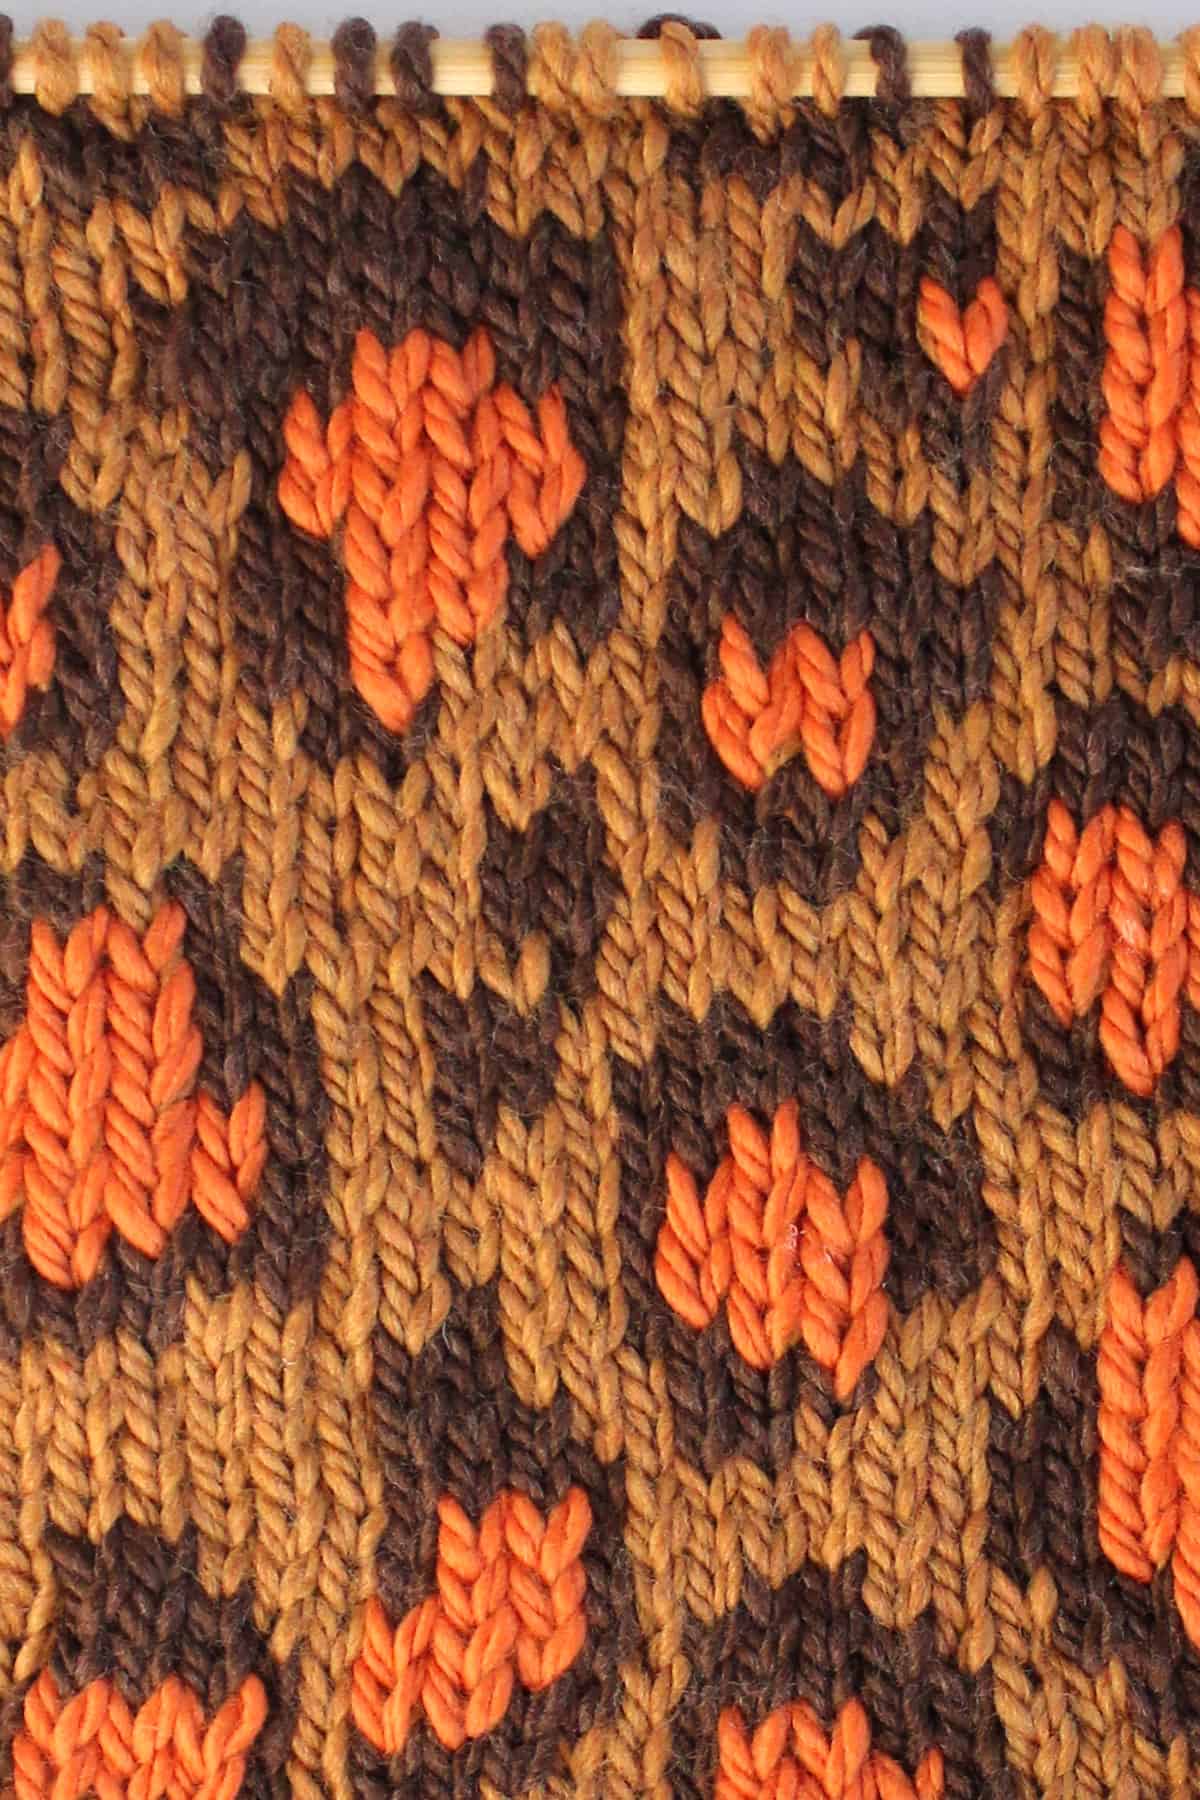
To create the leopard animal print, we begin by knitting with two different yarn colors. You may stop here, or add a third color by using the duplicate stitch technique.
Please feel free to get creative with your color combinations! Ever noticed how leopard print design adds a special flair? Those unique spots bring an exciting charm, creating a wild yet elegant look.
Knitting Pattern Chart
The printable written pattern, along with the knitting chart, is found further below in this post. I enjoy knitting from a chart with colorwork, rather than following the intricate knitting instructions. Both the 2-Color and 3-Color versions are provided to you, whichever way you prefer to knit.

Duplicate Stitch Technique
Duplicate stitch is a technique used in knitting colorwork to add additional details or to correct mistakes after the fabric has been knitted. It involves embroidering over existing stitches with a tapestry needle and yarn. Here’s a short description of how to perform duplicate stitch on stockinette stitch:
- Thread the Needle: Start by threading a tapestry needle with the yarn you want to use for the duplicate stitches. Make sure the yarn is of similar weight to the yarn used in the knitted fabric.
- Anchor the Yarn: Begin at the bottom of the stitch you want to duplicate, on the wrong side of the fabric. Leave a small tail of yarn to weave in later.
- Follow the Path: Insert the needle under both loops of the V-shaped stitch you want to duplicate, from bottom to top, making sure not to split the yarn. Pull the needle through gently until the yarn tail is secured.
- Create the Duplicate Stitch: Now, insert the needle back into the same hole you came out of, but this time, go over the top of the existing stitch. Pull the yarn through, creating a loop on the surface of the fabric.
- Continue Stitching: Repeat this process for each stitch you want to duplicate. Keep the tension consistent with the surrounding stitches to maintain an even appearance.
- Finish Off: Once you’ve duplicated all desired stitches, weave in the yarn tail on the wrong side of the fabric to secure it. Trim any excess yarn.
- Secure the Ends: If you’re working on a color change or finishing off the yarn, weave in the ends neatly on the wrong side of the fabric to ensure they’re secure and don’t unravel over time.
Watch Video Tutorial
Is this Colorwork Stitch Reversible?
No, this is not a reversible pattern. As you can see, the right side of the work displays the animal print design, although your yarn floats are carried on the wrong (back) side.
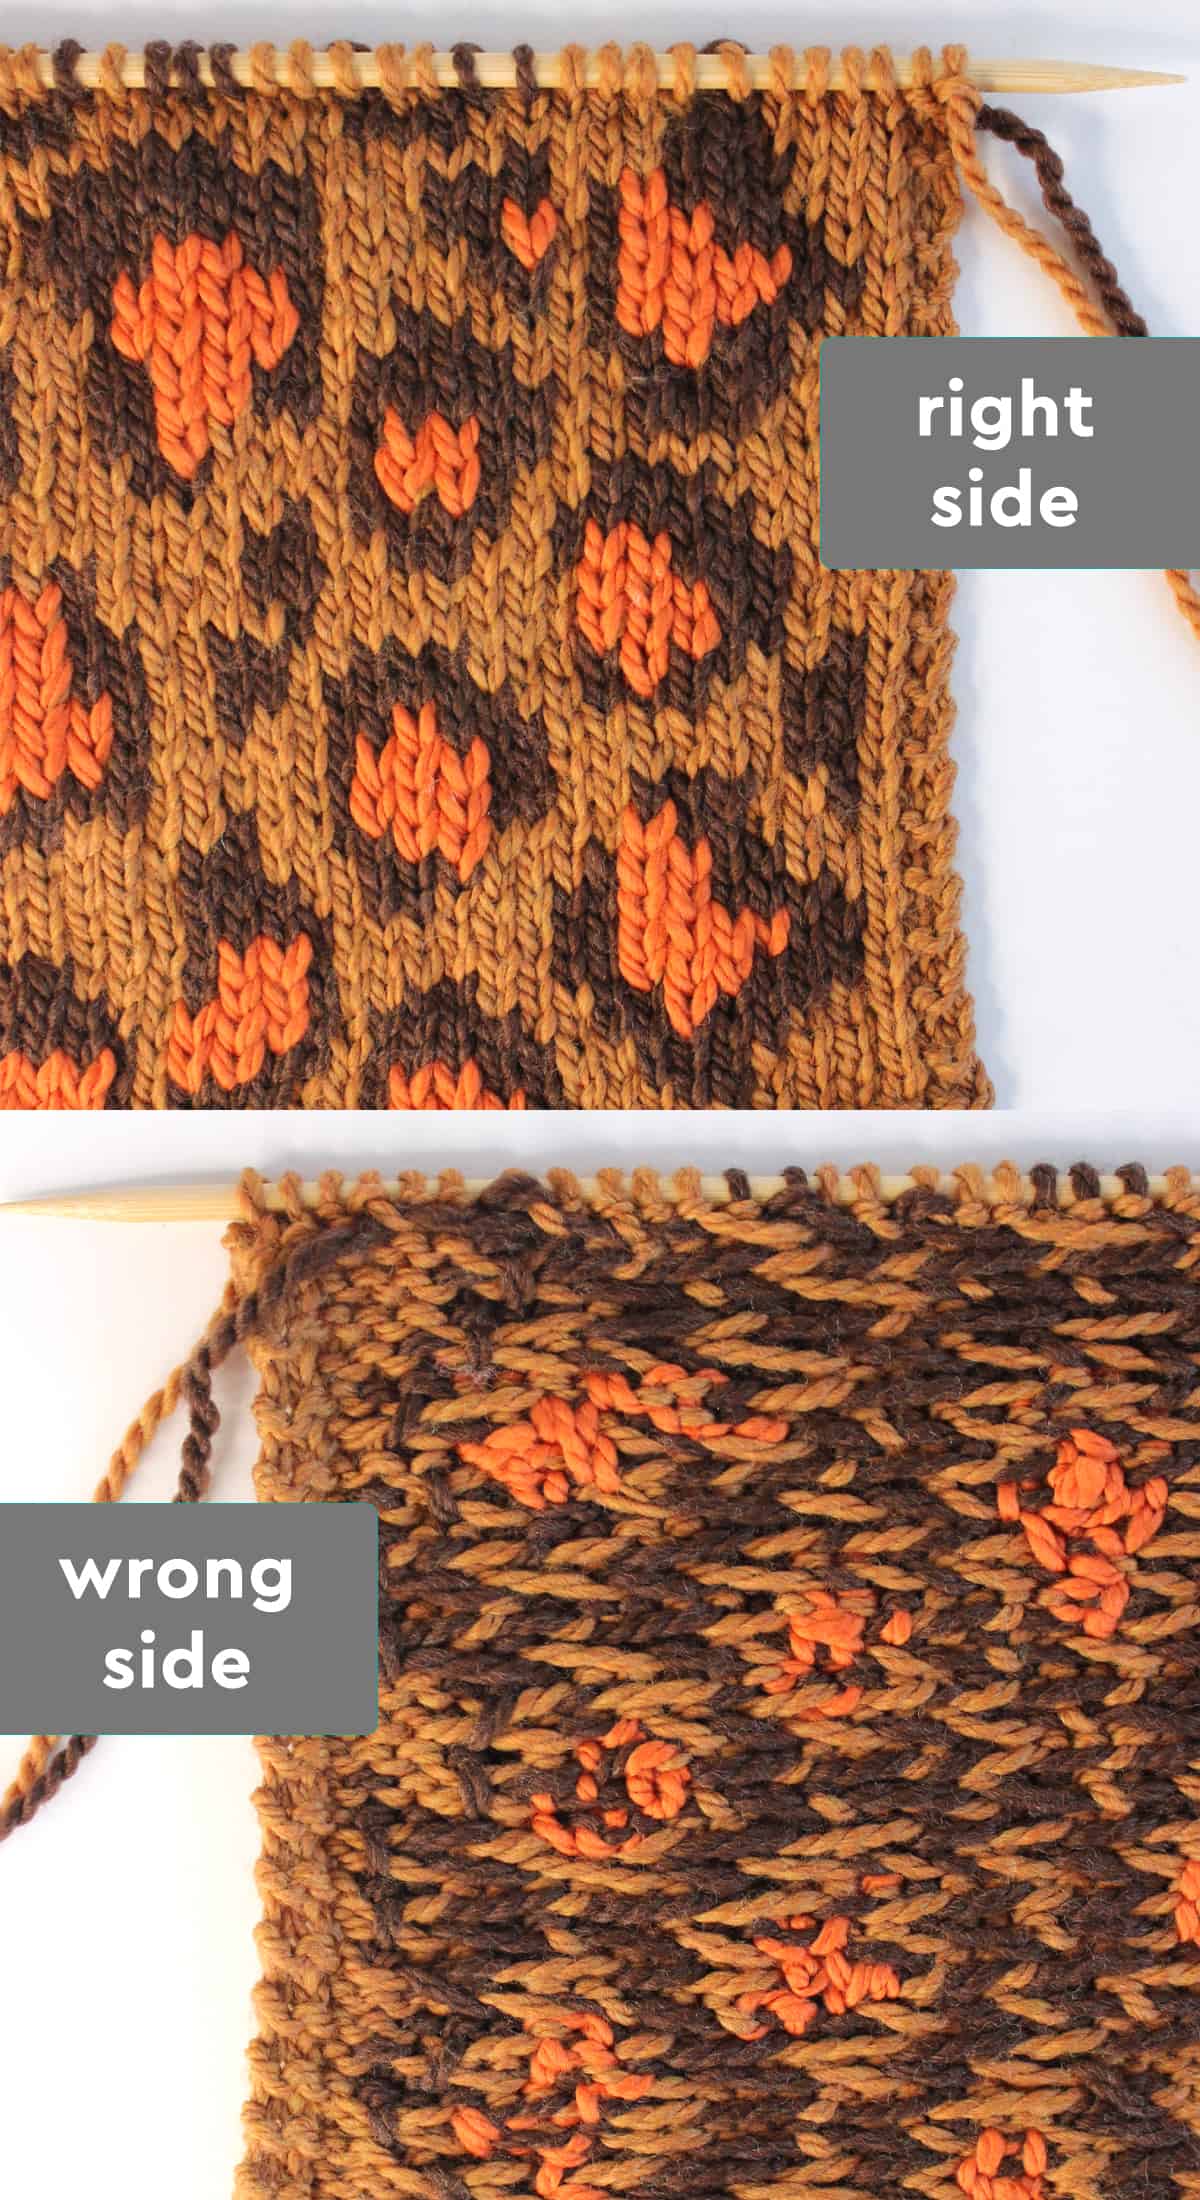
How to carry yarn floats?
Colorwork knitting with two or more colors requires carrying your yarn in the back of your work. Doing so also creates a thicker swatch of fabric.
Think of yarn floats as the threads that bridge the gaps between your colorful stitches. They’re what allow you to create those lovely patterns, intricate motifs, and beautiful fair isle designs without drowning in a tangle of yarn.
I recommend catching your floats every fourth stitch for this pattern. This technique is new to you, make sure to watch my detailed video tutorial Catch Floats on my YouTube channel.
Does this stitch curl or lay flat?
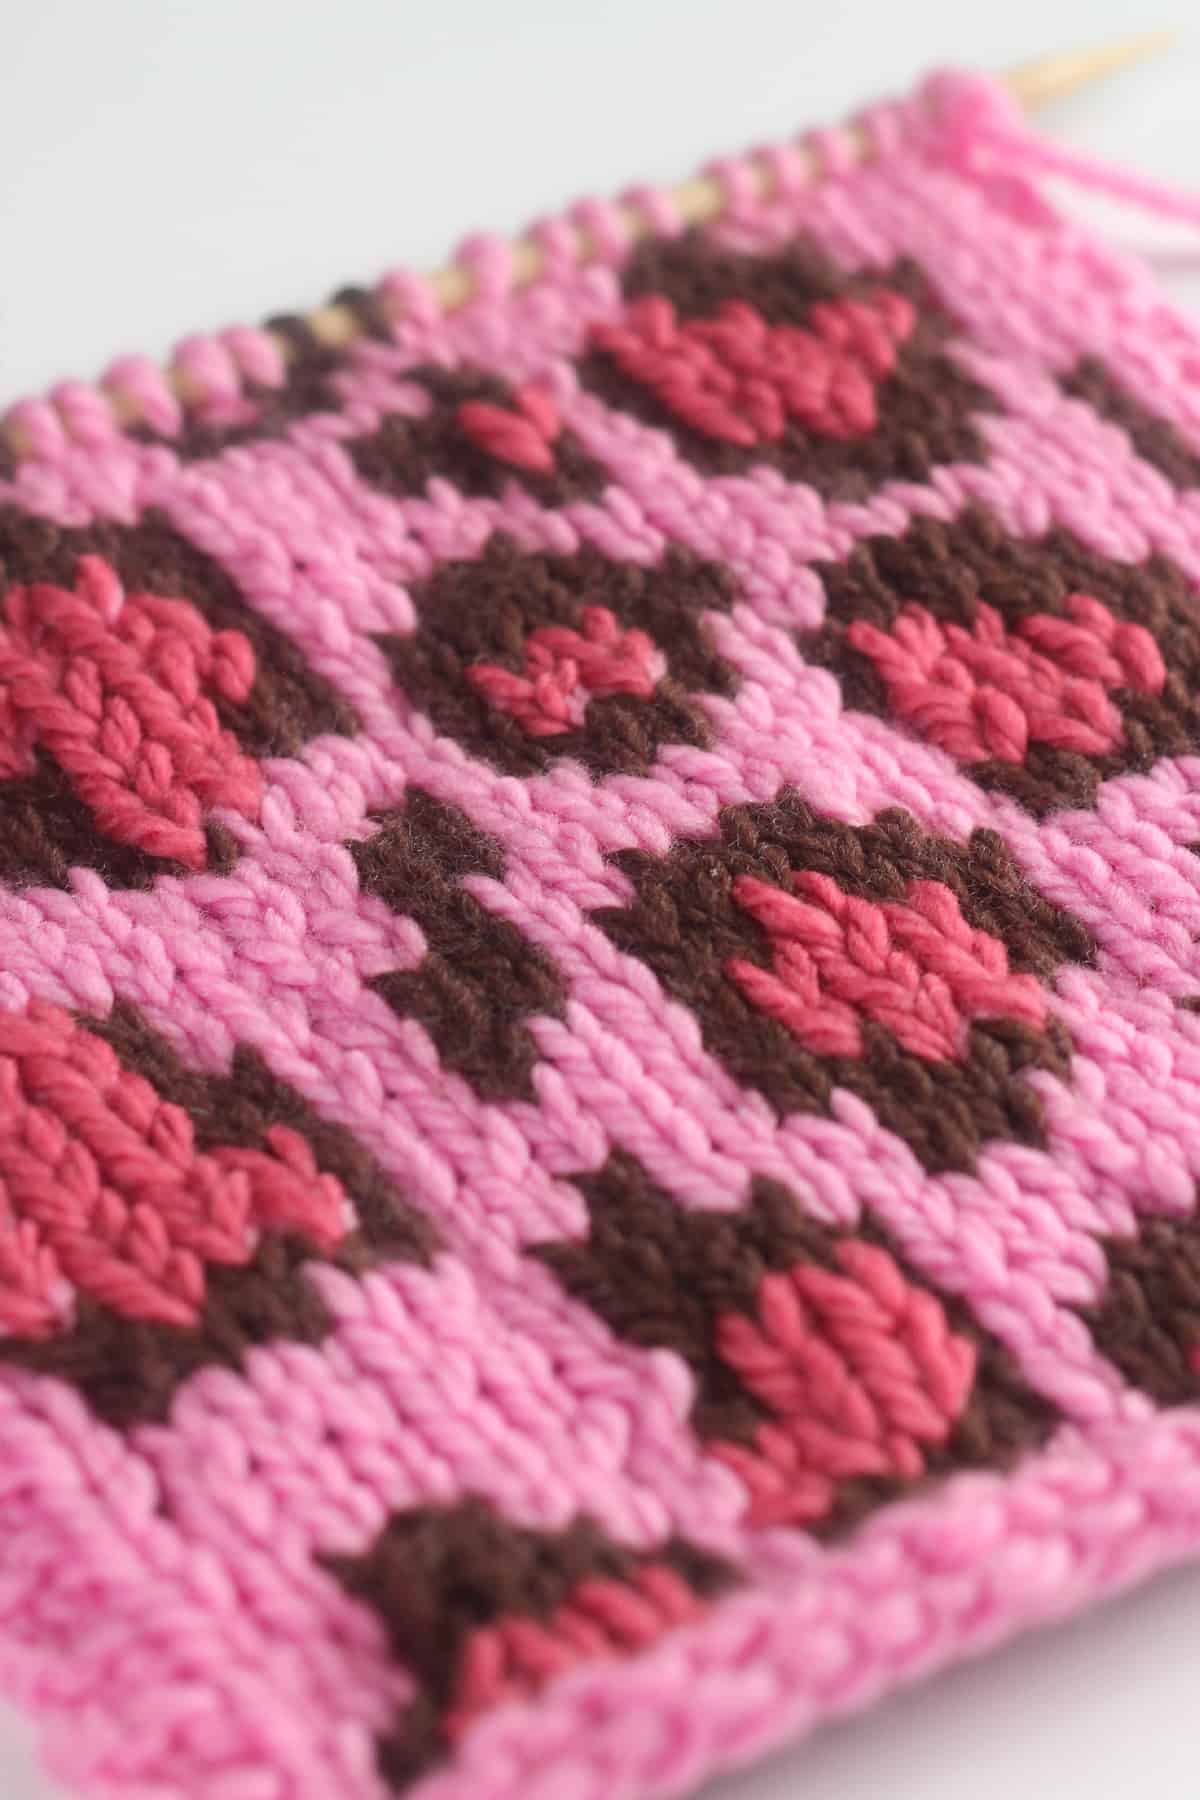
Because of the texture created with the Stockinette Stitch your piece will likely tend to curl within itself on the edges. It is recommended to add garter stitch borers and lightly wet-block your work for the best results.
Can this stitch be knit in the round on circular needles?
Yes, with a simple adjustment to the even-numbered rows, this leopard print design includes written instructions to knit it in the round. Try it out with either circular or double-pointed needles.
Knitting Techniques
For this colorwork design, we are using the following knitting techniques and abbreviations:
- RS = Right Side (front of work)
- WS = Wrong Side (back of work)
- MC = Main Color
- CC = Contrasting Color
- Long Tail Cast On
- K = Knit Stitch
- P = Purl Stitch
- St/Sts = Stitch/Stitches
- BO = Bind Off
- Weave-in Yarn Ends
Printable Knitting Instructions
Printable Knitting Pattern
This Leopard Print Knit Stitch Pattern, inspired by the untamed beauty of the jungle, uses either two or more yarn colors.
Materials
- 2 or 3 colors of Yarn - Any Gauge
Tools
- Knitting Needles - Appropriate Size for Yarn
- Tapestry Needle
- Scissors
Instructions
FLAT ON STRAIGHT NEEDLES
Cast On in Multiples of 24
← Row 1 [Right Side]: K8 (MC), K1 (CC), K3 (MC), K1 (CC), K3 (MC), K2 (CC), K1 (MC), K1 (CC), K3 (MC), K1 (CC)
→ Row 2 [Wrong Side]: P1 (CC), P3 (MC), P1 (CC), P1 (MC), P3 (CC), P2 (MC), P1 (CC), P2 (MC), P2 (CC), P3 (MC), P2 (CC), P3 (MC)
← Row 3 [RS]: K3 (MC), K3 (CC), K2 (MC), K5 (CC), K1 (MC), K2 (CC), K3 (MC), K4 (CC), K1 (MC)
→ Row 4 [WS]: P1 (MC), P3 (CC), P5 (MC), P1 (CC), P1 (MC), P4 (CC), P2 (MC), P5 (CC), P2 (MC)
← Row 5 [RS]: K1 (MC), K3 (CC), K1 (MC), K2 (CC), K3 (MC), K2 (CC), K2 (MC), K1 (CC), K2 (MC), K1 (CC), K3 (MC), K2 (CC), K1 (MC)
→ Row 6 [WS]: P6 (MC), P1 (CC), P2 (MC), P1 (CC), P6 (MC), P2 (CC), P3 (MC), P3 (CC)
← Row 7 [RS]: K2 (CC), K4 (MC), K2 (CC), K6 (MC), K4 (CC), K6 (MC)
→ Row 8 [WS]: P6 (MC), P3 (CC), P2 (MC), P2 (CC), P3 (MC), P2 (CC), P2 (MC), P3 (CC), P6 (MC)
← Row 9 [RS]: K2 (MC), K2 (CC), K2 (MC), K1 (CC), K3 (MC), K3 (CC), K3 (MC), K2 (CC), K6 (MC)
→ Row 10 [WS]: P3 (CC), P4 (MC), P1 (CC), P2 (MC), P2 (CC), P7 (MC), P2 (CC), P3 (MC)
← Row 11 [RS]: K1 (CC), K2 (MC), K3 (CC), K2 (MC), K2 (CC), K3 (MC), K1 (CC), K5 (MC), K3 (CC), K1 (MC), K1 (CC)
→ Row 12 [WS]: P4 (MC), P1 (CC), P5 (MC), P1 (CC), P3 (MC), P2 (CC), P6 (MC), P2 (CC)
← Row 13 [RS]: K2 (CC), K6 (MC), K3 (CC), K1 (MC), K2 (CC), K2 (MC), K1 (CC), K2 (MC), K1 (CC), K4 (MC)
→ Row 14 [WS]: P3 (MC), P2 (CC), P2 (MC), P2 (CC), P1 (MC), P5 (CC), P2 (MC), P3 (CC), P2 (MC), P2 (CC)
← Row 15 [RS]: K1 (CC), K2 (MC), K2 (CC), K1 (MC), K1 (CC), K3 (MC), K3 (CC), K2 (MC), K2 (CC), K2 (MC), K2 (CC), K2 (MC), K2 (CC)
→ Row 16 [WS]: P1 (CC), P2 (MC), P1 (CC), P4 (MC), P1 (CC), P11 (MC), P2 (CC)
← Row 17 [RS]: K2 (MC), K2 (CC), K10 (MC), K2 (CC), K4 (MC), K1 (CC), K1 (MC), K2 (CC)
→ Row 18 [WS]: P8 (MC), P2 (CC), P2 (MC), P2 (CC), P2 (MC), P1 (CC), P2 (MC), P3 (CC), P2 (MC)
← Row 19 [RS]: K3 (MC), K5 (CC), K1 (MC), K4 (CC), K1 (MC), K1 (CC), K9 (MC)
→ Row 20 [WS]: P2 (CC), P3 (MC), P2 (CC), P4 (MC), P1 (CC), P2 (MC), P1 (CC), P2 (MC), P3 (CC), P3 (MC), P2 (CC)
← Row 21 [RS]: K1 (CC), K7 (MC), K2 (CC), K2 (MC), K1 (CC), K5 (MC), K2 (CC), K2 (MC), K1 (CC), K1 (MC)
→ Row 22 [WS]: P1 (MC), P1 (CC), P2 (MC), P2 (CC), P2 (MC), P2 (CC), P1 (MC), P5 (CC), P2 (MC), P3 (CC), P2 (MC), P1 (CC)
← Row 23 [RS]: K1 (CC), K1 (MC), K4 (CC), K3 (MC), K4 (CC), K1 (MC), K2 (CC), K2 (MC), K2 (CC), K2 (MC), K2 (CC)
→ Row 24 [WS]: P1 (CC), P3 (MC), P1 (CC), P4 (MC), P2 (CC), P2 (MC), P3 (CC), P2 (MC), P1 (CC), P2 (MC), P2 (CC)
← Row 25 [RS]: K1 (MC), K2 (CC), K3 (MC), K1 (CC), K1 (MC), K5 (CC), K1 (MC), K4
← Row 26 [WS]: P2 (MC), P4 (CC), P2 (MC), P2 (CC), P4 (MC), P2 (CC), P1 (MC), P1 (CC), P4 (MC), P1 (CC), P1 (MC)
→ Row 27 [RS]: K1 (MC), K3 (CC), K2 (MC), K1 (CC), K2 (MC), K2 (CC), K3 (MC), K8 (CC), K2 (MC)
← Row 28 [WS]: P3 (MC), P7 (CC), P3 (MC), P3 (CC), P1 (MC), P1 (CC), P3 (MC), P7 (CC), P3 (MC)
→ Row 29 [RS]: K2 (MC), K3 (CC), K3 (MC), K1 (CC), K7 (MC), K3 (CC), K5 (MC)
← Row 30 [WS]: P1 (MC), P3 (CC), P7 (MC), P3 (CC), P5 (MC), P3 (CC), P2 (MC)
→ Row 31 [RS]: K3 (MC), K1 (CC), K5 (MC), K2 (CC), K1 (MC), K7 (CC), K1 (MC), K2 (CC)
← Row 32 [WS]: P2 (CC), P3 (MC), P1 (CC), P6 (MC), P2 (CC), P6 (MC), P2 (CC), P8 (MC)
_____
IN-THE-ROUND ON CIRCULAR NEEDLES
Cast On in Multiples of 24
← Round 1 [Right Side]: K8 (MC), K1 (CC), K3 (MC), K1 (CC), K3 (MC), K2 (CC), K1 (MC), K1 (CC), K3 (MC), K1 (CC)
← Round 2: K3 (MC), K2 (CC), K3 (MC), K2 (CC), K2 (MC), K1 (CC), K2 (MC), K3 (CC), K1 (MC), K1 (CC), K3 (MC)
← Round 3: K3 (MC), K3 (CC), K2 (MC), K5 (CC), K1 (MC), K2 (CC), K3 (MC), K4 (CC), K1 (MC)
← Round 4: K2 (MC), K5 (CC), K2 (MC), K4 (CC), K1 (MC), K1 (CC), K5 (MC), K3 (CC), K1 (MC)
← Round 5: K1 (MC), K3 (CC), K1 (MC), K2 (CC), K3 (MC), K2 (CC), K2 (MC), K1 (CC), K2 (MC), K1 (CC), K3 (MC), K2 (CC), K1 (MC)
← Round 6: K3 (CC), K3 (MC), K2 (CC), K6 (MC), K1 (CC), K2 (MC), K6 (CC)
← Round 7: K2 (CC), K4 (MC), K2 (CC), K6 (MC), K4 (CC), K6 (MC)
← Round 8: K1 (MC), K3 (CC), K2 (MC), K2 (CC), K3 (MC), K2 (CC), K2 (MC), K3 (CC), K6 (MC)
← Round 9: K2 (MC), K2 (CC), K2 (MC), K1 (CC), K3 (MC), K3 (CC), K3 (MC), K2 (CC), K6 (MC)
← Round 10: K3 (MC), K2 (CC), K7 (MC), K2 (CC), K2 (MC), K1 (CC), K4 (MC), K3 (CC)
← Round 11: K1 (CC), K2 (MC), K3 (CC), K2 (MC), K2 (CC), K3 (MC), K1 (CC), K5 (MC), K3 (CC), K1 (MC), K1 (CC)
← Round 12: K2 (CC), K6 (MC), K2 (CC), K3 (MC), K1 (CC), K5 (MC), K1 (CC), K4 (MC)
← Round 13: K2 (CC), K6 (MC), K3 (CC), K1 (MC), K2 (CC), K2 (MC), K1 (CC), K2 (MC), K1 (CC), K4 (MC)
← Round 14: K2 (CC), K2 (MC), K3 (CC), K2 (MC), K5 (CC), K1 (MC), K2 (CC), K2 (MC), K2 (CC), K3 (MC)
← Round 15: K1 (CC), K2 (MC), K2 (CC), K1 (MC), K1 (CC), K3 (MC), K3 (CC), K2 (MC), K2 (CC), K2 (MC), K2 (CC), K2 (MC), K1 (CC)
← Round 16: K2 (MC), K2 (CC), K11 (MC), K1 (CC), K4 (MC), K1 (CC), K2 (MC), K1 (CC)
← Round 17: K2 (MC), K2 (CC), K10 (MC), K2 (CC), K4 (MC), K1 (CC), K1 (MC), K2 (CC)
← Round 18: K2 (MC), K3 (CC), K2 (MC), K1 (CC), K2 (MC), K2 (CC), K2 (MC), K2 (CC), K8 (MC)
← Round 19: K3 (MC), K5 (CC), K1 (MC), K4 (CC), K1 (MC), K1 (CC), K9 (MC)
← Round 20: K1 (CC), K3 (MC), K3 (CC), K2 (MC), K1 (CC), K2 (MC), K1 (CC), K4 (MC), K2 (CC), K3 (MC), K2 (CC)
← Round 21: K1 (CC), K7 (MC), K2 (CC), K2 (MC), K1 (CC), K5 (MC), K2 (CC), K2 (MC), K1 (CC), K1 (MC)
← Round 22: K1 (CC), K2 (MC), K3 (CC), K2 (MC), K5 (CC), K1 (MC), K2 (CC), K2 (MC), K2 (CC), K2 (MC), K1 (CC), K1 (MC)
← Round 23: K1 (CC), K1 (MC), K4 (CC), K3 (MC), K4 (CC), K1 (MC), K2 (CC), K2 (MC), K2 (CC), K2 (MC), K2 (CC)
← Round 24: K2 (MC), K2 (CC), K1 (MC), K2 (CC), K3 (MC), K2 (CC), K2 (MC), K1 (CC), K4 (MC), K1 (CC), K3 (MC), K1 (CC)
← Round 25: K1 (MC), K2 (CC), K3 (MC), K1 (CC), K1 (MC), K1 (CC), K5 (MC), K1 (CC), K4 (MC), K2 (CC), K2 (MC), K1 (CC)
← Round 26: K1 (MC), K1 (CC), K4 (MC), K1 (CC), K1 (MC), K2 (CC), K4 (MC), K2 (CC), K2 (MC), K4 (CC), K2 (MC)
← Round 27: K1 (MC), K3 (CC), K2 (MC), K1 (CC), K2 (MC), K2 (CC), K3 (MC), K8 (CC), K2 (MC)
← Round 28: K2 (MC), K3 (CC), K1 (MC), K1 (CC), K1 (MC), K3 (CC), K3 (MC), K7 (CC), K3 (MC)
← Round 29: K2 (MC), K3 (CC), K3 (MC), K1 (CC), K7 (MC), K3 (CC), K5 (MC)
← Round 30: K3 (MC), K2 (CC), K5 (MC), K3 (CC), K7 (MC), K3 (CC), K1 (MC)
← Round 31: K3 (MC), K1 (CC), K5 (MC), K2 (CC), K1 (MC), K1 (CC), K7 (MC), K1 (CC), K1 (MC), K2 (CC)
← Round 32: K8 (MC), K2 (CC), K6 (MC), K2 (CC), K1 (MC), K1 (CC), K3 (MC), K1 (CC)
_____
KNITTING CHARTS
Two-Color Knitting:
Third Color Added with Duplicate Stitch:

Notes
Repeat Pattern between * *
Repeat Rows 1 – 32 until your piece is the length you desire and then Bind Off.
Non-Reversible Knit Stitch Pattern.
_____
KNITTING TECHNIQUES AND ABBREVIATIONS

Kristen McDonnell
Author • Designer • Teacher
Kristen from StudioKnit LLC produces knitting video lessons and pattern designs from her vibrant production studio on Half Moon Bay’s California coast.
Kristen McDonnell is the author of the highly acclaimed book Knit Stitch: 50 Knit + Purl Patterns featuring vintage and unique designs.