Tree of Life Wreath Knitting Pattern (Step-by-Step Tutorial)

This Tree of Life Wreath design is rooted in ancient Celtic-inspired symbolism and are often associated with connection, renewal, and home. I created this knitted version as a handmade welcome for my new studio in Moss Beach, using knitting and nature-inspired details.

Table of Contents
While walking through my neighborhood forest, surrounded by coastal cypress trees draped with moss and overlooking the cliffs above the crashing waves, I realized I wanted to bring this symbol to life through knitting. I love adding something handmade and welcoming for the door of my new studio.
Below I share my materials list, knitting instructions, and step-by-step crafting process so you can make your own Tree of Life wreath.

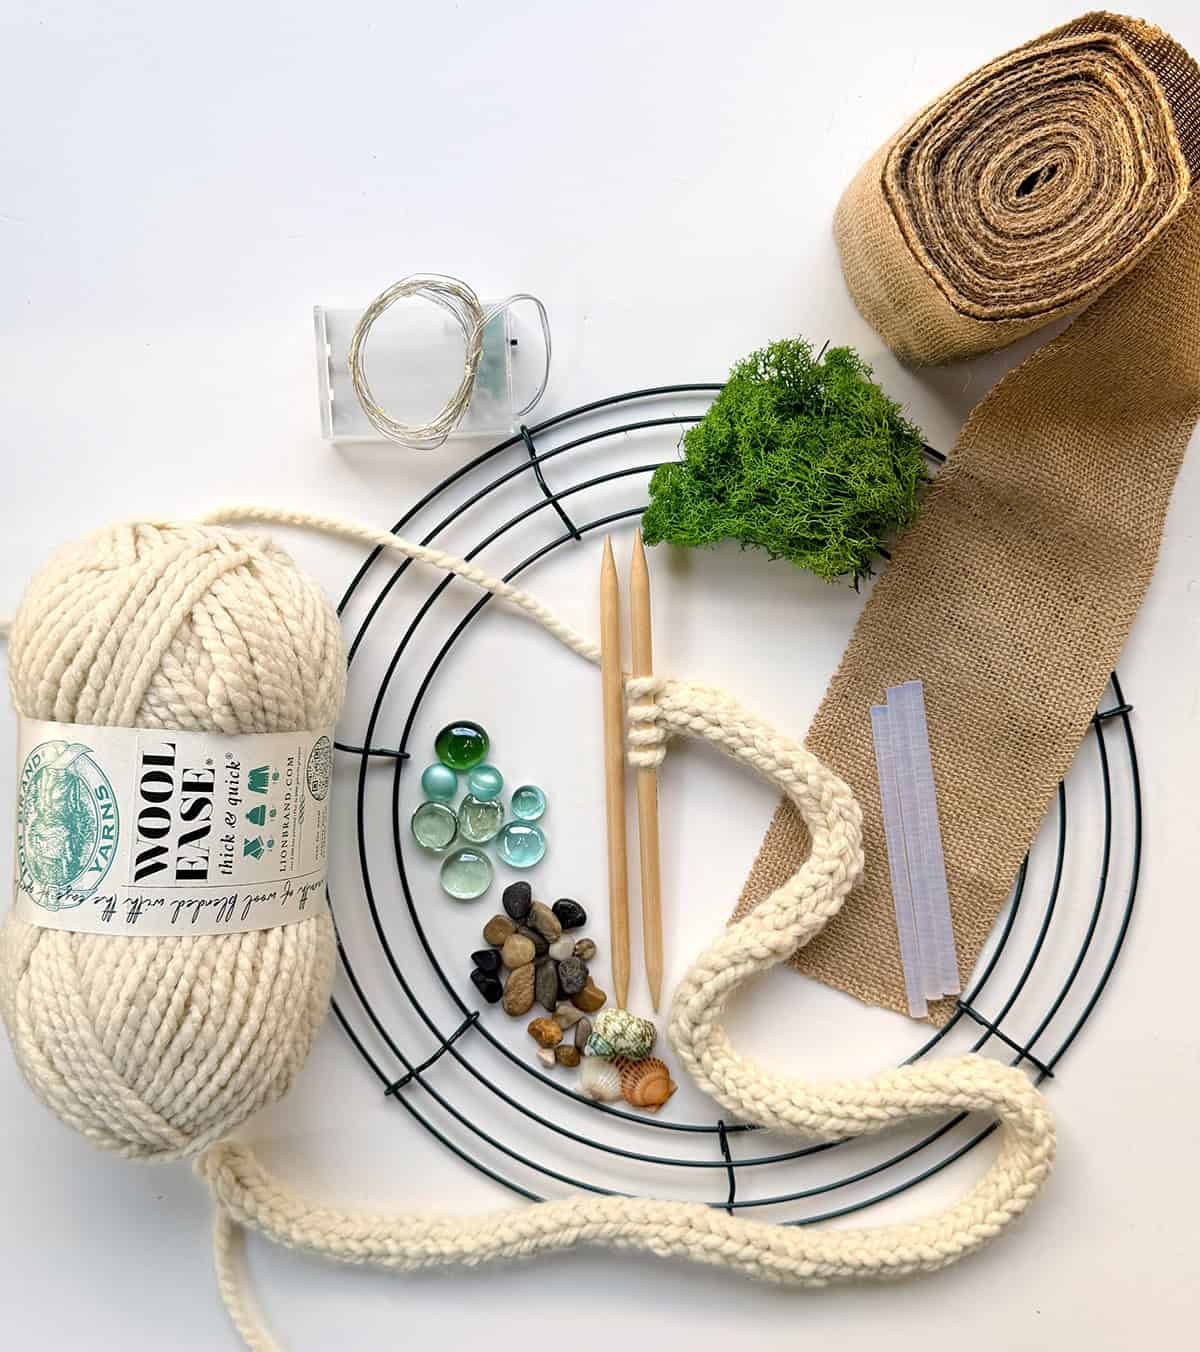
Craft Supplies
Shop my favorite Tree of Life Wreath supplies on Amazon.
As an Amazon Associate, I earn from qualifying purchases.
Materials
- 14 Inch Wire Wreath Frame
- Lion Brand Yarn – Wool-Ease Thick & Quick
- Jute Twine Rope, Heavy Duty 100 Feet 5mm
- Preserved Reindeer Moss – Natural Green
- Natural Burlap Fabric Roll (Jute Ribbon)
- Fairy Lights Battery Operated – LED String Lights with Timer
- AA Batteries (3)
- Mix Green Gem Value Pack By Ashland
- 18 Gauge Floral Wire
- Natural Sea Shells
- Wreath Hanger (Adjustable)
Tools
Why I Chose the Tree of Life
With St. Patrick’s Day coming up, it felt like the perfect time to create my own Tree of Life wreath.
This symbol already holds personal meaning for me. I knitted a Tree of Life wedding ring pillow for our ceremony, so bringing it into my new studio space feels like a full-circle moment.
One of my favorite things about Tree of Life wreaths is how easy they are to customize. You can add little swings hanging from branches, tuck in fairy figurines, or even include a tiny pet for personality. How would you customize yours?
Knitting Instructions
Knitted I-Cord (Tree Trunk + Branches)
The knitted I-cord is admittedly the most time-consuming part of this project, so I recommend starting here first. Once this is finished, the rest of the wreath comes together quickly.
You’ll be knitting a lot of I-cord for this design. The total length comes out to about 55 feet, which is roughly the length of a school bus. It sounds like a lot (because it is!), but once you get into the rhythm, it becomes a relaxing, repetitive knit. If you also enjoy knitting these up, see all of my I-Cord Knitting Projects, too!
If you’re not a knitter, you can substitute a thick rope or cord instead. Look for something flexible that’s about the same thickness as bulky yarn.
Yarn Used
- Lion Brand Yarn – Wool-Ease Thick & Quick
- Amount used: 92.5 g (approximately 90 yards)
- About 85% of one ball
Needles
How to Knit the I-Cord
Here is how to knit your i-cord:
- Using the Long Tail Cast On, cast on 4 stitches.
- Knit a standard 4-stitch I-cord, continuing until you reach approximately 658 inches (55 feet) total length.
- Bind off loosely.
I-Cord Video Tutorial
Attaching the I-Cord to the Wreath Frame
Once your I-cord is complete, take your wire wreath frame and tie one end of the I-cord securely to the frame.
Begin wrapping the I-cord around the frame with medium tension, covering just over half of the wreath. You want it snug but not tight. Wrapping too tightly will flatten the tubular shape of the I-cord and require more knitted length, while wrapping too loosely can cause the finished wreath to sag.
Use the vertical bars on the frame as reference points to guide placement evenly. I wrapped my knitted section approximately four-sevenths (4/7) around the base of the wreath.

Crafting Your Wreath
The jute twine adds structure and texture to the Tree of Life, creating the branches, trunk, and roots. This is where your wreath really starts to take shape, and it’s also the most creative part of the build. Feel free to adjust strand counts and thickness based on your own style.
Create the Branches
- Cut 21 strands of jute twine, each 30 inches long.
- Tie all 21 strands securely to the top of the wire wreath frame.
- Working at eight different points, gather 2–3 strands at a time (depending on how thick you’d like each branch) and begin twisting them together to form branches.
- Add 18-gauge floral wire alongside the twine as you twist. This gives the branches structure so you can bend and shape them later.
- Continue twisting the strands in different groupings to create a natural, branching look. Be creative with the number of branches and their placement.

Form the Trunk
Once your branches are shaped:
- Bring all remaining strands together to form the trunk.
- Cut the floral wire and cinch it tightly on the back side of the wreath frame to secure everything in place.
- Continue twisting the jute twine downward to build the trunk.
Secure the Roots
At the bottom of the wreath:
- Tie and hot glue most of the rope to the back of the lower frame for stability.
- Leave a few strands loose at the front. These will become the roots, which you’ll later unfurl and attach over the rocks during assembly.
- This grounding detail adds a beautiful finishing touch and reinforces the Tree of Life design.
Stone Placement + Above-Ground Roots
This step is all about grounding your Tree of Life and adding personality. There’s no exact formula here. I simply used a hot glue gun and placed stones, shells, and gems where they felt right.
Take your time and build this area slowly. Be careful with the heat and hot glue, especially when working near the rope and moss.
Once your base is set:
- Arrange your stones, shells, and gems at the base of the trunk until you like the composition.
- Hot glue each piece in place, working in small sections.
After your base is secure, bring in the roots.
Take the loose jute strands you saved from the trunk and glue them individually over the stones. Let them unfurl naturally as they spread outward. This adds a whimsical 3-D touch and really brings the Tree of Life to life.
Feel free to overlap strands, vary directions, and layer pieces. This organic approach makes every wreath unique.
Natural Burlap Base
Wrap the natural burlap fabric roll around the top of the wreath frame, weaving it between the branches. This creates a simple base layer where you can hot glue the fairy lights and moss so everything has something to grip.

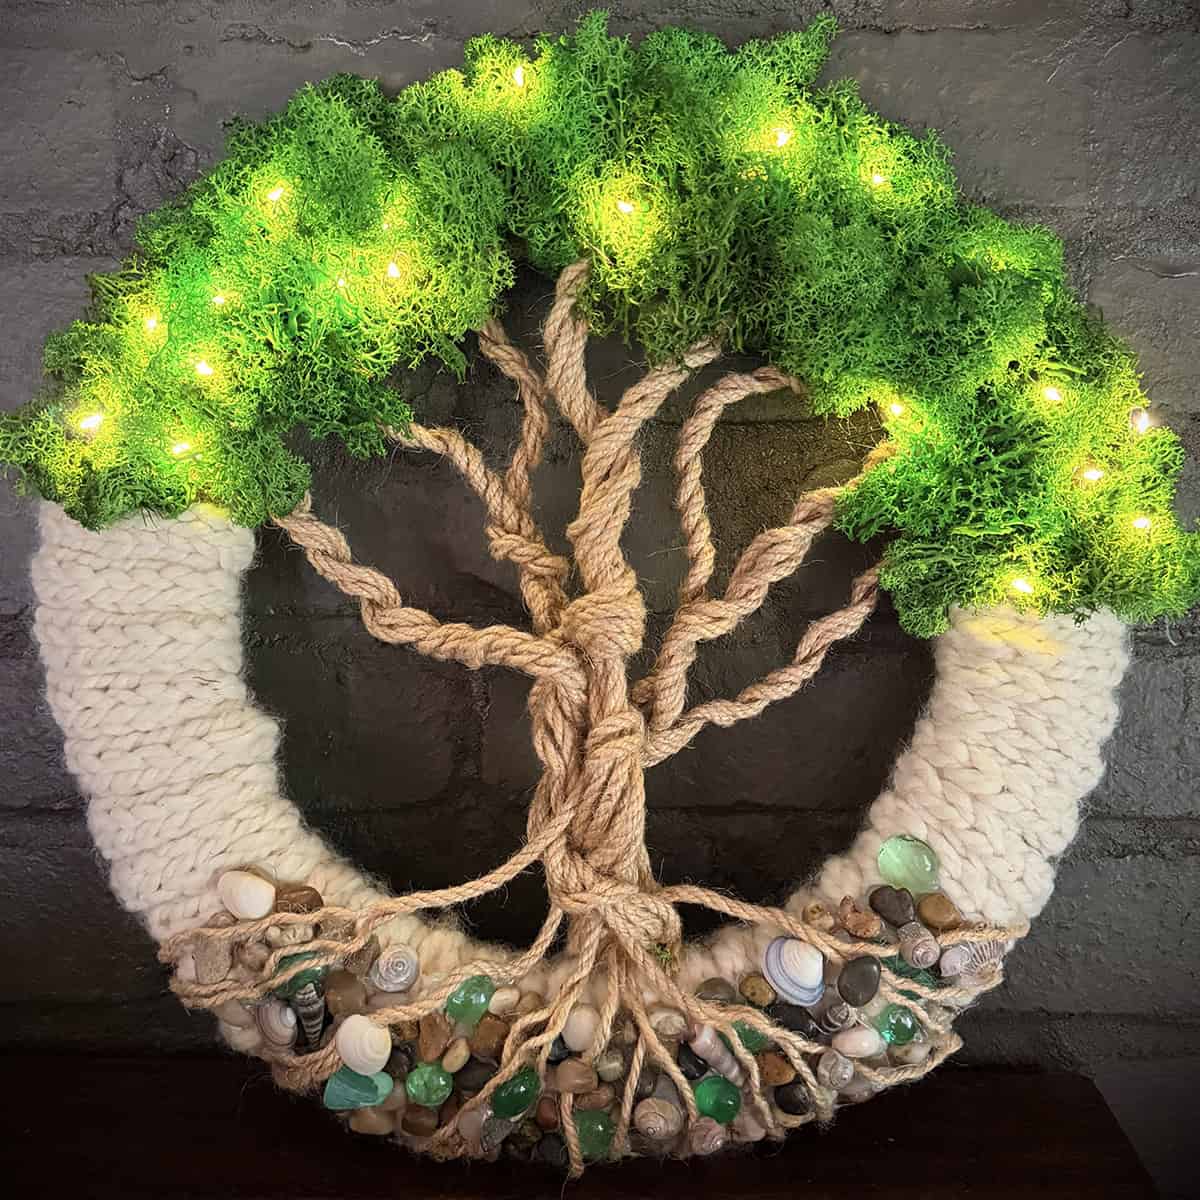
Fairy Light Placement
The fairy lights add a soft glow that really brings the Tree of Life to life, especially in the evening.
I used one pack of battery-operated fairy lights powered by 3 AA batteries. The set I chose includes a built-in timer that automatically turns the lights on for 6 hours and off for 18, which is such a nice touch. There’s something special about coming home and seeing the wreath already glowing on the door.
Before adding any moss, begin placing your lights:
- Arrange the silver wire along the branches and around the tree shape.
- Hot glue the wire down in a few spots to keep everything in place.
- Gently bend the individual lights upward so they peek out from the branches.
This part doesn’t have to look perfect. It’s totally fine if it feels a little sloppy at this stage. The moss will cover the wiring later, leaving just the lights visible.
Once the lights are secured and positioned how you like, you’re ready to move on to moss placement.
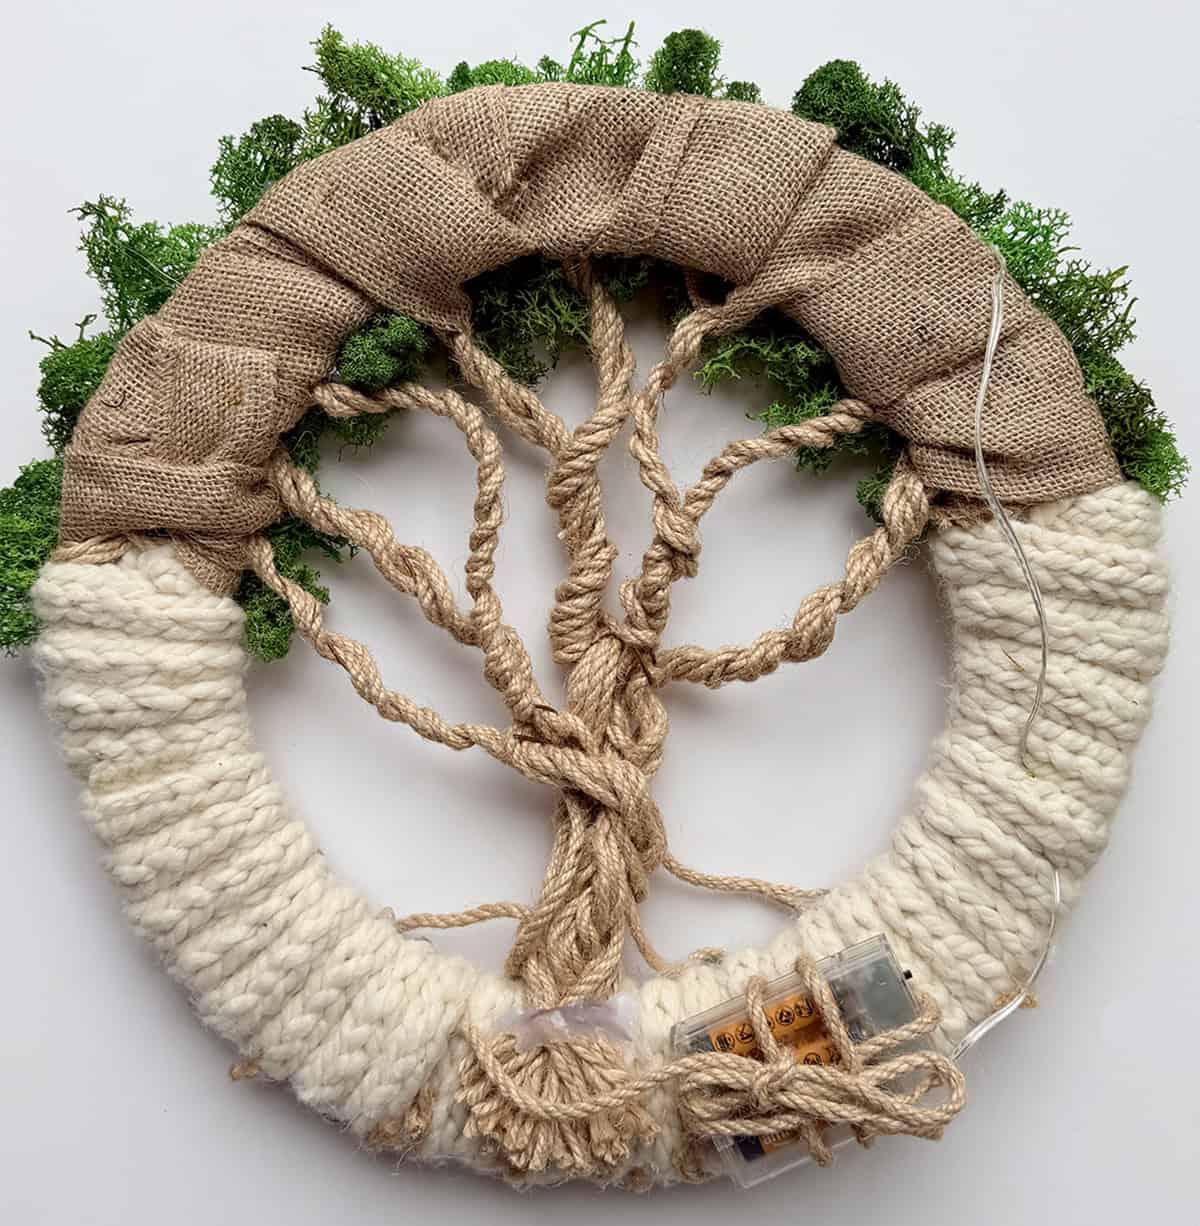
Secure the Battery Pack
Flip your wreath over to the back. Position the battery pack near the bottom of the wreath so it’s easy to reach when changing batteries.
Using short pieces of jute twine, gently weave the twine through the knitted i-cords and around the battery pack, tying it snugly in place. I like threading the twine through the natural gaps in the i-cord and wreath frame so everything stays secure without needing glue.
Once tied, tuck any extra twine ends into the back of the wreath. This keeps the battery pack hidden from the front while still allowing easy access.
Make sure the on/off switch and timer button remain reachable. You’ll thank yourself later.
Add the Moss (Tree Foliage)
Now it’s time to give your Tree of Life its leafy canopy. I used Preserved Reindeer Moss to create the tree foliage along the top of the wreath.
Using your hot glue gun, begin attaching small clusters of moss around the upper curve of the wreath and throughout the branches. Build it up gradually, filling in gaps and shaping the moss into a soft, rounded tree form. As you go, keep the fairy lights peeking above the moss so they remain visible and glowing through the greenery.
Press gently as you glue so everything settles naturally around the branches and lights.
A quick heads-up: this moss definitely dyed my fingers green. Consider wearing gloves unless you’d like temporarily festive hands.
It also has a strong earthy scent, so keep that in mind when choosing where to display your wreath. Between the natural odor and the dye, an outdoor covered area (like a porch or protected entryway) may be the perfect spot.
Once the moss is in place, your Tree of Life really starts to feel alive.
Final Shaping + Care
Take a moment to gently bend and shape the branches until your Tree of Life wreath feels balanced and natural. Adjust the lights, moss, and roots as needed, and trim any stray fibers.
For hanging, I’m using an adjustable front door wreath hanger. I like that I can change the height from 15 to 25 inches so the wreath sits just where I want it, and it feels sturdy enough to support the finished piece. Being able to adjust the placement makes a big difference once the lights are on.
For care, display your wreath in a covered outdoor area or protected entryway. Since the moss is preserved, it doesn’t need watering. Avoid direct rain or harsh sun to help keep everything looking its best.
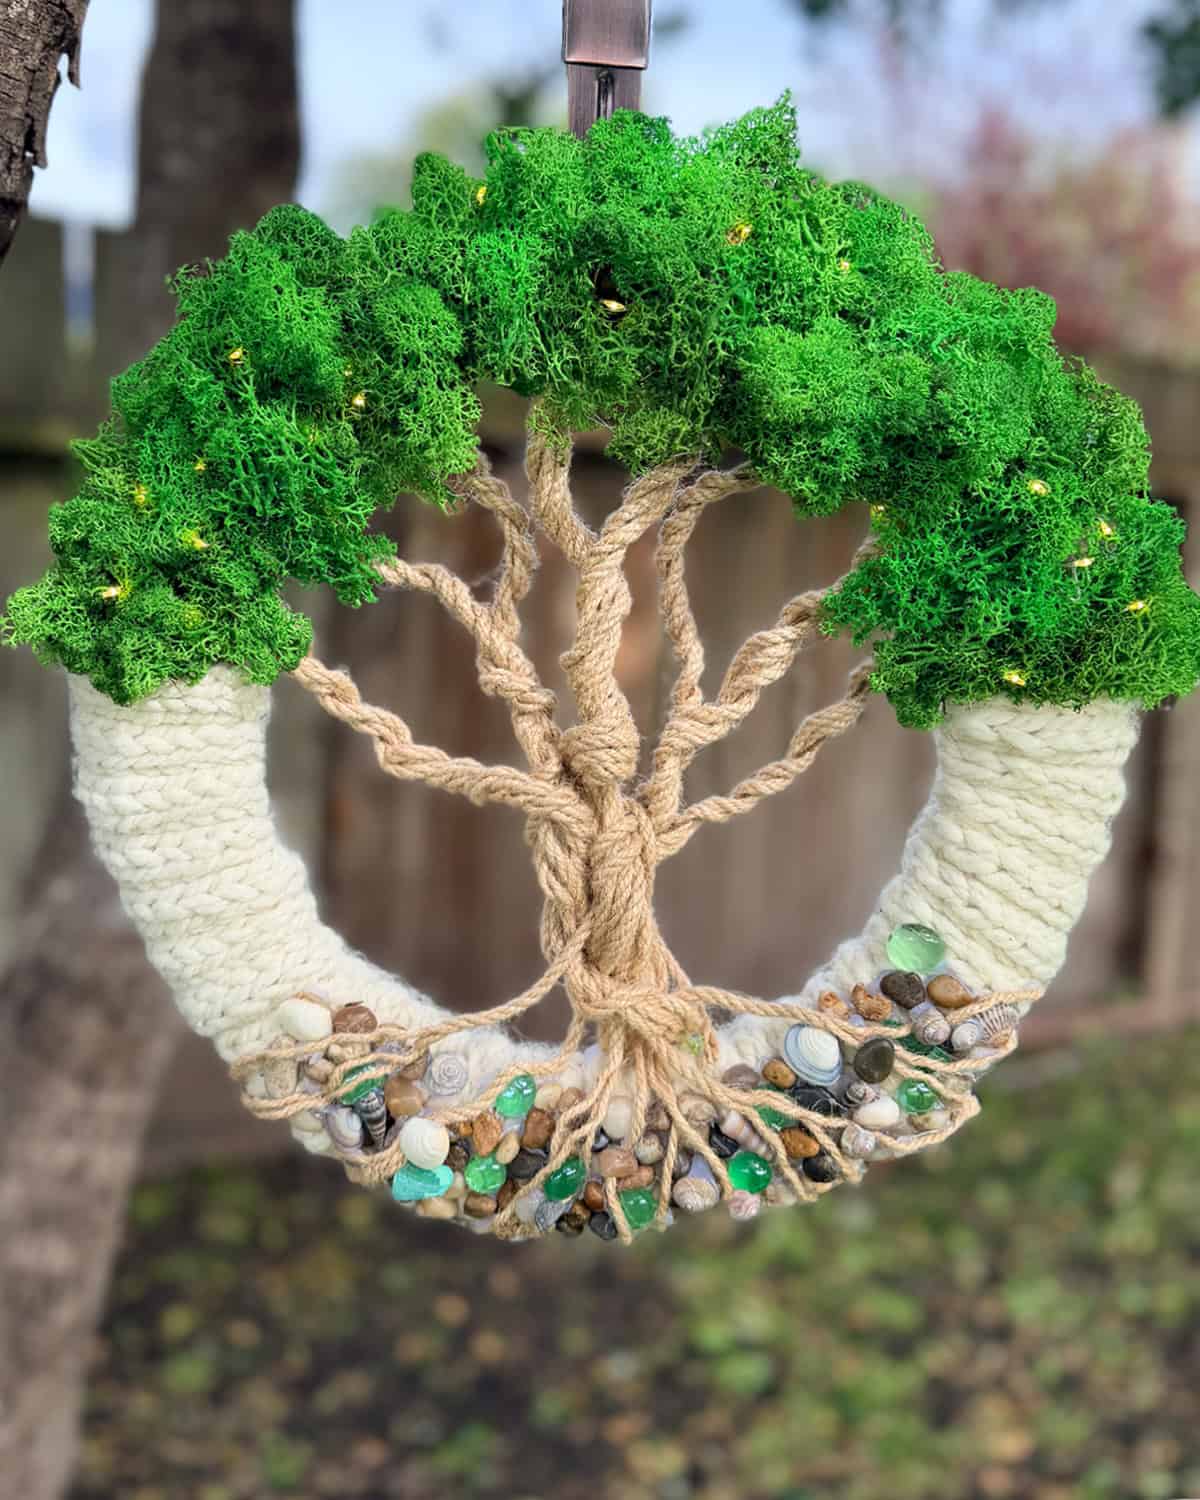
Enjoy Your Handmade Wreath
Every Tree of Life wreath will look a little different, and that’s part of what makes this project so special. Have fun adding your own touches, trust your creativity, and enjoy the process. I hope this handmade wreath brings a sense of warmth and welcome to your home, just like it has to mine.


Printable Knitting Instructions

Printable Knitting Pattern
This handmade Tree of Life wreath combines knitted I-cord with jute twine branches, fairy lights, moss, and natural accents for a warm, welcoming door decoration.
Materials
- • 14” Wire Wreath Frame
- • Bulky yarn (Lion Brand Wool-Ease Thick & Quick)
- • Jute twine rope (5mm)
- • Preserved reindeer moss
- • Natural burlap ribbon
- • Battery fairy lights (with timer) + 3 AA batteries
- • Green glass gems
- • Floral wire (18 gauge)
- • Optional: shells or stones
- • Adjustable wreath hanger
Tools
- • US 11 (8mm) double-pointed needles
- • Hot glue gun
- • Tapestry needle
- • Scissors
Instructions
Knitted I-Cord (Tree Trunk + Branch Base)
Start with the knitting first. Once the I-cord is finished, the rest of the project comes together quickly.
Yarn used: ~92.5 g / 90 yards (about 85% of one ball)
Finished length: ~55 feet (658 inches — about the length of a school bus!)
- Cast on 4 stitches using Long Tail Cast On.
- Knit standard 4-stitch I-cord until you reach approximately 55 feet total.
- Bind off loosely.
_____
Attach I-Cord to Wreath Frame
Tie one end of the I-cord to the wire wreath frame.
Wrap with medium tension around just over half the wreath (I wrapped about 4/7 of the base), using the vertical bars as guides.
Pro tip: Too tight flattens the cord and needs more length. Too loose may cause sagging.
_____
Create Jute Branches + Trunk
- Cut 21 strands of jute twine, each 30 inches long.
- Tie all strands to the top of the frame.
- At 8 points, twist 2–3 strands together to form branches.
- Add floral wire while twisting so branches hold their shape.
- Gather remaining strands to form the trunk.
- Cinch wire tightly on the back, then twist downward.
At the bottom, glue most rope to the back for stability. Leave a few strands loose for roots.
_____
Stone Base + Roots
Arrange stones, shells, and gems at the base. Hot glue in place.
Glue loose jute strands over stones to create above-ground roots. Let them unfurl naturally.
_____
Burlap Base
Wrap burlap ribbon around the top of the wreath frame, weaving between branches. This creates a surface for lights and moss to grip.
_____
Fairy Lights
Place lights before moss.
• Arrange wire along branches
• Glue wire in a few spots
• Bend bulbs upward so they peek through later
Timer lights automatically glow at night — such a cozy surprise when you come home.
_____
Secure Battery Pack
Flip wreath over. Position battery pack near the bottom.
Use short jute pieces to weave through I-cord and frame, tying snugly in place. Tuck ends behind.
Make sure the switch and timer stay reachable.
_____
Add Moss (Tree Foliage)
Hot glue small moss clusters around the upper wreath and branches.
Build gradually into a soft rounded canopy, keeping lights visible.
Heads up: moss may dye fingers green and has an earthy scent. Gloves help. Covered outdoor display is ideal.
_____
Final Shaping + Care
Gently bend branches until your Tree of Life wreath feels balanced and natural.
Display in a covered entryway. Preserved moss needs no water. Avoid direct rain or harsh sun.
_____
Pro Tips
• Start with knitting first
• Wrap I-cord with medium tension
• Add lights before moss
• Place battery pack low for easy access
_____
Enjoy creating your own Tree of Life wreath!
Notes
Knitting Techniques + Abbreviations
- Slip Knot
- CO = Cast On Long Tail Method
- Knitting the Round on Double Pointed Needles
- K = Knit Stitch
_____
No knitting? Substitute thick flexible rope similar to bulky yarn.

Kristen McDonnell
Author • Designer • Teacher
Kristen from StudioKnit LLC produces knitting video lessons and pattern designs from her vibrant production studio on Half Moon Bay’s California coast.
Kristen McDonnell is the author of the highly acclaimed book Knit Stitch: 50 Knit + Purl Patterns featuring vintage and unique designs.