Two-Color Braided Cast On for Knitters
This Two-Color Braided Cast On creates a decorative edge in your knitting. The technique is similar to the basic Long-Tail technique with the slingshot hold, but uses two different yarn colors.
You can create two different edge designs, depending on how you twist the yarn between stitches. You also can make an easy one-color edge without the twist. This knitting tutorial gives written and video help for both right and left-handed knitters.
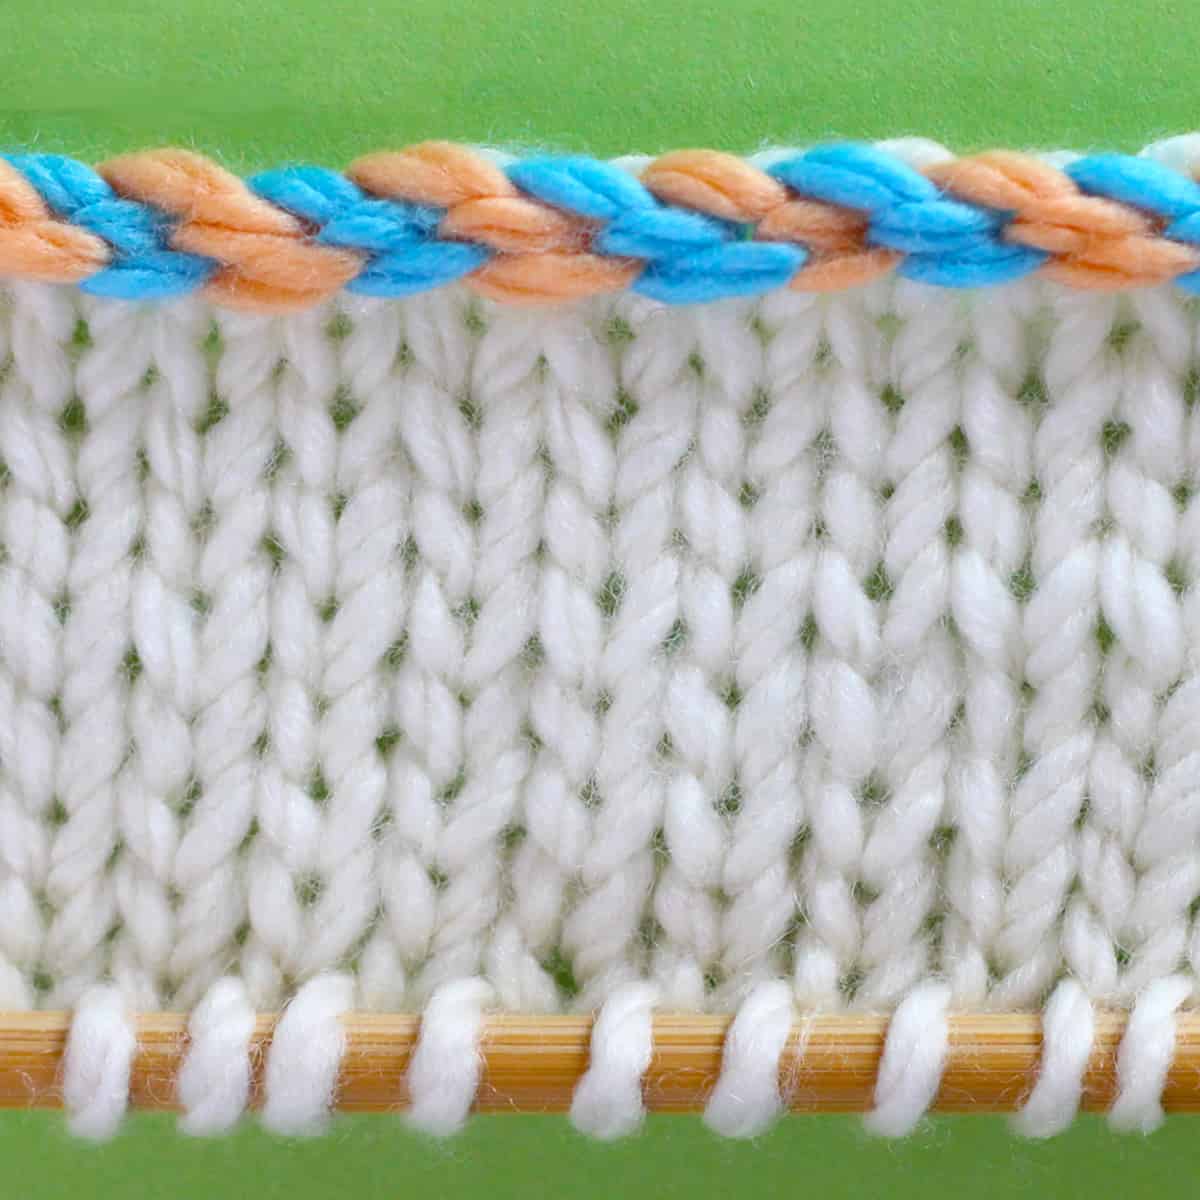
Table of Contents

Video Tutorial of the 2-Color Braided Cast On
Step-by-Step Instructions Right-Handed Knitters
LEFT-HANDED KNITTERS: Find the video Two-Color Braided Cast On for Left-Handed Knitters on my Studio Knit YouTube Channel.
Love Knitting Help? Visit my entire Cast On Knitting Techniques section for more great tips!
Three Versions of the 2-Color Braided Cast On
Preparation to Cast On
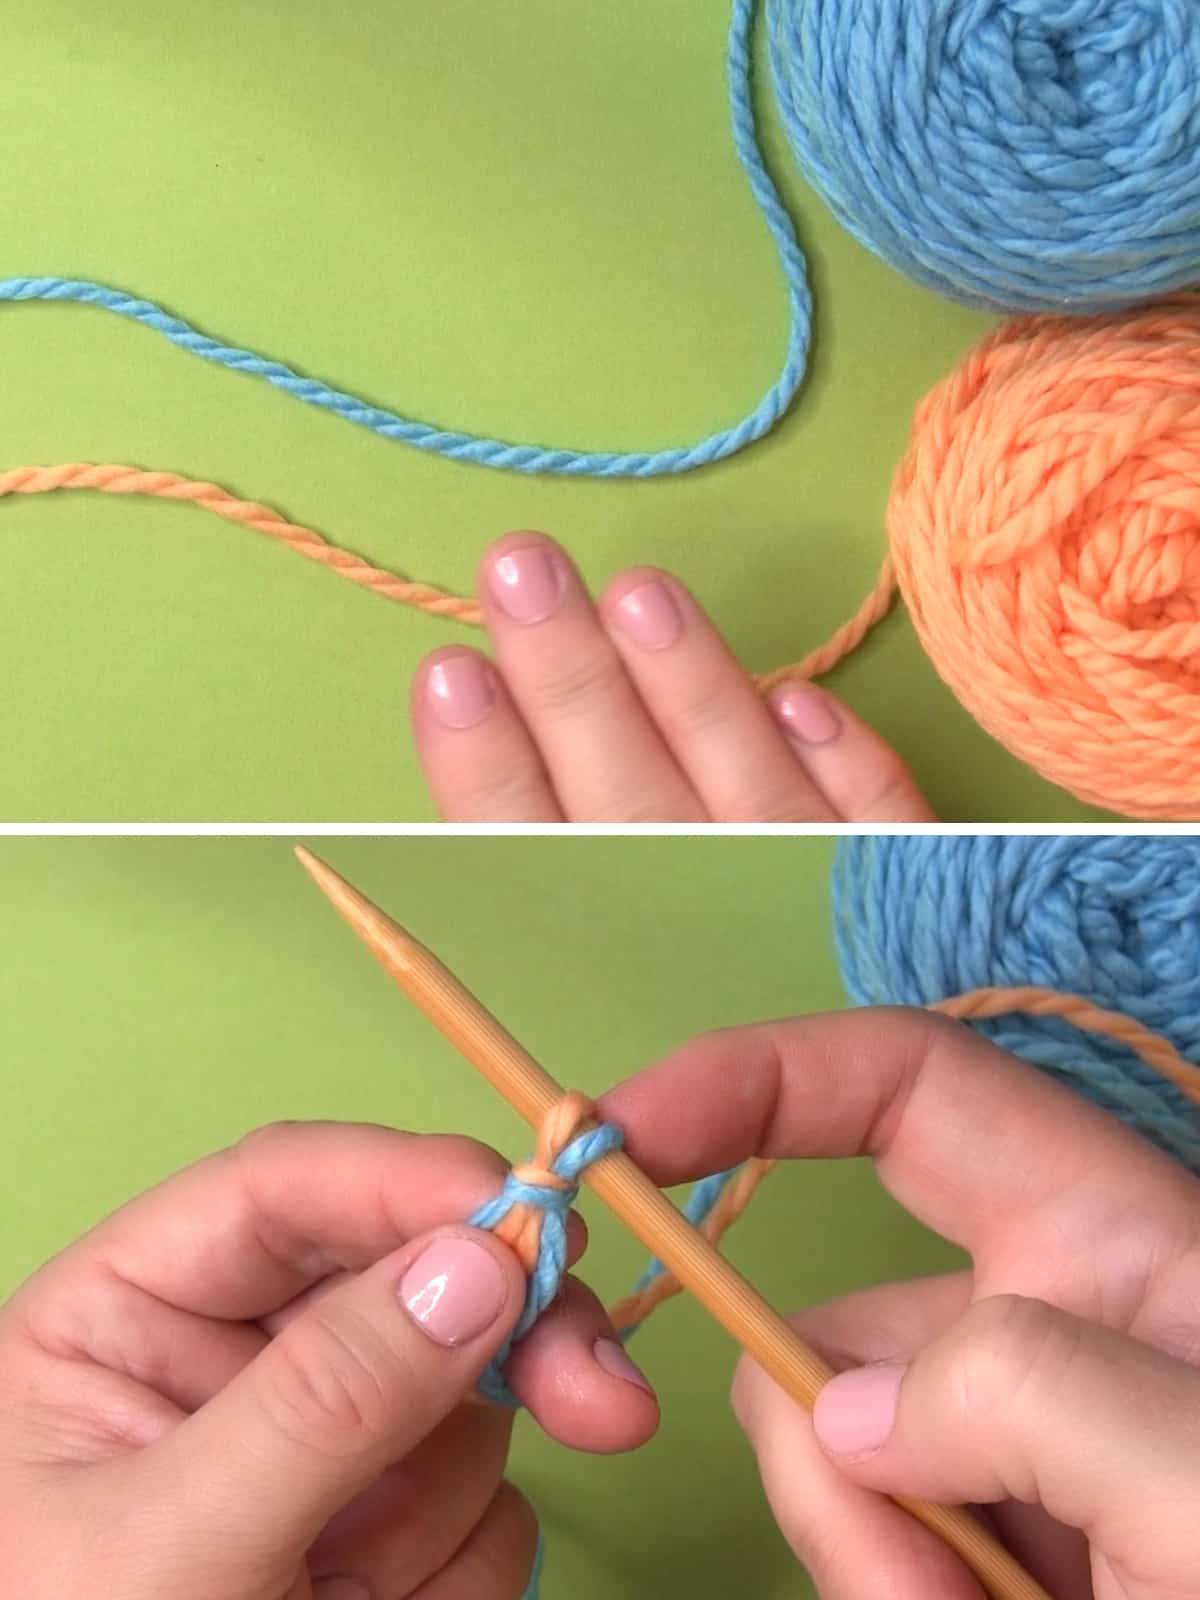
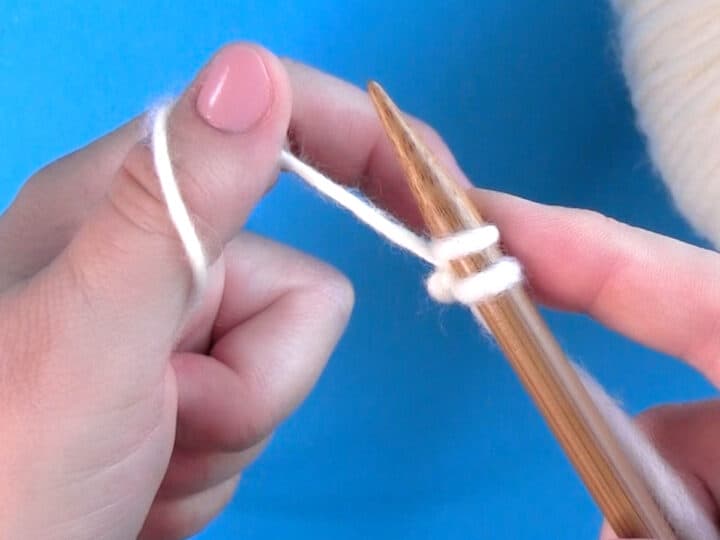
Make a Slip Knot: Begin with a short yarn tail of about 4 inches. Holding both yarn colors, create a Slip Knot and place it on your knitting needle. It does not matter which color is on which side of your needle, as we will be removing the slip knot upon completing our first row of knitting.
_____
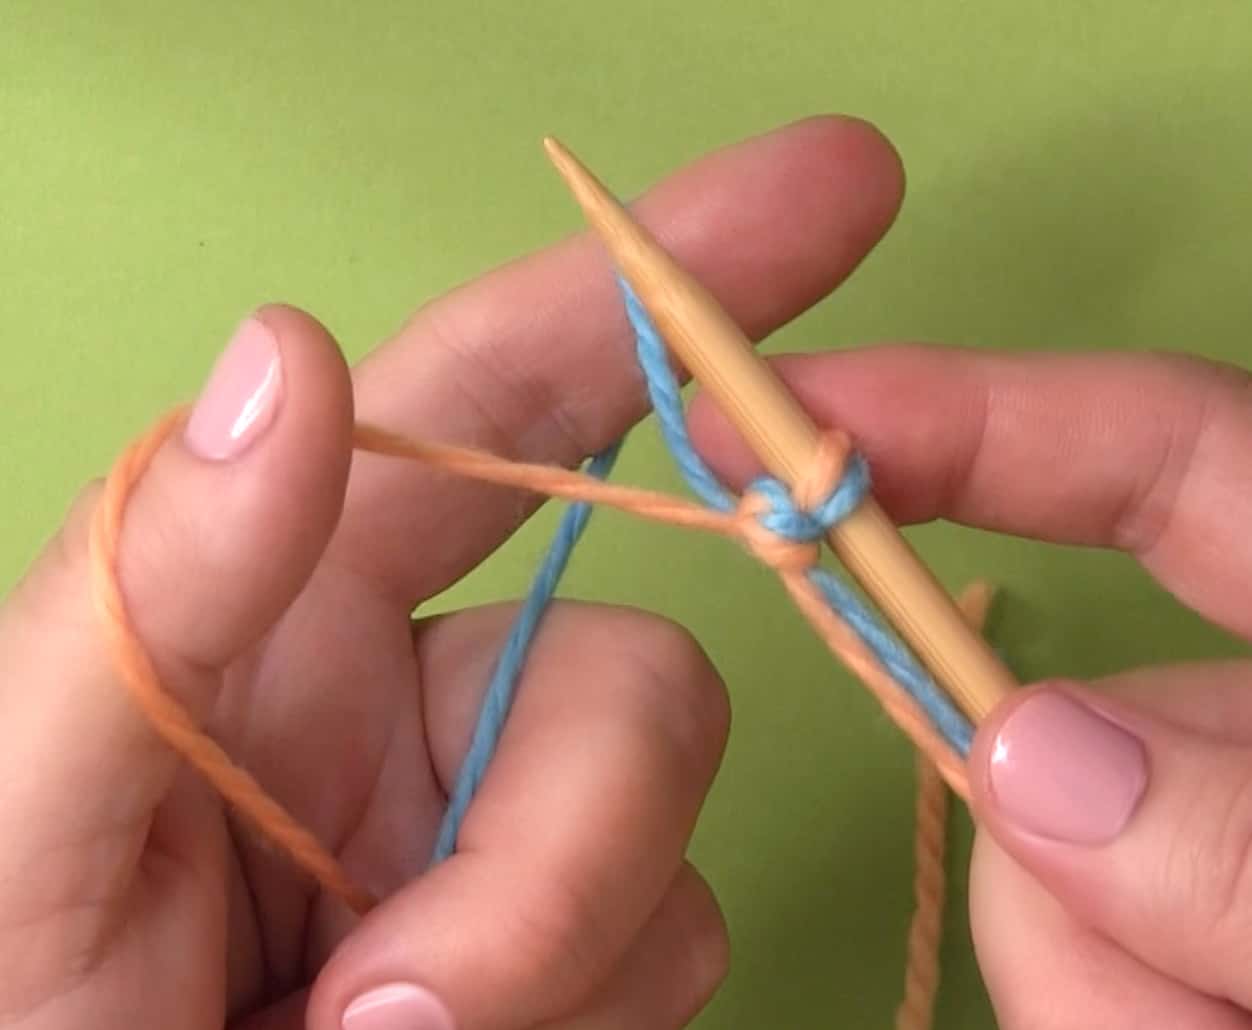
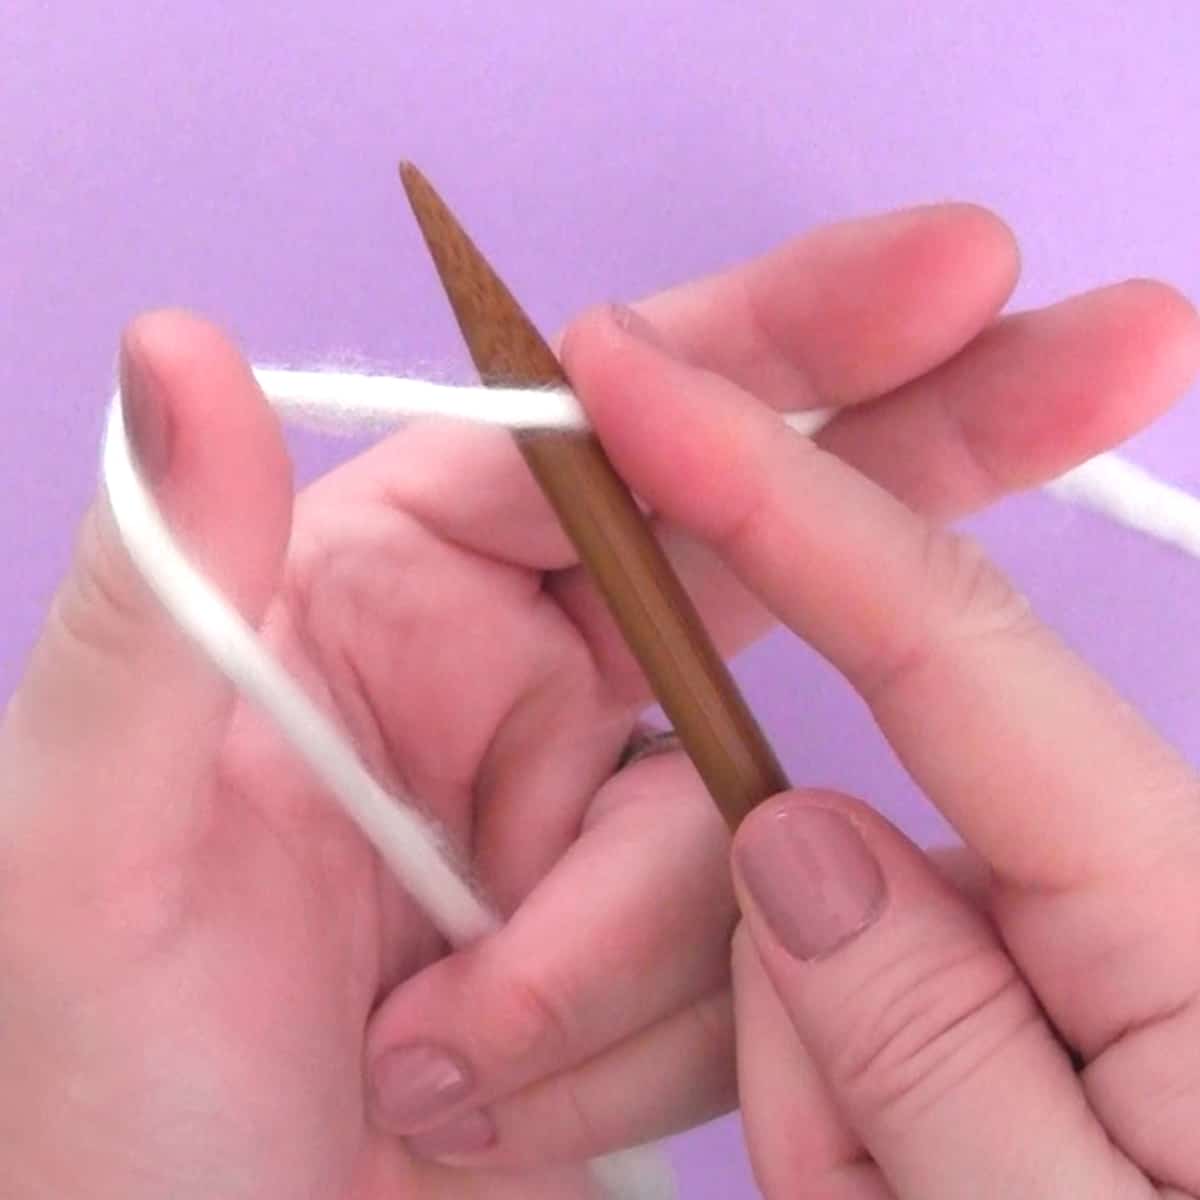
Slingshot Hold: Hold your yarn with the slingshot method.
Right-Handed knitters hold the needle with your right hand and slingshot with your left.
Left-Handed knitters hold the needle with your left hand and slingshot with your right.
Yarn A is in the front (example is orange), wrapped around your thumb. Yarn B is in the back (example is blue), wrapped around your index finger.
I like to hold my knitting needle with the short yarn tail held along the knitting needle edge, as pictured.
_____
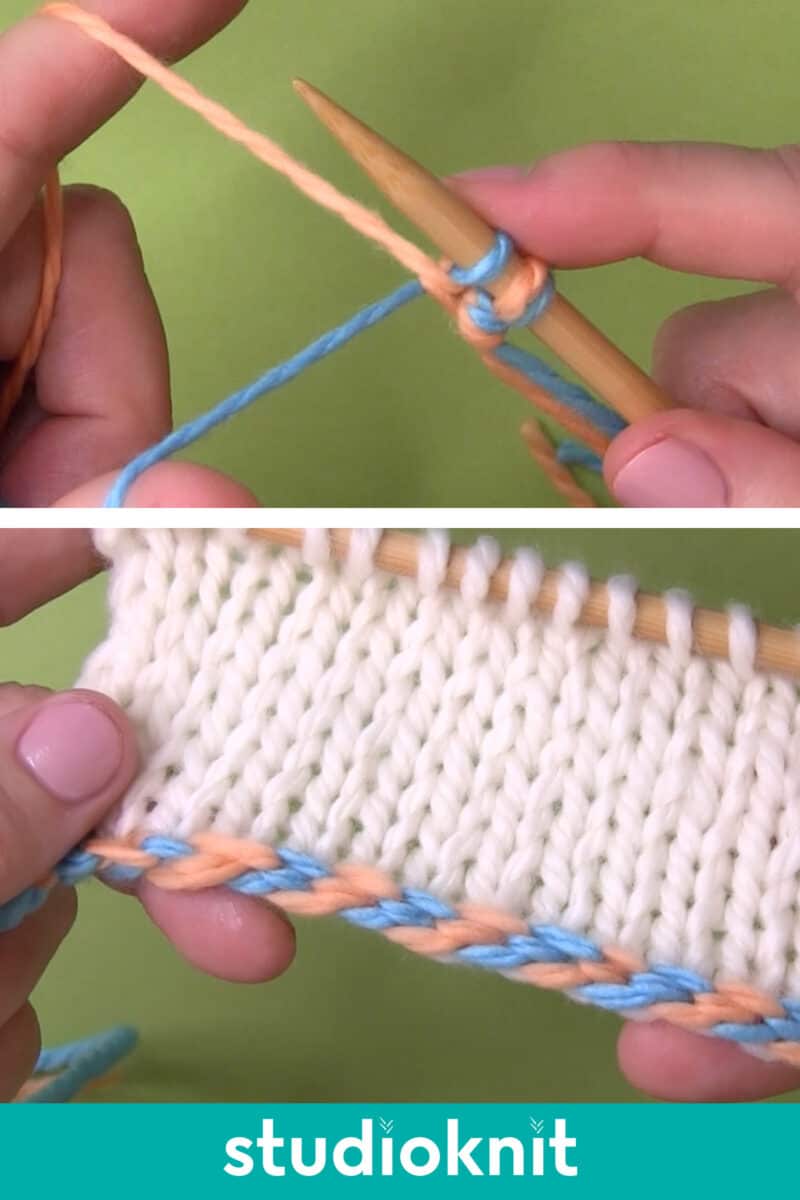
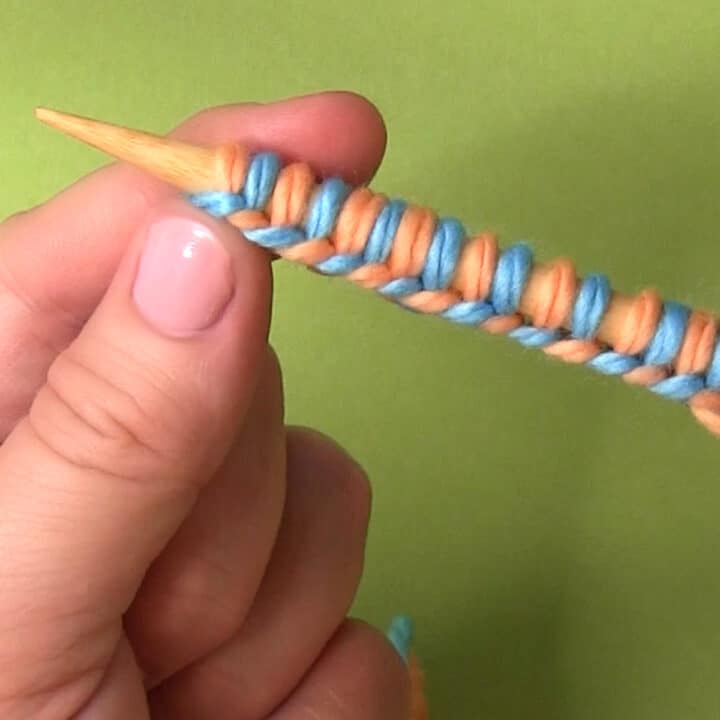
Version 1: Braided Edge
Step 1: Begin by Casting On your First Stitch
Make your first stitch as you would the long-tail cast on. Bring the tip of your knitting needle around to the outside of your thumb picking up Yarn A, then pick up the Yarn B on the outside of your index finger, then pull the stitch through around your needle.
Step 2: Twist Yarn Colors
RIGHT-HANDED KNITTERS: Twist the yarns in a counterclockwise direction. This is from the perspective of your left hand. Yarn A twists over Yarn B.
LEFT-HANDED KNITTERS: Twist the yarns in a clockwise direction. This is from the perspective of your right hand. Yarn A twists over Yarn B.
Step 3: Continue Casting On
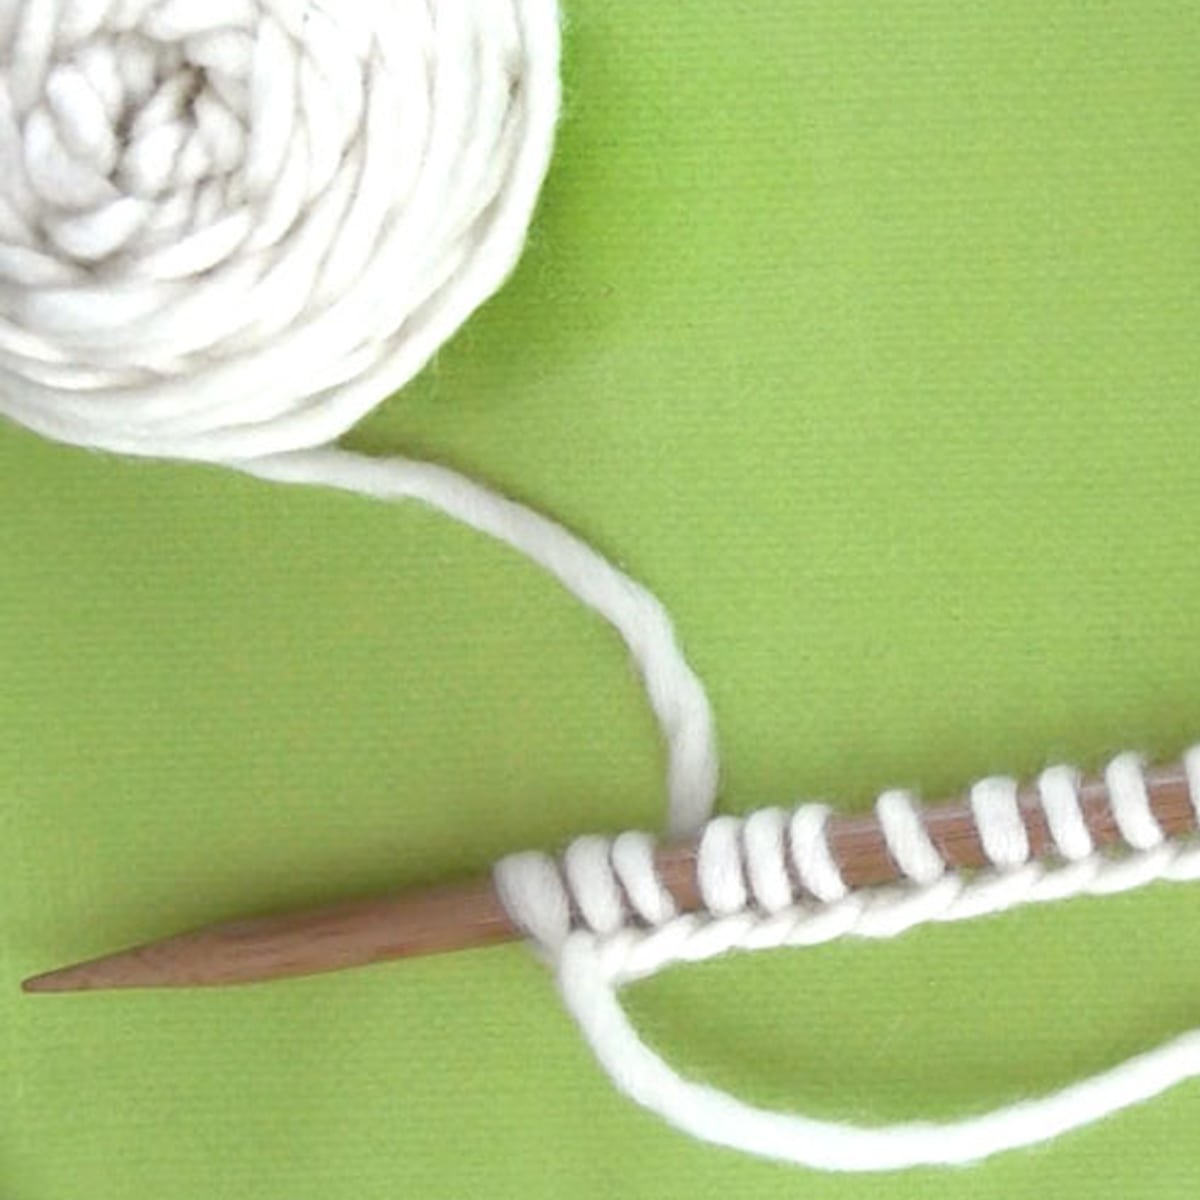
Cast on the next stitch, then twist each time between stitches to alternate your yarn colors. Continue casting on in this manner until you have the desired number of stitches on your needle.
_____
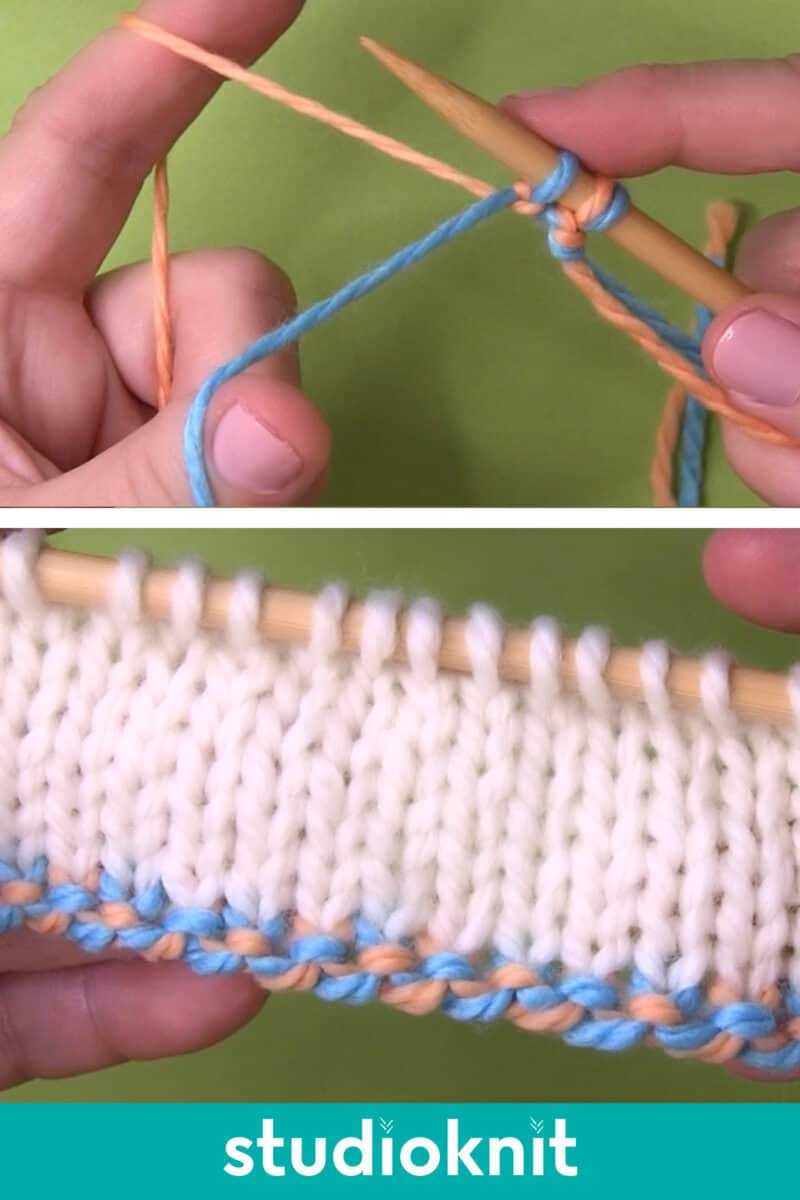
Version 2: Corded Edge
Step 1: Begin by Casting On your First Stitch
Make your first stitch as you would the long-tail cast on. Bring the tip of your knitting needle around to the outside of your thumb picking up Yarn A, then pick up the Yarn B on the outside of your index finger, then pull the stitch through around your needle.
Step 2: Twist Yarn Colors
RIGHT-HANDED KNITTERS: Twist the yarns in a clockwise direction. This is from the perspective of your left hand. Yarn A twists under Yarn B.
LEFT-HANDED KNITTERS: Twist the yarns in a counterclockwise direction. This is from the perspective of your right hand. Yarn A twists under Yarn B.
Step 3: Continue Casting On
Cast on the next stitch, then twist each time between stitches to alternate your yarn colors. Continue casting on in this manner until you have the desired number of stitches on your needle.
_____
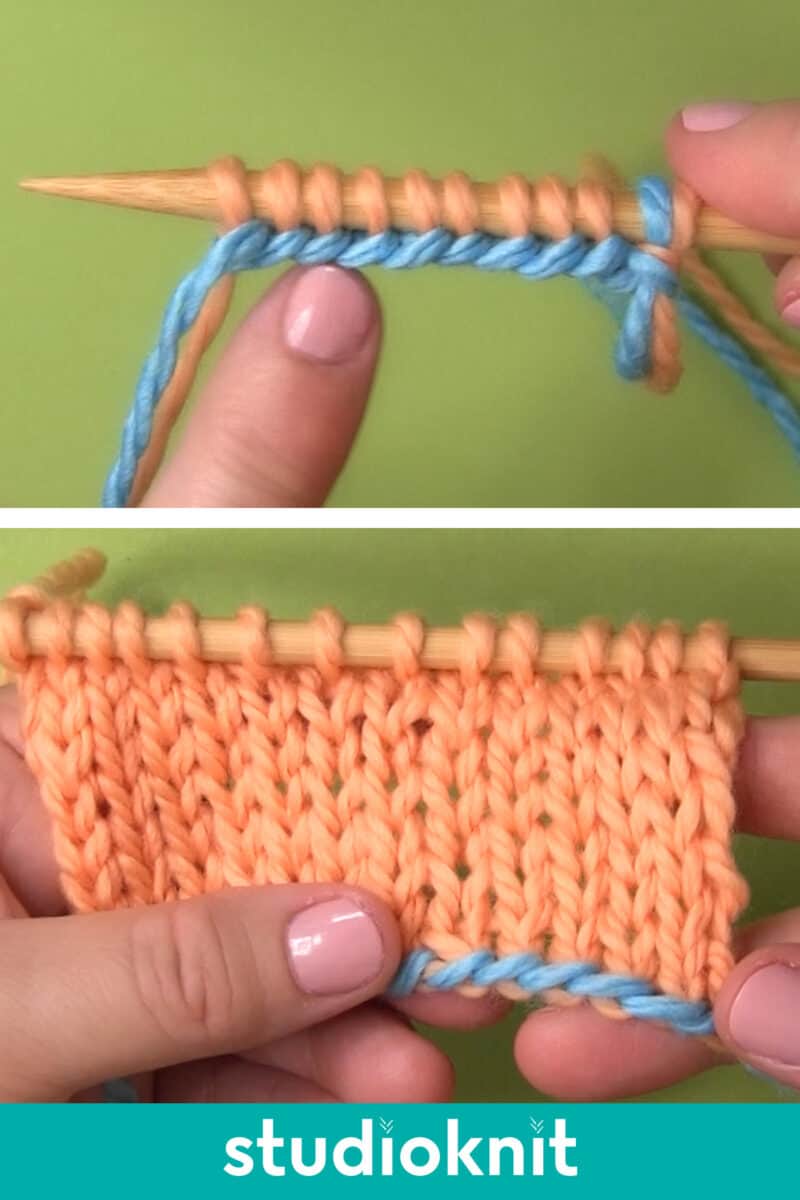
Version 3: Two-Color Contrast Edge
Step 1: Begin by Casting On your First Stitch
Make your first stitch as you would the long-tail cast on. Bring the tip of your knitting needle around to the outside of your thumb picking up Yarn A, then pick up the Yarn B on the outside of your index finger, then pull the stitch through around your needle.
Step 2: Continue Casting On
Cast on the each subsequent stitch in the same manner, without twisting colors. Continue casting on until you have the desired number of stitches on your needle.
Learn More About Casting On Two-Colors for Knitters
Begin casting on two yarn colors by making a slip knot with both yarn colors together. Place on your needle, then alternate casting on each color by twisting either clockwise or counterclockwise between stitches.
The cast on technique is the same for right handed knitters, it is simply the mirror image for left handed knitters. Both the written and video tutorial instructions are available in this Studio Knit tutorial to Two-Color Braided Cast On for right- and left-handed knitters.
The Long-Tail Cast On is the standard knitting choice for most projects. The edge is clean, has a little bit of stretch, but is also firm. It is a popular choice for most blanket, hat, and scarf knitting patterns.
When you are casting stitches onto your stitches, you are doing so on the Wrong side of the work. Once you turn your needles and begin your knitting project, you are knitting on the Right Side.
No, the row of stitches cast onto your knitting needle in preparation of knitting is not counted as a row. Your pattern will have the first stitches on the right side of your work counted as the first row.
Printable Knitting Instructions
Printable Knitting Instructions
This Two-Color Braided Cast On creates a decorative edge in your knitting. The technique is similar to the basic Long-Tail technique with the slingshot hold, but uses two different yarn colors.
Materials
- Yarn - Any Gauge
Tools
- Knitting Needles - Appropriate Size for Yarn
Instructions
Three Versions of the 2-Color Braided Cast On
Preparation to Cast On
Make a Slip Knot: Begin with a short yarn tail of about 4 inches. Holding both yarn colors, create a Slip Knot and place it on your knitting needle. It does not matter which color is on which side of your needle, as we will be removing the slip knot upon completing our first row of knitting.
Slingshot Hold: Hold your yarn with the slingshot method.
RIGHT-HANDED KNITTERS: Hold the needle with your right hand and slingshot with your left.
LEFT-HANDED KNITTERS: Hold the needle with your left hand and slingshot with your right.
Yarn A is in the front, wrapped around your thumb. Yarn B is in the back, wrapped around your index finger. Hold your knitting needle with the short yarn tail held along the knitting needle edge.
_____
Version 1: Braided Edge
- Step 1: Begin by Casting On your First Stitch
Make your first stitch as you would the long-tail cast on. Bring the tip of your knitting needle around to the outside of your thumb picking up Yarn A, then pick up the Yarn B on the outside of your index finger, then pull the stitch through around your needle. - Step 2: Twist Yarn Colors
RIGHT-HANDED KNITTERS: Twist the yarns in a counterclockwise direction. This is from the perspective of your left hand. Yarn A twists over Yarn B.
LEFT-HANDED KNITTERS: Twist the yarns in a clockwise direction. This is from the perspective of your right hand. Yarn A twists over Yarn B. - Step 3: Continue Casting On
Cast on the next stitch, then twist each time between stitches to alternate your yarn colors. Continue casting on in this manner until you have the desired number of stitches on your needle.
_____
Version 2: Corded Edge
- Step 1: Begin by Casting On your First Stitch
Make your first stitch as you would the long-tail cast on. Bring the tip of your knitting needle around to the outside of your thumb picking up Yarn A, then pick up the Yarn B on the outside of your index finger, then pull the stitch through around your needle. - Step 2: Twist Yarn Colors
RIGHT-HANDED KNITTERS: Twist the yarns in a clockwise direction. This is from the perspective of your left hand. Yarn A twists under Yarn B.
LEFT-HANDED KNITTERS: Twist the yarns in a counterclockwise direction. This is from the perspective of your right hand. Yarn A twists under Yarn B. - Step 3: Continue Casting On
Cast on the next stitch, then twist each time between stitches to alternate your yarn colors. Continue casting on in this manner until you have the desired number of stitches on your needle.
_____
Version 3: Two-Color Contrast Edge
- Step 1: Begin by Casting On your First Stitch
Make your first stitch as you would the long-tail cast on. Bring the tip of your knitting needle around to the outside of your thumb picking up Yarn A, then pick up the Yarn B on the outside of your index finger, then pull the stitch through around your needle. - Step 2: Continue Casting On
Cast on the each subsequent stitch in the same manner, without twisting colors. Continue casting on until you have the desired number of stitches on your needle.

Kristen McDonnell
Author • Designer • Teacher
Kristen from StudioKnit LLC produces knitting video lessons and pattern designs from her vibrant production studio on Half Moon Bay’s California coast.
Kristen McDonnell is the author of the highly acclaimed book Knit Stitch: 50 Knit + Purl Patterns featuring vintage and unique designs.